

When Proxy Configuration May Be Required
Proxy configuration may be required if:- You see “Failed to connect” or similar network errors in the Windsurf plugin
- The Cascade panel in the IDE stays blank and never loads
- Cascade or other Windsurf plugin features cannot connect or time out
- Checking whether your network uses a proxy
- Configuring the IDE’s proxy
- Enabling proxy detection in the Windsurf plugin
- Configuring proxy settings for JetBrains Remote
Check Whether Your Network Uses a Proxy
Before changing anything: Ask your IT / infra / network team:- Do we use an HTTP/HTTPS proxy for outbound traffic?
- If yes, is it configured automatically (system settings / PAC file / device management), or do I need to configure it manually in applications?
Configure the JetBrains IDE Proxy
First, make sure the IDE itself can access the internet through your proxy — in particular, that it can reachwindsurf.com.
- Open Settings / Preferences in your JetBrains IDE. For example: File → Settings… (Windows/Linux) or ⌘, → Settings… (macOS).
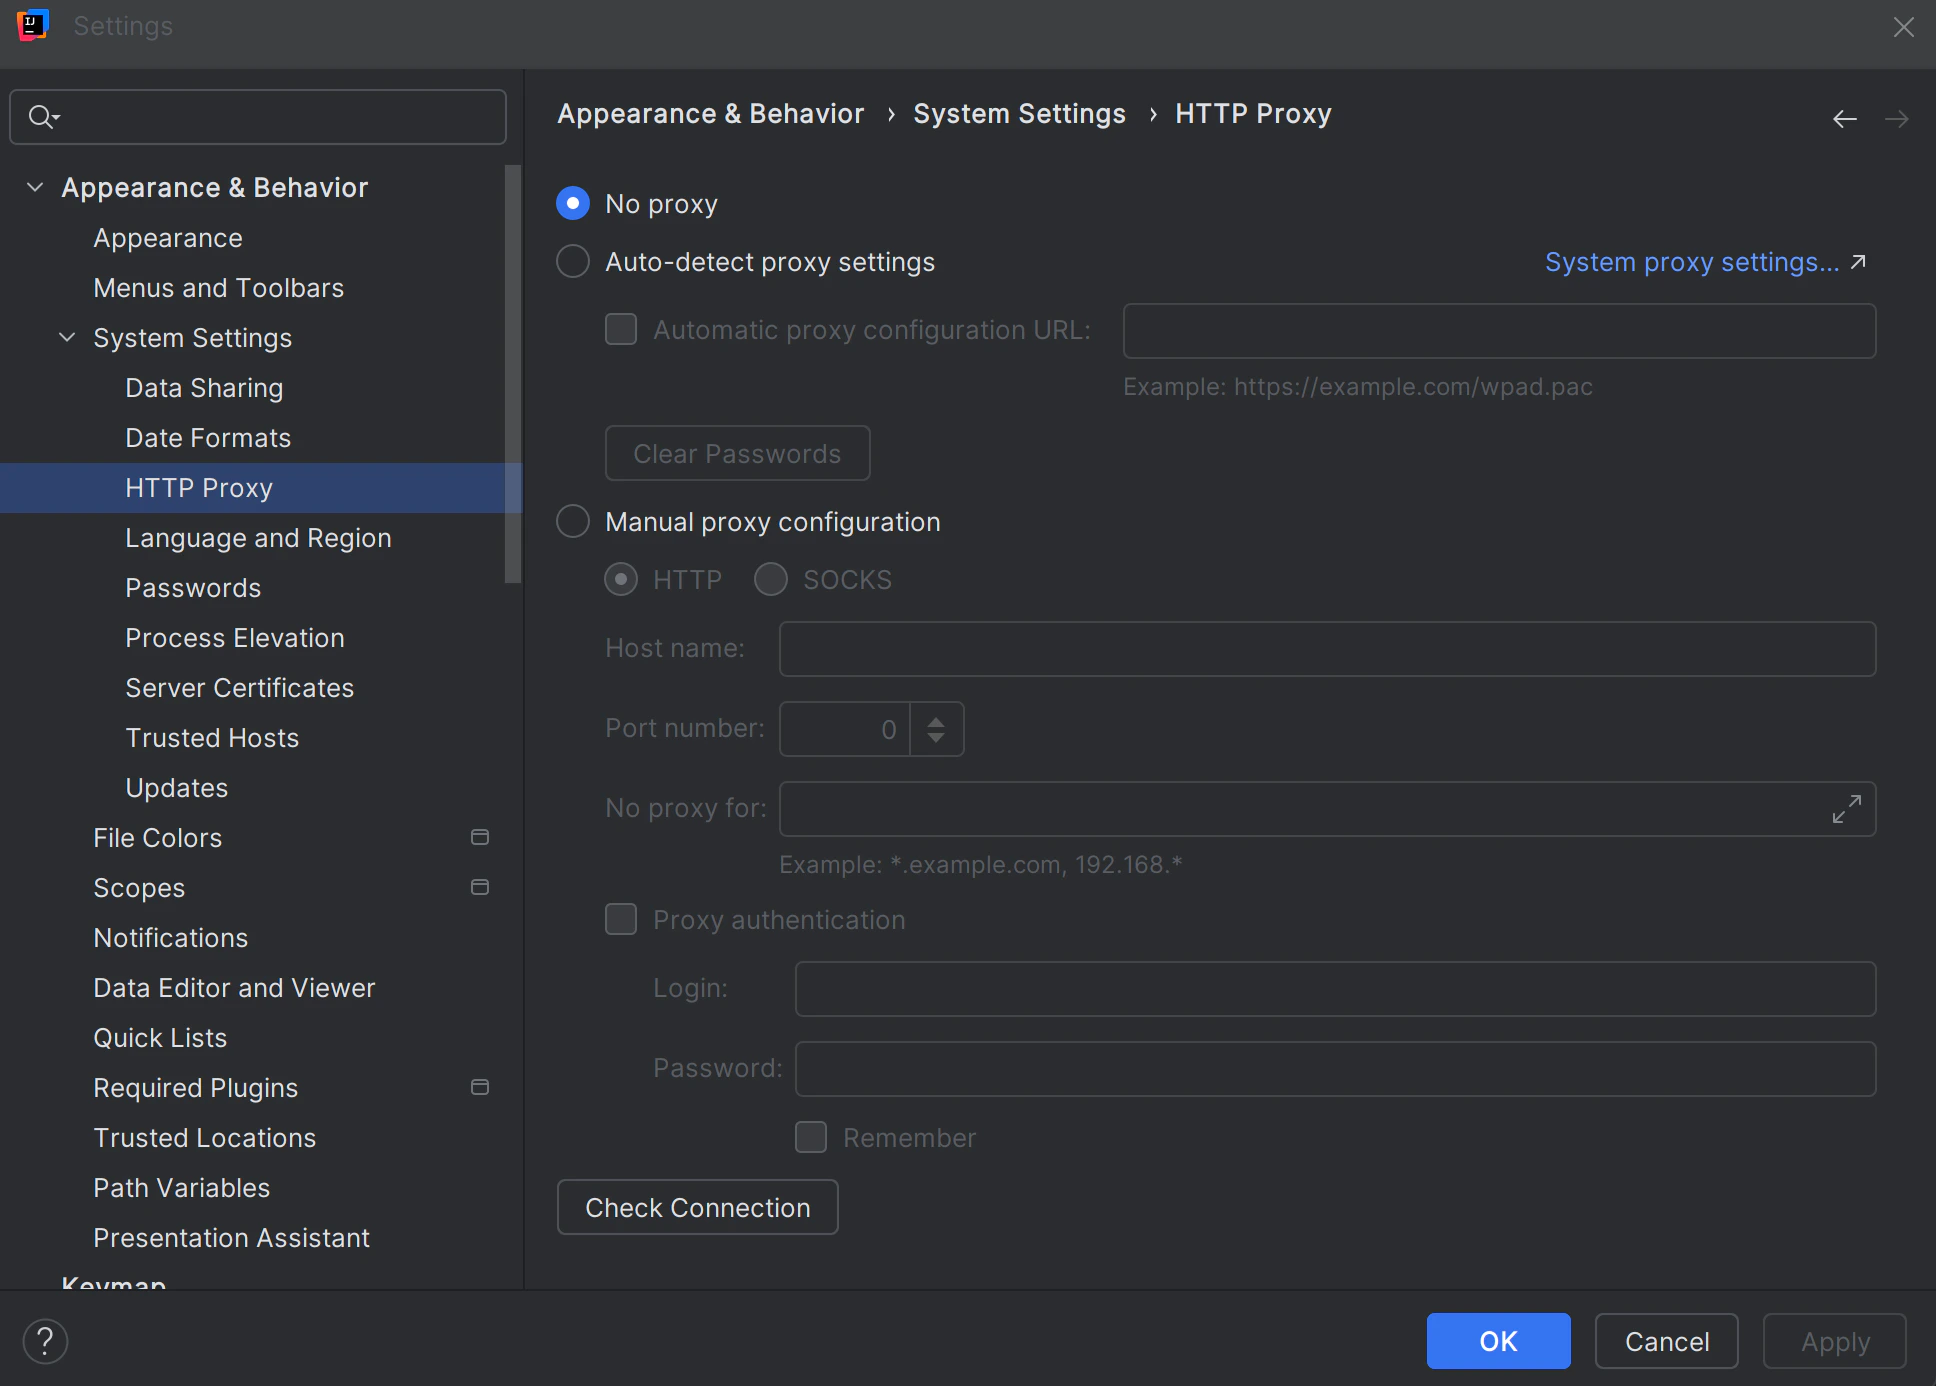
- Go to Appearance & Behavior → System Settings → HTTP Proxy.
-
Choose the appropriate option based on your IT team’s guidance:
- No proxy – if your network does not use a proxy.
- Auto-detect proxy settings or Use system proxy settings – if the proxy is configured globally on your machine.
- Manual proxy configuration – if IT provided a specific proxy host/port (and optional username/password) to enter here.
-
Use Check connection… (if available) to verify the configuration — ideally test connectivity to
https://windsurf.comfrom this dialog. - Apply the changes and restart the IDE if prompted.
https://windsurf.com can fail in the IDE. The Windsurf plugin requires this connection.
Enable Windsurf Plugin Proxy Detection in JetBrains
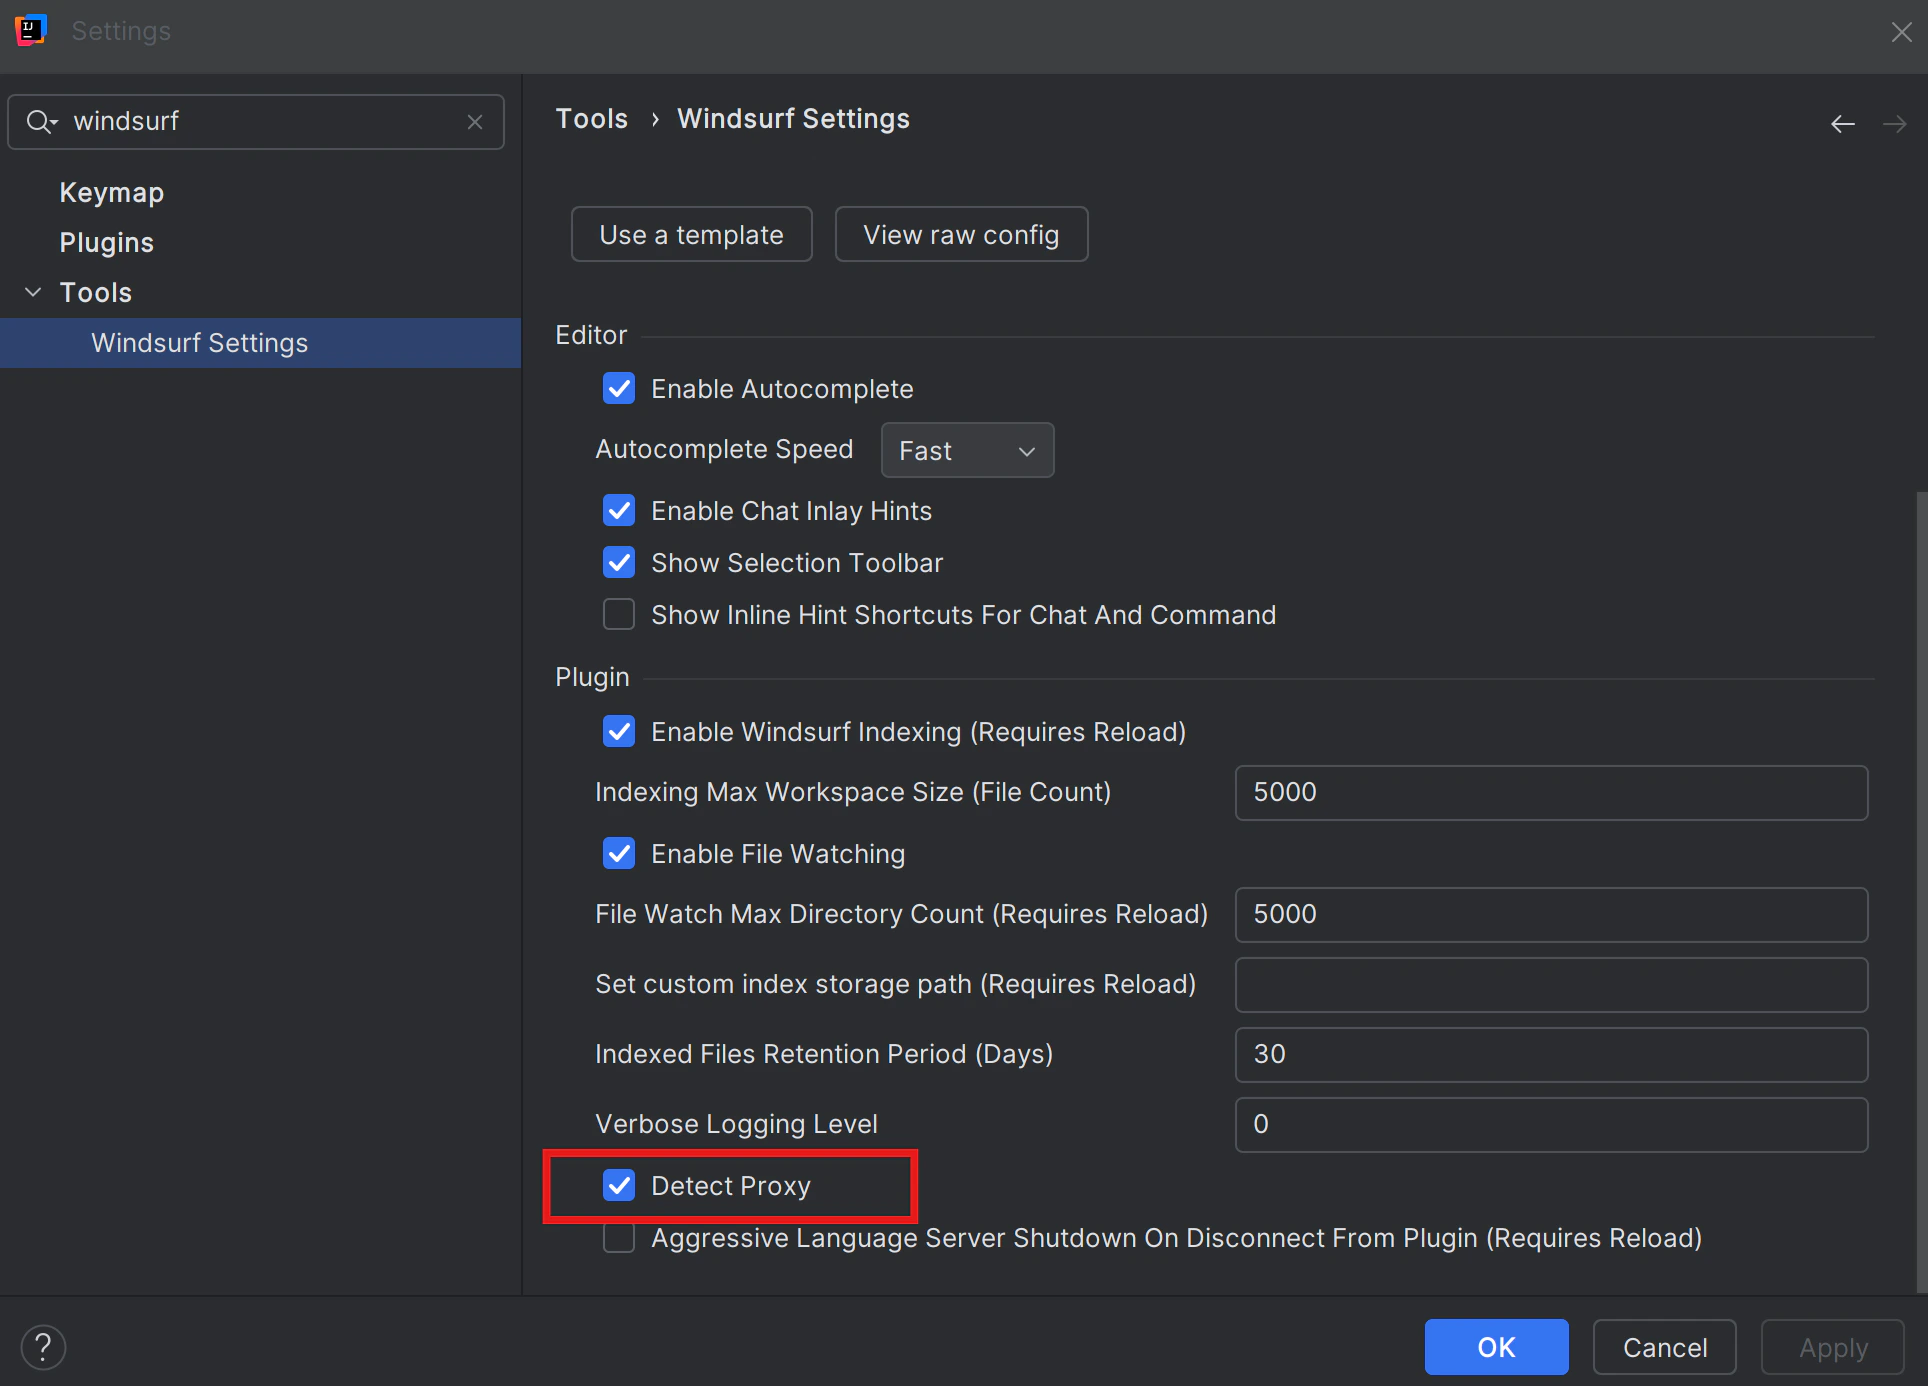
Once your IDE-level proxy is set (or confirmed not needed), configure how the Windsurf plugin uses those settings. The Windsurf plugin has its own Detect Proxy option in its settings:- In your JetBrains IDE, open Settings / Preferences.
- Navigate to Tools → Windsurf Settings.
- Find the Detect Proxy checkbox.
-
Select Detect Proxy if:
- Your proxy is configured at the OS or IDE level, and
- IT expects applications to “just pick up” those settings.
- Click Apply and OK if needed, then restart the IDE.
-
Try the plugin again:
- Open the Cascade panel from the IDE sidebar
- Run Cascade or retry the operation that was failing with “Failed to connect” or showing a blank screen
- Clear Detect Proxy,
- Double-check your IDE HTTP Proxy configuration (including that it can reach
https://windsurf.com), and - Confirm with IT whether additional manual configuration is required.
Proxy Configuration in JetBrains Remote
If you use JetBrains Remote Development (for example via JetBrains Gateway, a remote backend, or a cloud dev environment), there are effectively two places where proxy settings matter:- Your local machine, running the thin client.
- The remote machine, where the IDE backend and the Windsurf plugin backend run.
- The proxy setup on the remote IDE controls how the plugin connects to Windsurf services.
- The remote machine may need its own proxy configuration, even if your local machine is already set up correctly.
Configure the Proxy for the Remote Environment
- Connect to your remote backend using JetBrains Remote / Gateway.
- Open Settings / Preferences in the remote IDE session (this opens the settings for the IDE running on the remote machine).
-
Configure the proxy for the remote IDE:
- Go to Appearance & Behavior → System Settings → HTTP Proxy on the remote IDE.
- Set the proxy according to your IT team’s instructions (No proxy / Auto-detect / Use system proxy / Manual).
- If the IDE provides a Check connection… button, use it to test connectivity to
https://windsurf.comfrom the remote machine.
-
Configure the Windsurf plugin on the remote IDE:
- Go to Tools → Windsurf Settings (still in the remote session).
- Select Detect Proxy if your IT team expects applications on the remote host to use system/IDE proxy settings.
- Apply the changes, then restart the remote IDE backend or disconnect and reconnect your remote session.
- Open the Cascade panel again in the remote IDE and retry the previously failing action.
It’s common in corporate setups that both your local machine and the remote machine have their own proxy rules. Make sure you follow IT guidance for each side; fixing only the local proxy will not help if the remote host itself cannot reach the internet (including
https://windsurf.com) without its own proxy configuration.When to Change What
Change Only the Local IDE HTTP Proxy
If:- You are not using JetBrains Remote, and
- Other JetBrains features already work after setting it, and
- The Windsurf plugin works without changes to its own settings, and
- The IDE can reach
https://windsurf.com.
Enable the Windsurf Plugin “Detect Proxy” Option
(Local or remote) if:- The proxy is already set up at the OS or IDE level on that machine, and
- The Windsurf plugin is the only item that cannot connect, or the Cascade panel is blank.
Configure Proxy on the Remote IDE
If:- You use JetBrains Remote,
- You’ve installed the Windsurf (Remote Development) plugin for that environment, and
- Errors occur only when connected to a remote backend, or
- IT says the remote server must also go through a proxy to reach the internet (including
https://windsurf.com).
Talk to IT / Infra
If:- You’re not sure whether your environment uses a proxy at all, or
- You configured the HTTP Proxy and Detect Proxy (locally, remotely, or both) and verified the connection to
https://windsurf.com, and - You still see a blank Cascade panel or connection failures.