> ## Documentation Index
> Fetch the complete documentation index at: https://docs.devin.ai/llms.txt
> Use this file to discover all available pages before exploring further.
# MCP(模型上下文协议)市场
MCP 是一种开放协议,使 Devin 能够使用数百个外部工具和数据源。Devin 支持 3 种传输方式 (stdio、SSE 和 HTTP) 。
## 为什么使用 MCP?
通过 MCP,Devin 可以帮助你:
* 深入排查 Sentry、Datadog 和 Vercel 的日志
* 在 Slack 中借助数据库 MCP,[将 Devin 用作数据分析师](https://devin.ai/ai-data-analyst-1)
* 深入分析 SonarQube、CircleCI 和 Jam 中的问题
* 批量创建 Linear 工单、Notion 文档、Google Docs (通过 Zapier) 等
* 从 Airtable、Stripe 和 Hubspot 获取上下文并与之交互
* 以及更多功能!
## 开始使用 MCP
前往 [Settings > Connections > MCP servers](https://app.devin.ai/settings/connections?tab=mcps) 浏览并启用 MCP。
查看我们的分步指南!
探索 Devin 与 Datadog、Sentry、Linear、Figma 等 MCP 的实用示例。
## 配置提示
对于通过 OAuth 进行认证的 MCP,Devin 会提示你访问一个 URL 来连接你的账户。**我们强烈建议使用服务账号**,而不是你的个人账户,因为访问权限会在你的组织内共享。
没有看到你要找的 MCP?组织管理员可以使用 **Add a custom MCP** 按钮添加任何 MCP 服务器。如果你没有管理员权限,请使用 **Suggest MCP Integration** 提交请求。
遇到问题?请通过我们的[支持页面](https://app.devin.ai/settings/support)或发送邮件至 [support@cognition.ai](mailto:support@cognition.ai) 与我们联系。
## 设置自定义 MCP 服务器
如果你需要的 MCP 不在市场中,组织管理员可以使用 **Add a custom MCP** 按钮添加任意 MCP 服务器。Devin 支持三种用于自定义服务器的传输方式:
添加自定义 MCP 服务器需要 **Manage MCP Servers** 权限。如果你看不到 **Add a custom MCP** 按钮,请联系你的组织管理员,或使用 **Suggest MCP Integration** 选项来请求新增服务器。
| Transport | 最适用场景 | 必填字段 |
| --------- | ------------------------------------- | ---------- |
| **STDIO** | 本地基于 CLI 的服务器 (例如 `npx`、`uvx`、Docker) | 命令、参数、环境变量 |
| **SSE** | 使用 Server-Sent Events 的远程服务器 | 服务器 URL、标头 |
| **HTTP** | 使用可流式传输的 HTTP 的远程服务器 | 服务器 URL、标头 |
### 分步指南:添加自定义 MCP 服务器
1. 转到 [Settings > Connections > MCP servers](https://app.devin.ai/settings/connections?tab=mcps)。
2. 点击页面顶部的 **Add a custom MCP**。
3. 填写服务器详细信息:
* **Server Name**:为服务器填写一个描述性名称 (例如:“Internal API Gateway”) 。
* **Icon** (可选) :用作服务器图标的表情符号或 URL。
* **Short Description**:对服务器功能的简要说明。
4. 选择 **transport type** (STDIO、SSE 或 HTTP) 。
5. 填写对应传输类型的配置字段 (参见下文的 [Configuration format](#configuration-format)) 。
6. 点击 **Save** 以创建服务器。
7. 点击 **Test listing tools** 以验证连接。Devin 将启动一个隔离的测试环境,连接到你的服务器,并尝试检测其可用工具。
在保存配置之前,**Test listing tools** 按钮处于禁用状态。如果验证失败,请查看显示的错误消息——它会指明问题是出在连接、身份验证还是超时。
### 配置格式
下面的示例展示了每种传输方式配置字段的 JSON 表示形式。在实际使用中,您将通过 Web 表单填写这些字段——无需手动编写或粘贴 JSON。这里展示 JSON 格式是为了便于理解,并为基于 API 或编程方式的配置提供参考。
#### STDIO 传输
对于作为本地进程运行的服务器,请使用 STDIO。你需要提供启动服务器的命令,以及任何参数和环境变量。
**字段:**
* **Command** (必填) :要运行的可执行文件 (例如 `npx`、`uvx`、`docker`) 。
* **Arguments**:传递给服务器的命令行参数。
* **Environment Variables**:在服务器进程环境中设置的键值对。使用这些变量来传递 API key、令牌或配置值。
**示例 — 使用 `npx` 的自定义 STDIO 服务器:**
```json theme={null}
{
"transport": "STDIO",
"command": "npx",
"args": ["-y", "@example/my-mcp-server"],
"env_variables": {
"API_KEY": "your-api-key",
"API_BASE_URL": "https://internal-api.example.com"
}
}
```
**示例 — 使用 Docker 运行自定义 STDIO 服务器:**
```json theme={null}
{
"transport": "STDIO",
"command": "docker",
"args": ["run", "-i", "--rm", "-e", "DB_CONNECTION_STRING", "my-org/my-mcp-server:latest"],
"env_variables": {
"DB_CONNECTION_STRING": "postgresql://user:pass@host:5432/mydb"
}
}
```
#### SSE 和 HTTP 传输方式
对于通过网络访问的远程服务器,请使用 SSE 或 HTTP。对于新的集成,推荐使用 HTTP (Streamable HTTP) ;SSE 适用于遗留服务器。
**字段:**
* **Server URL** (必填) :MCP 服务器的端点 URL。
* **Authentication method**:在 `None`、`Auth Header` 或 `OAuth` 之间选择。
* 对于 **Auth Header**:提供 header 键 (默认为 `Authorization`) 和 header 值 (例如 `Bearer your-token`) 。
* 对于 **OAuth**:Devin 会在首次会话期间提示你完成 OAuth 流程。
**示例 — 使用 Bearer Token 认证的远程 HTTP 服务器:**
```json theme={null}
{
"transport": "HTTP",
"url": "https://mcp.internal-service.example.com/mcp",
"auth_method": "auth_header",
"headers": {
"Authorization": "Bearer your-api-token"
}
}
```
**示例 — 无需认证的远程 SSE 服务器:**
```json theme={null}
{
"transport": "SSE",
"url": "https://mcp.example.com/sse"
}
```
在 SSE 和 HTTP 之间进行选择时,优先使用 **HTTP** (可流式传输的 HTTP) 。SSE 是一种传统协议,正在整个 MCP 生态系统中逐步被弃用。
## 常见模式
### 连接到内部 API
将内部 API 暴露为 MCP 服务器,使 Devin 能直接向其发起查询。使用 STDIO 传输方式,并通过一个封装层将 MCP 工具调用转换为 API 请求。
```json theme={null}
{
"transport": "STDIO",
"command": "npx",
"args": ["-y", "@example/api-mcp-bridge"],
"env_variables": {
"API_BASE_URL": "https://api.internal.example.com",
"API_TOKEN": "your-internal-api-token"
}
}
```
或者,如果你们的内部 API 可以通过网络访问,则可以使用 HTTP 传输:
```json theme={null}
{
"transport": "HTTP",
"url": "https://api.internal.example.com/mcp",
"headers": {
"Authorization": "Bearer your-internal-api-token"
}
}
```
### 连接到数据库
使用数据库 MCP 服务器,为 Devin 提供对你的数据的读写访问权限。社区已经为常见数据库维护了许多此类服务器。
```json theme={null}
{
"transport": "STDIO",
"command": "npx",
"args": ["-y", "@modelcontextprotocol/server-postgres", "postgresql://user:password@host:5432/database"]
}
```
对于生产环境数据库,请使用**只读**连接字符串或权限受限的数据库用户。Devin 会根据用户指令执行查询,因此合理限制访问权限非常重要。
### 连接自定义工具或脚本
将任意 CLI 工具或脚本封装为 MCP 服务器。例如,使用 `uvx` 运行的 Python 服务器:
```json theme={null}
{
"transport": "STDIO",
"command": "uvx",
"args": ["my-custom-mcp-server"],
"env_variables": {
"CONFIG_PATH": "/path/to/config.json"
}
}
```
或者使用基于 Docker 的服务器来进行隔离执行:
```json theme={null}
{
"transport": "STDIO",
"command": "docker",
"args": ["run", "-i", "--rm", "my-org/custom-mcp-server:latest"]
}
```
### 使用环境变量管理机密信息
通过环境变量传递敏感数据,而不是将其硬编码在参数中。Devin 的 [Secrets](/zh/product-guides/secrets) 功能可以帮助你管理这些数据——先将 API key 或令牌存储为机密,然后在 MCP 服务器配置中引用它们。
## 自定义 MCP 服务器故障排除
### “测试列出工具”失败
| 症状 | 可能原因 | 解决方法 |
| ----------------------------------- | ---------------- | ------------------------------------------------ |
| “验证服务器 URL 和网络连接” | 服务器 URL 无法访问 | 检查 URL 是否正确,并且可从互联网访问 (或在使用 VPN 时可从 Devin 的网络访问) |
| “检查认证凭据和权限” | 身份验证凭据无效或缺失 | 检查并确认你的 API key、token 或 OAuth 配置 |
| “服务器响应超时——请检查服务器状态” | 服务器未在超时时间内响应 | 确保服务器正在运行且有响应;检查是否有防火墙规则阻止连接 |
| “MCP server validation failed” (通用) | 找不到命令、依赖缺失或服务器崩溃 | 对于 STDIO 服务器,确认该命令存在并能在本地运行;检查所有必需的环境变量是否已设置 |
### 服务器已连接但工具不可用
* 确认服务器正确实现了 MCP 协议的 `tools/list` 方法。
* 对于 STDIO 类型的服务器,确保进程向 stdout 写入有效的 JSON-RPC 消息并从 stdin 读取——将日志或调试输出写到 stdout 会导致协议出错。
* 检查环境变量是否设置正确。缺少值 (例如,空的 API key) 可能会导致服务器可以启动但无法注册工具。
### OAuth 身份验证问题
* 当系统提示进行身份验证时,请在弹出的浏览器窗口中完成 OAuth 流程。Devin 会等待回调。
* 如果身份验证失败,请检查是否已在提供商端正确配置 OAuth 重定向 URI。
* 只有具有 **管理 MCP 服务器** 权限的用户才可以为基于 OAuth 的 MCP 服务器完成身份验证。如果你看到权限错误,请联系你的组织管理员。
对于基于 OAuth 的 MCP,**请使用服务账号** 而不是你的个人账户。访问权限会在整个组织中共享,所有成员的会话都会使用同一个已完成认证的连接。
### 常规调试建议
* **先在本地检查服务器。** 在将自定义服务器添加到 Devin 之前,先在你自己的机器上运行命令或访问该 URL,确认它能正常工作。
* **查看 Devin 的会话日志。** 如果服务器在某次会话中出错,Devin 会记录错误。在会话输出中查找与 MCP 相关的消息。
* **简化并迭代。** 从最小配置开始 (例如无鉴权、使用默认设置) ,在基础连接正常后再逐步增加复杂性。
* **验证环境变量。** 常见问题是环境变量缺失或命名错误。仔细检查配置中每个必需的环境变量都已正确设置。
如果你在构建自己的 MCP 服务器,[Model Context Protocol 规范](https://modelcontextprotocol.io/introduction)中有关于协议、传输类型和工具定义的详细文档。
***
## Marketplace MCPs
以下是 Marketplace 中特定 MCP 的配置详细信息。
### Vercel、Atlassian、Notion、Sentry、Neon、Asana、Jam 等众多服务
在我们的市场中,许多 MCP 都可以一键启用,无需任何配置!
只需点击 “Enable”。在 Devin 会话期间,或当你点击 “Test listing tools” 时,系统会提示你连接服务账号。
可用的 MCP 包括:
* AlloyDB
* Asana
* Atlassian
* BigQuery
* Cloud SQL (MySQL)
* Cloud SQL (PostgreSQL)
* Cloud SQL (SQL Server)
* Cloudflare
* Cortex
* Dataplex
* Figma
* Fireflies
* Firestore
* Jam
* Linear
* Looker
* Metabase
* MySQL
* Neon
* Notion
* PostgreSQL
* Prisma
* Sentry
* Spanner
* SQL Server
* Vercel
* 更多见下文!
**Linear**:如果你已经连接了 [Linear 集成](/zh/integrations/linear),Devin 已经内置了 Linear 工具,无需另外配置 Linear MCP。
### Datadog
这是官方的 Datadog 远程 MCP 服务器。当你从市场启用它时,系统会提示你通过 OAuth 使用你的 Datadog 账户进行身份验证。
启用 MCP 时,你还需要选择 Datadog 站点/区域 (例如 US1、US3、US5、EU、AP1、AP2、US1-FED) 。
[文档](https://docs.datadoghq.com/bits_ai/mcp_server/)
### Slack
这是官方的 Slack 远程 MCP 服务器。在市场中启用后,系统会提示你通过 OAuth 使用你的 Slack 账户完成身份验证。
请注意,它使用用户级 OAuth:如果以组织范围的访问权限连接,所有组织成员都会共享同一个用户身份,因此我们建议使用个人访问权限。
[文档](https://docs.slack.dev/ai/slack-mcp-server)
### Supabase
你需要提供一个个人访问令牌,可以在 [https://supabase.com/dashboard/account/tokens](https://supabase.com/dashboard/account/tokens) 上创建和查看。
[文档](https://mcpservers.org/servers/supabase-community/supabase-mcp)
### Figma
这是官方的 Figma 远程 MCP 服务器。当你从 marketplace 启用此 MCP 时,系统会提示你通过 OAuth 使用你的 Figma 账户进行身份验证。
使用此 MCP 时,请务必将你的 Figma 文件链接发送给 Devin。
[文档](https://developers.figma.com/docs/figma-mcp-server/remote-server-installation/)
### Stripe
你需要在请求中提供一个格式为 `Bearer <TOKEN>` 的 `Authorization` 头,其中 `<TOKEN>` 是你的 Stripe API 密钥。更多信息请参见:[https://docs.stripe.com/mcp#bearer-token](https://docs.stripe.com/mcp#bearer-token)
[文档](https://docs.stripe.com/mcp)
### Zapier
你需要提供一个格式为 `Bearer <TOKEN>` 的 Authorization 头部。
你需要从 [https://mcp.zapier.com/mcp/servers](https://mcp.zapier.com/mcp/servers) > Connect 中提供的 Server URL 里提取你的 Bearer token。
你的 Server URL 看起来会类似这样:[https://mcp.zapier.com/api/mcp/s/\*\*\*\*\*/mcp](https://mcp.zapier.com/api/mcp/s/*****/mcp)
从中提取带星号的这段 (\*\*\*\*\*) ,并将其用于你提供的 Authorization 头部中:`Bearer *****`
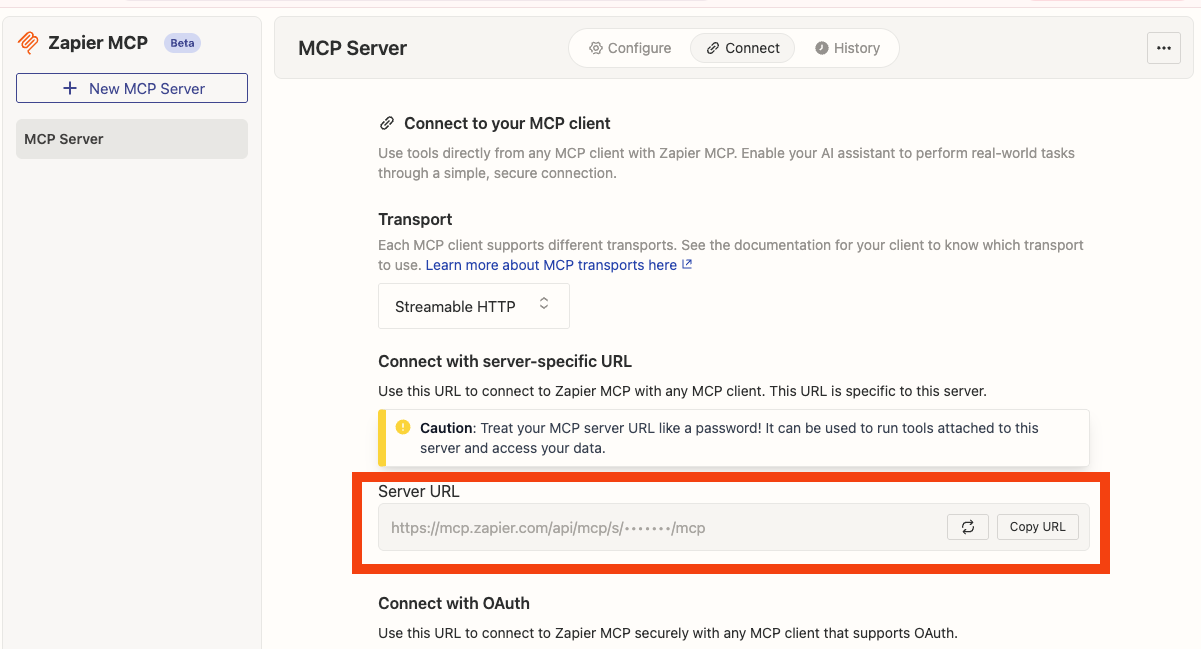 [文档](https://zapier.com/mcp)
### Airtable
你需要提供一个 Airtable API 密钥。你可以在以下页面找到你的 API 密钥:[https://airtable.com/create/tokens](https://airtable.com/create/tokens)
[文档](https://www.npmjs.com/package/airtable-mcp-server)
### Docker Hub
所需凭证:
* Docker Hub 用户名:可在 My Hub 中查看
* 个人访问令牌 (Personal Access Token) :前往 Account Settings > Personal access tokens 并创建一个令牌
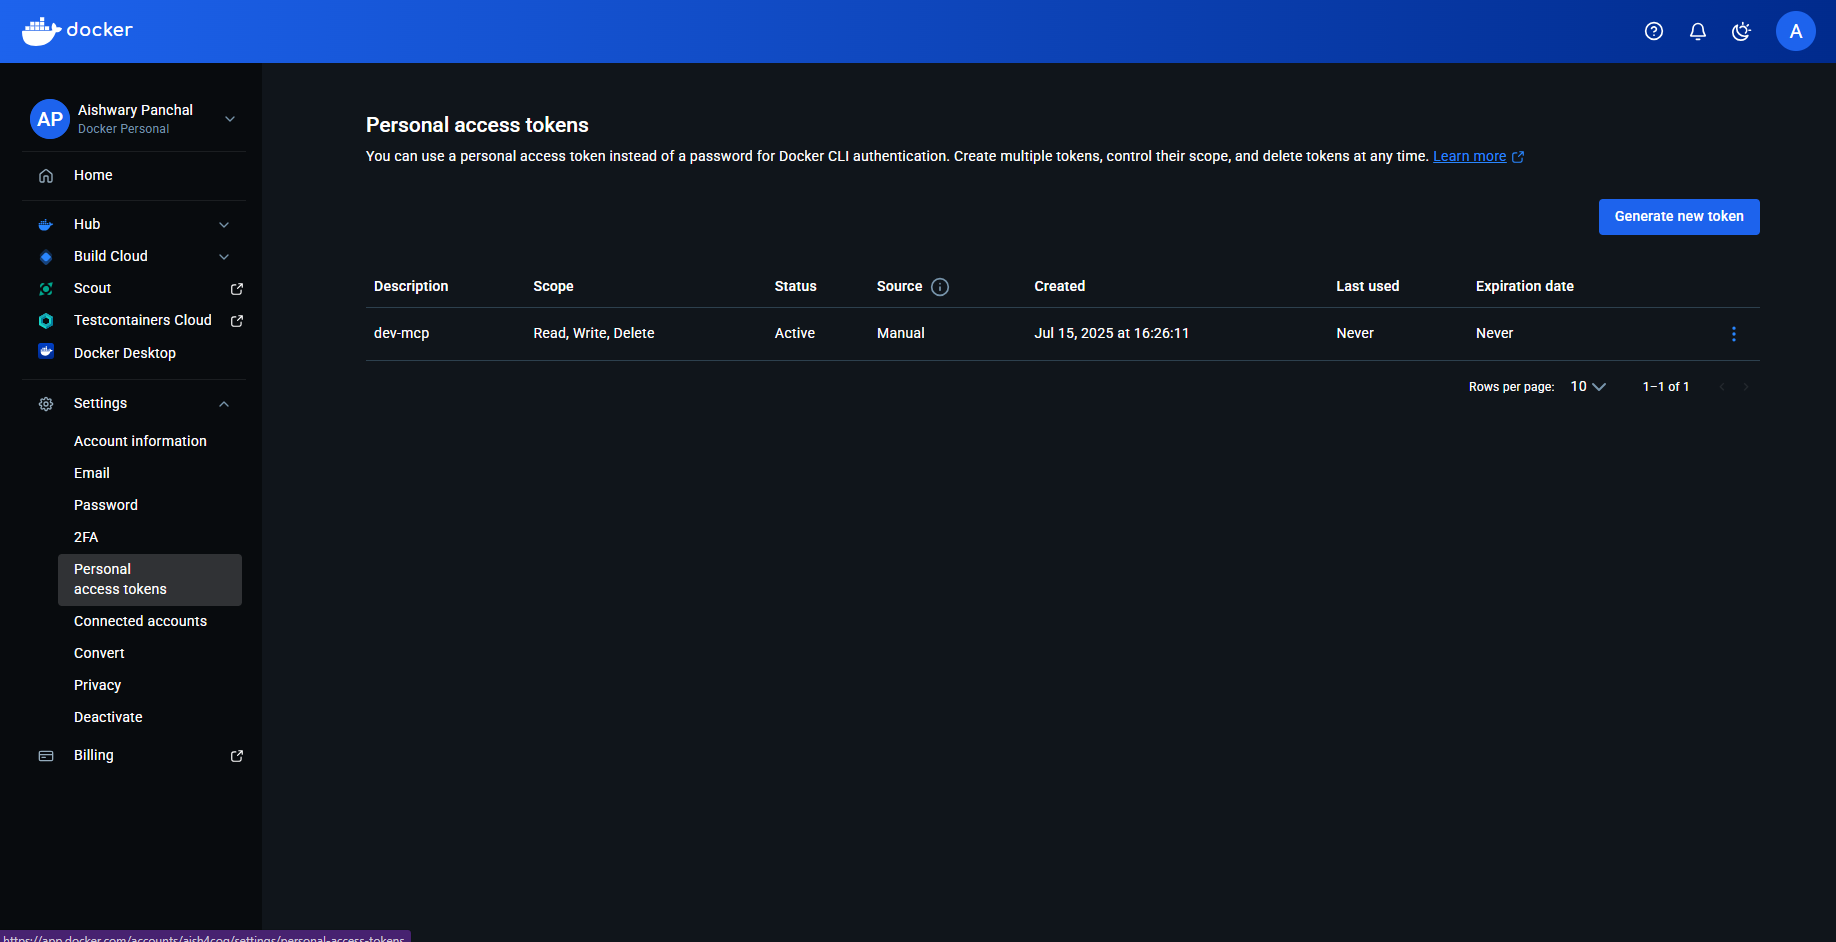 [文档](https://hub.docker.com/r/mcp/dockerhub)
### SonarQube
要获取所需的凭证:
* Sonarqube token:前往 “My Account > Security” 并生成你的 API token
* Sonarqube org:这是你的用户名,示例如下图所示
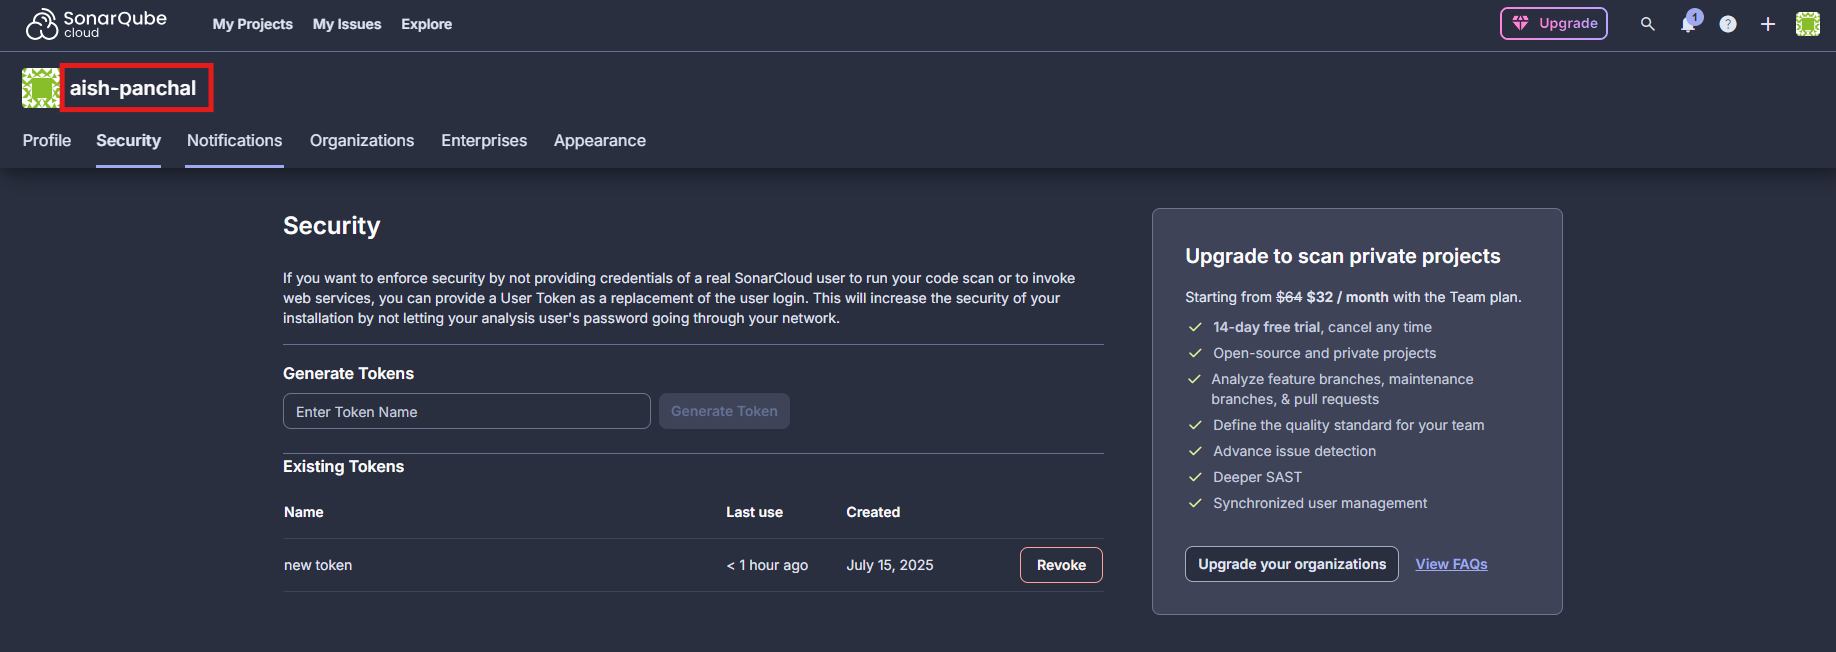 * Sonarqube URL:
* 自托管环境:格式为 [http://localhost:9000](http://localhost:9000/) 或 [https://sonarqube.mycompany.com](https://sonarqube.mycompany.com/)
* SonarCloud:使用 [https://sonarcloud.io](https://sonarcloud.io/)
[Documentation](https://github.com/SonarSource/sonarqube-mcp-server)
* Sonarqube URL:
* 自托管环境:格式为 [http://localhost:9000](http://localhost:9000/) 或 [https://sonarqube.mycompany.com](https://sonarqube.mycompany.com/)
* SonarCloud:使用 [https://sonarcloud.io](https://sonarcloud.io/)
[Documentation](https://github.com/SonarSource/sonarqube-mcp-server)
### Netlify
你需要提供一个个人访问令牌 (Personal Access Token,PAT) ,可以在 [https://app.netlify.com/user/applications#personal-access-tokens](https://app.netlify.com/user/applications#personal-access-tokens) 查看和创建。请务必在创建后立即复制该 PAT,之后将无法再次查看!
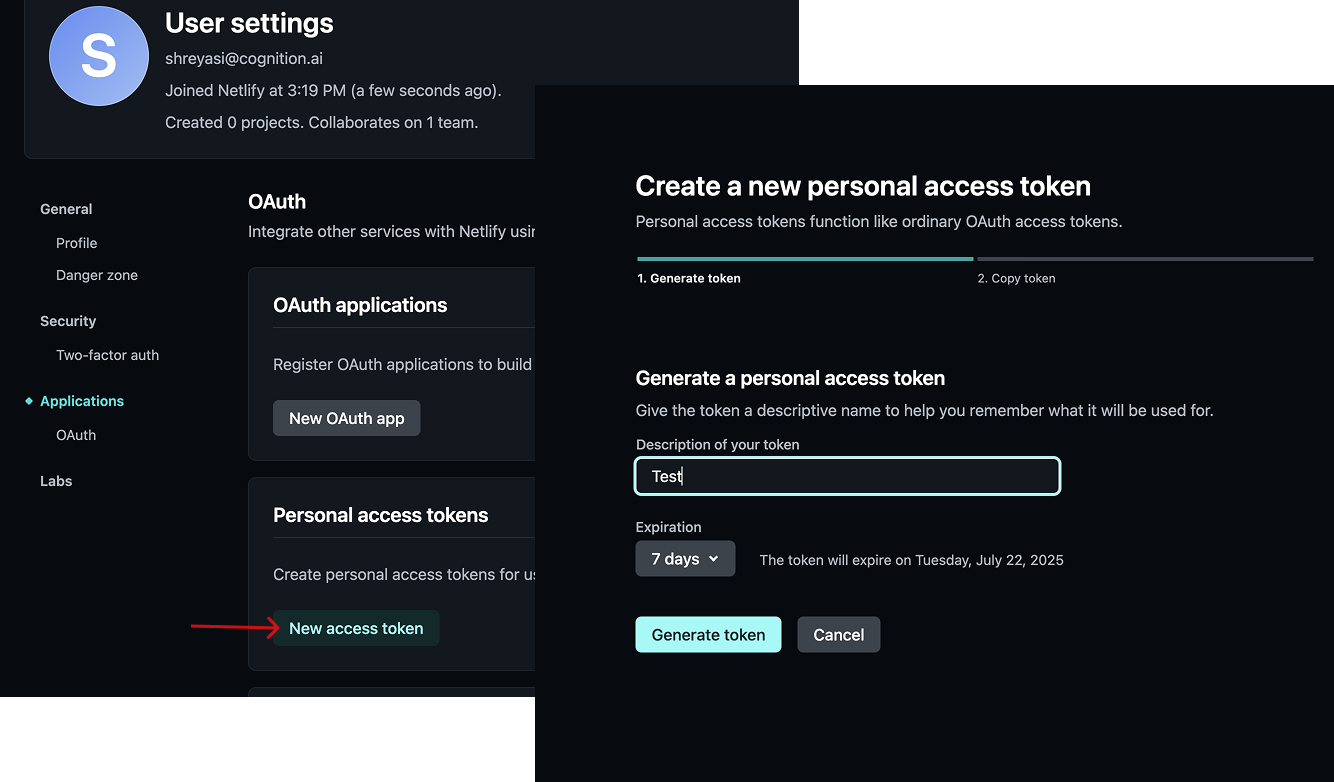 [文档](https://docs.netlify.com/welcome/build-with-ai/netlify-mcp-server/)
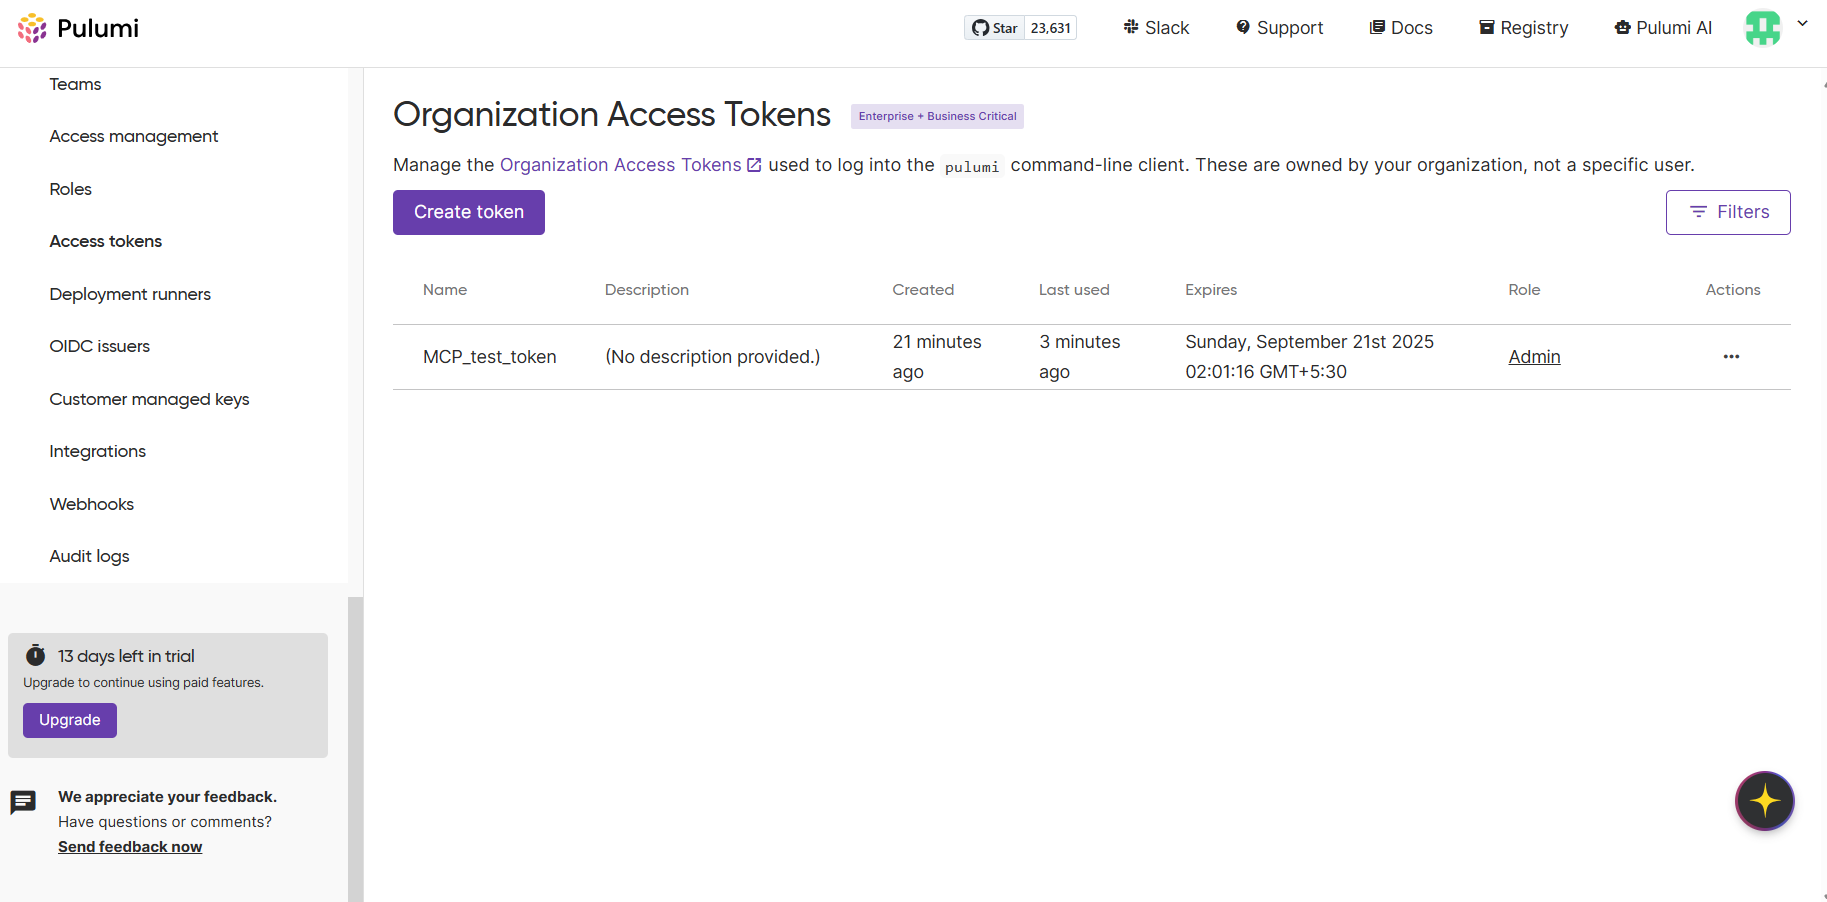
### Pulumi
你可以在 Pulumi 仪表盘侧边栏的 **Access tokens** 部分获取 Pulumi 访问令牌。
 [文档](https://www.pulumi.com/docs/iac/using-pulumi/mcp-server/)
### Parallel
您需要提供一个 API 密钥,可以在 [https://platform.parallel.ai/](https://platform.parallel.ai/) 上生成。
[文档](https://docs.parallel.ai/features/remote-mcp)
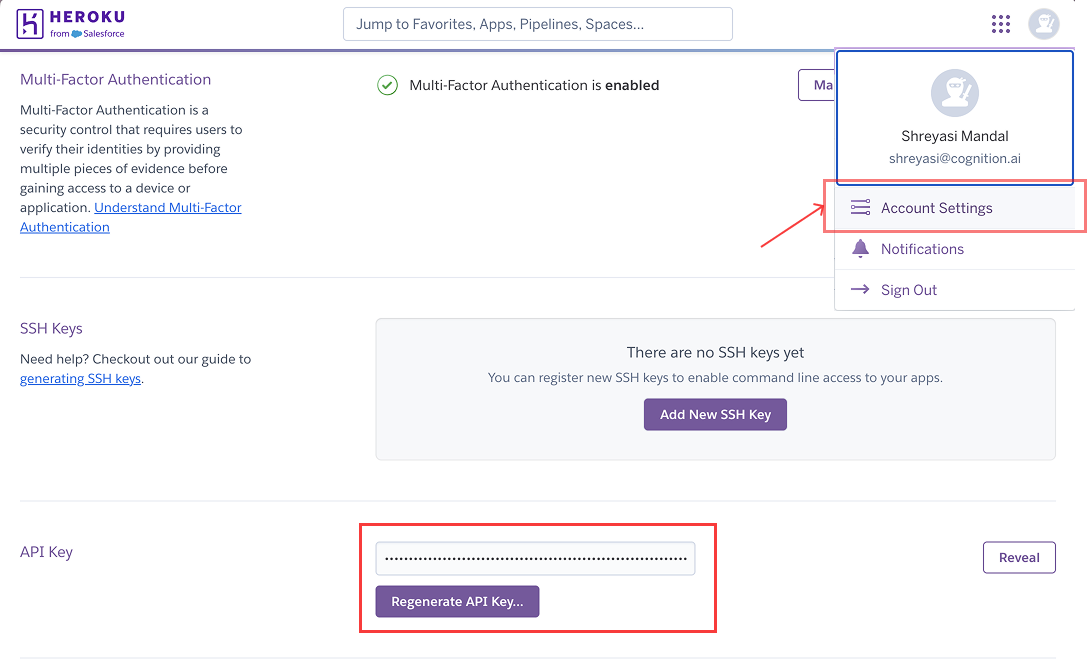
### Heroku
你需要提供一个 API 密钥,可以在 [https://dashboard.heroku.com/account](https://dashboard.heroku.com/account) 获取。
 [文档](https://www.heroku.com/blog/introducing-official-heroku-mcp-server/)
### CircleCI
你需要提供两个环境变量:
* `CIRCLECI_TOKEN` - CircleCI API 令牌,可在 [https://app.circleci.com/settings/user/tokens](https://app.circleci.com/settings/user/tokens) 创建。创建后请立即复制该 API 令牌,此后将无法再次查看!
 * `CIRCLECI_BASE_URL`【可选】 - 仅本地部署 (on‑prem) 客户需要填写,其他情况下为可选项。默认值为 `"https://circleci.com"`
[文档](https://hub.docker.com/r/mcp/circleci)
* `CIRCLECI_BASE_URL`【可选】 - 仅本地部署 (on‑prem) 客户需要填写,其他情况下为可选项。默认值为 `"https://circleci.com"`
[文档](https://hub.docker.com/r/mcp/circleci)
### Cortex
你需要提供一个 Cortex 个人访问令牌 (personal access token) 来启用此 MCP:
1. 登录到你的 Cortex 实例。
2. 在左侧菜单中,前往 *Settings → My access tokens*。
3. 点击 *Create new token*。
4. 输入该令牌的名称和描述。
5. 点击 *Create token* 并复制该令牌。
使用此 MCP 时,请确保 Devin 已配置为使用正确的 Cortex API URL (默认为 `https://api.getcortexapp.com`) 。
[Documentation](https://docs.cortex.io/get-started/mcp)
### Square
你需要提供一个遵循 `Bearer ` 格式的 `Authorization` 标头,其中 `` 是你的 Square 访问令牌。更多信息请参考:[https://developer.squareup.com/docs/build-basics/access-tokens](https://developer.squareup.com/docs/build-basics/access-tokens)
[文档](https://developer.squareup.com/docs/mcp)
### Hubspot
你需要通过环境变量提供访问令牌。要获取访问令牌:
1. 在 HubSpot 中创建一个私有应用:
2. 前往 Settings > Integrations > Private Apps
3. 点击“Create private app”
4. 为应用命名,并设置所需的权限范围
5. 点击“Create app”
6. 在 “Auth” 选项卡中复制生成的访问令牌
[文档](https://www.npmjs.com/package/@hubspot/mcp-server)
### Redis
所需凭据:
* Redis 主机地址
* Redis 端口
* Redis 用户名
* Redis 密码
[文档](https://redis.io/docs/latest/integrate/redis-mcp/client-conf/)
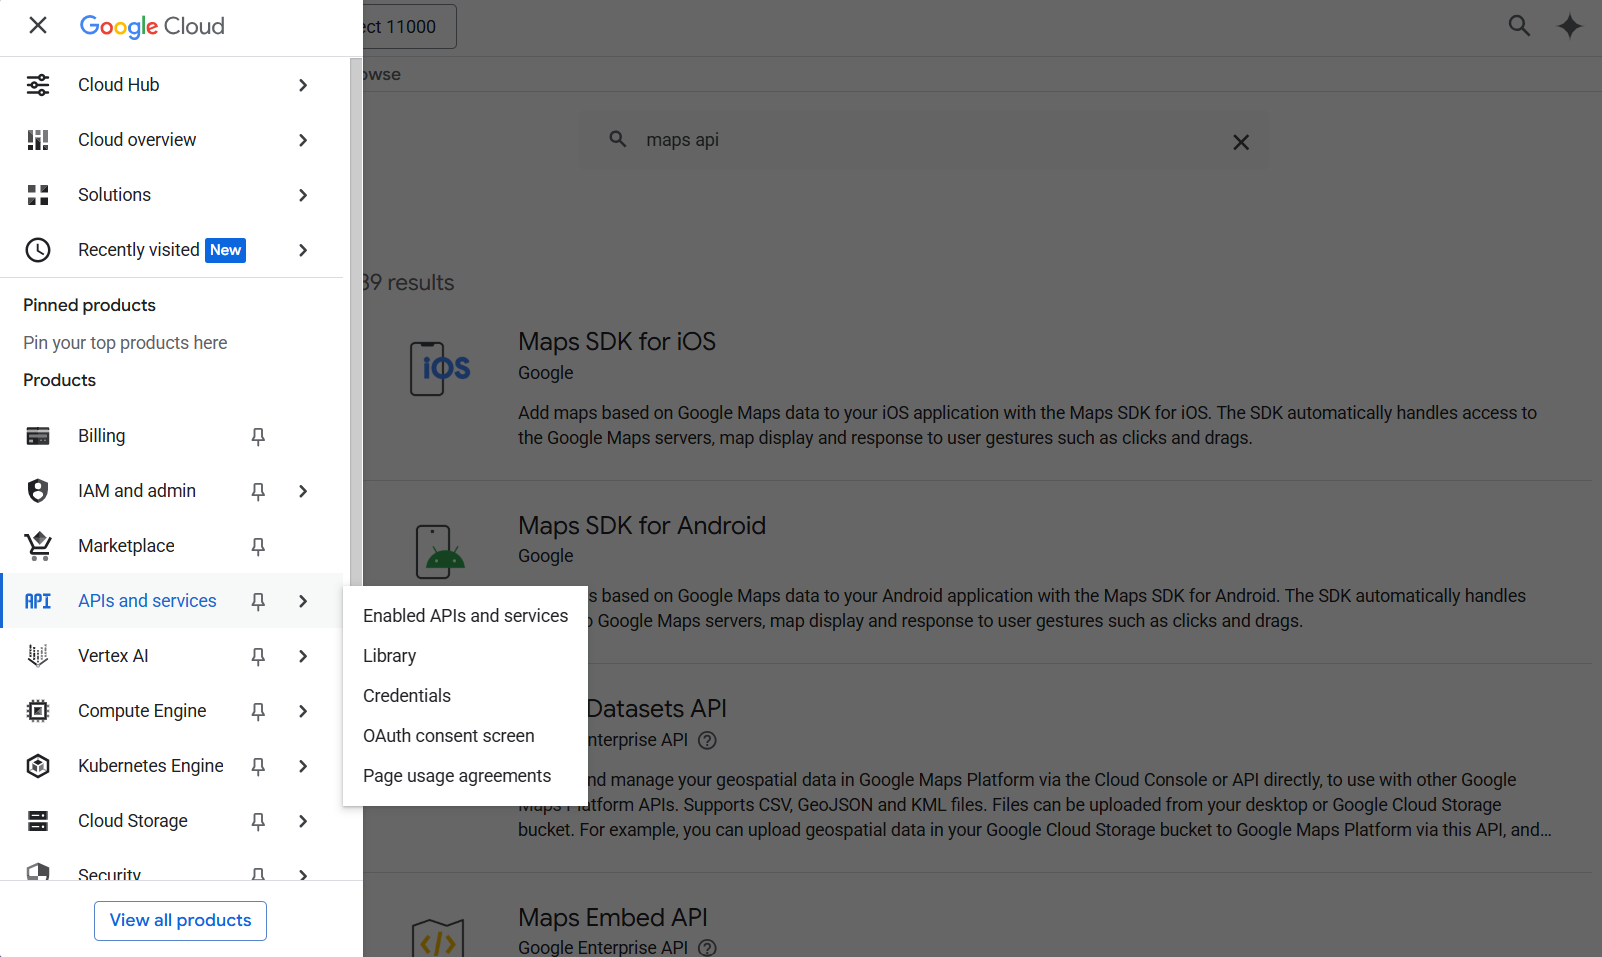
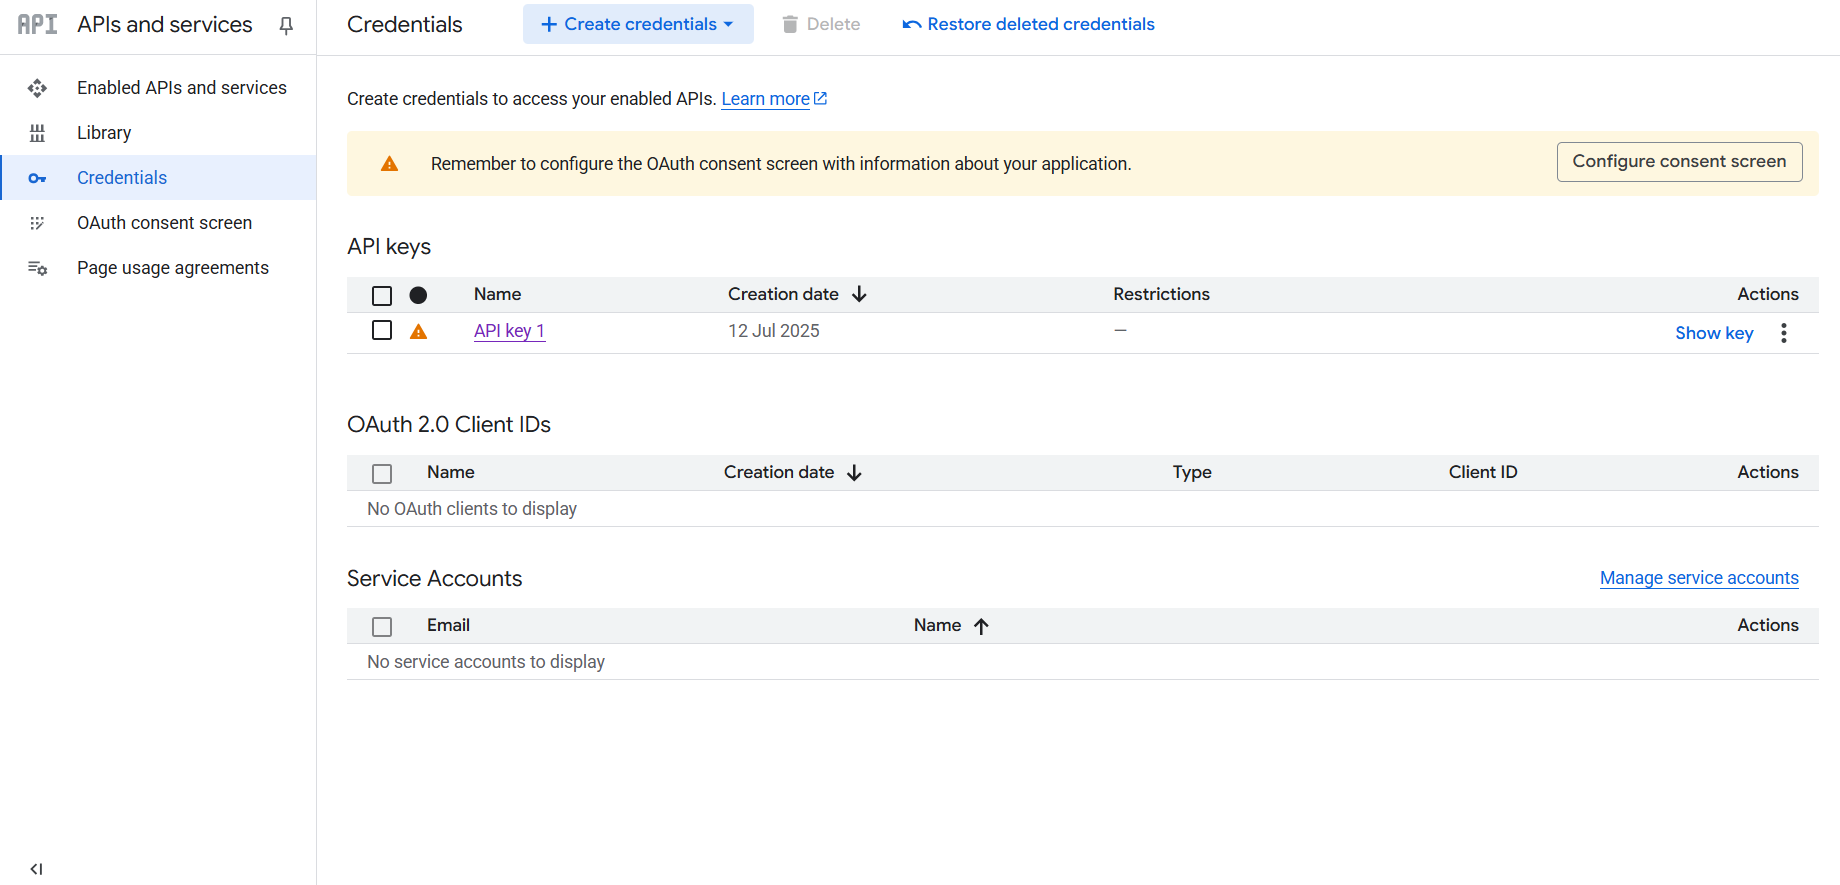
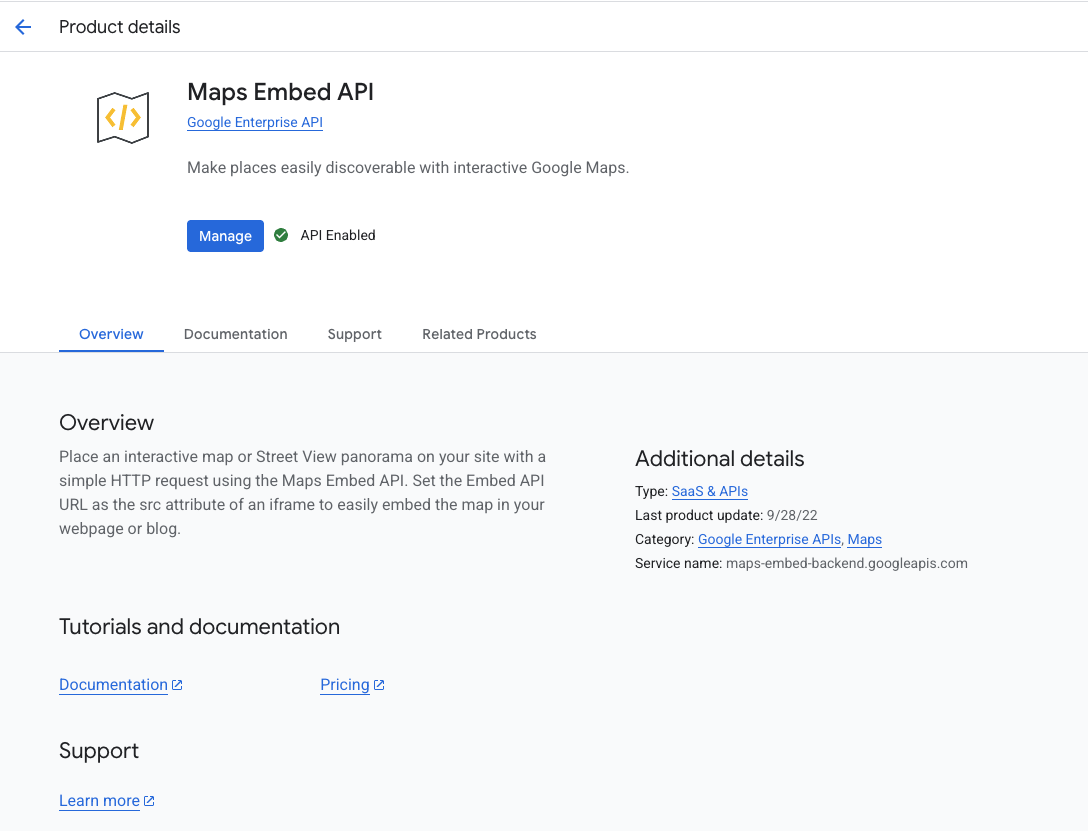
### Google Maps
你需要完成以下两步操作:(1) 提供一个 API 密钥,(2) 启用你希望 Devin 访问的各个 API。
要获取 API 密钥,前往 [https://console.cloud.google.com/apis/credentials,然后在侧边栏中依次点击](https://console.cloud.google.com/apis/credentials,然后在侧边栏中依次点击) APIs and services > Credentials。
要启用某个单独的 API,搜索该 API 并点击“启用”。
 [文档](https://www.npmjs.com/package/@modelcontextprotocol/server-google-maps)
### Playwright
无需配置任何环境变量!直接启用该集成即可。
[文档](https://hub.docker.com/r/mcp/playwright)
### Firecrawl
你需要提供一个 API 密钥 (`FIRECRAWL_API_KEY`) ,可以在 [https://www.firecrawl.dev/app/api-keys](https://www.firecrawl.dev/app/api-keys) 查看并创建。
[文档](https://hub.docker.com/r/mcp/firecrawl#use-this-mcp-server)
### ElasticSearch
你需要配置 2 个环境变量:
* `ES_URL` - ElasticSearch 的 URL 或端点,可以在 Elasticsearch 的 /overview 页面找到。
* `ES_API_KEY` - ElasticSearch 的 API 密钥,可以在 Elasticsearch 的 `/indices/index_details//data` 页面创建。
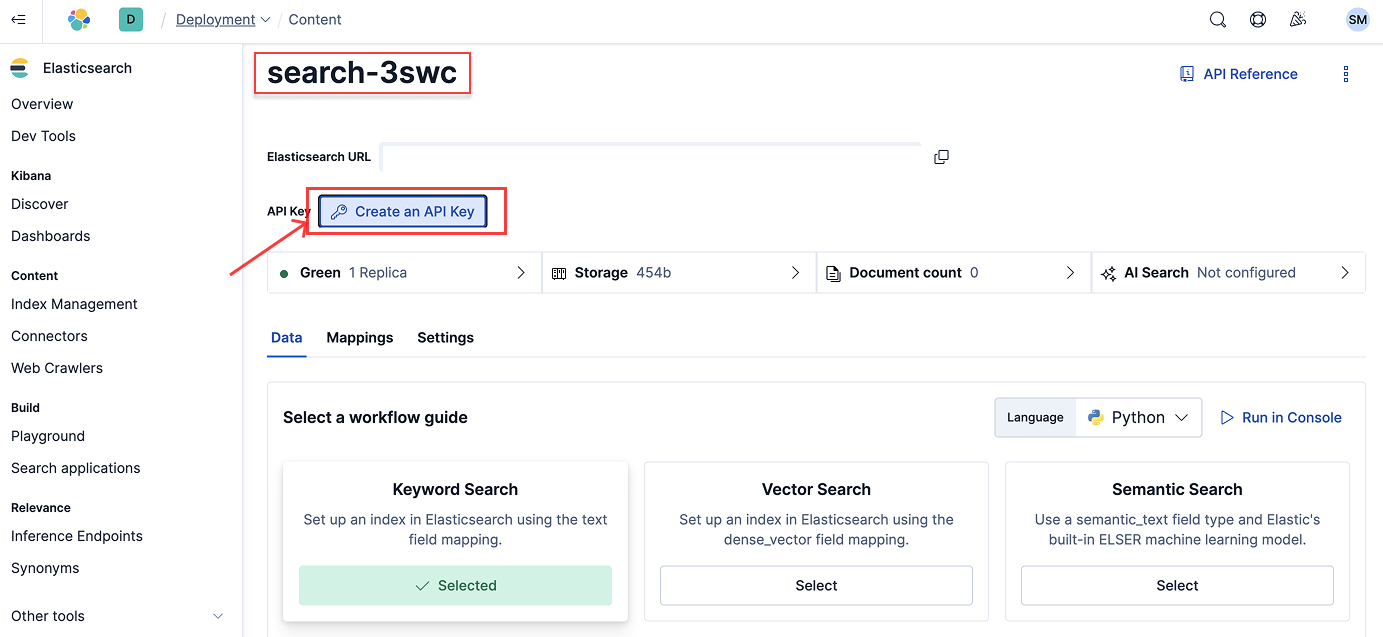 `ES_SSL_SKIP_VERIFY` 是一个可选的环境变量。将其设置为 `true` 时,连接到 Elasticsearch 时会跳过 SSL/TLS 证书验证。
[文档](https://hub.docker.com/r/mcp/elasticsearch)
`ES_SSL_SKIP_VERIFY` 是一个可选的环境变量。将其设置为 `true` 时,连接到 Elasticsearch 时会跳过 SSL/TLS 证书验证。
[文档](https://hub.docker.com/r/mcp/elasticsearch)
### Postgres
唯一需要的凭据是 Postgres 连接字符串。
[文档](https://www.npmjs.com/package/@modelcontextprotocol/server-postgres?activeTab=readme)
### Plaid
唯一需要的凭据是一个 OAuth Bearer 访问令牌,可通过运行以下代码获取:
```jsx theme={null}
curl -X POST https://production.plaid.com/oauth/token \
-H 'Content-Type: application/json' \
-d '{
"client_id": "YOUR_PLAID_CLIENT_ID",
"client_secret": "YOUR_PRODUCTION_SECRET",
"grant_type": "client_credentials",
"scope": "mcp:dashboard"
}'
```
要获取 `client_id` 和生产环境的 `client_secret`,请访问 [https://dashboard.plaid.com/developers/keys](https://dashboard.plaid.com/developers/keys)
[文档](https://plaid.com/docs/resources/mcp/)
### Replicate
唯一必需的凭证是 API 令牌,可在 [https://replicate.com/account/api-tokens](https://replicate.com/account/api-tokens) 获取。
[文档](https://replicate.com/docs/reference/mcp)
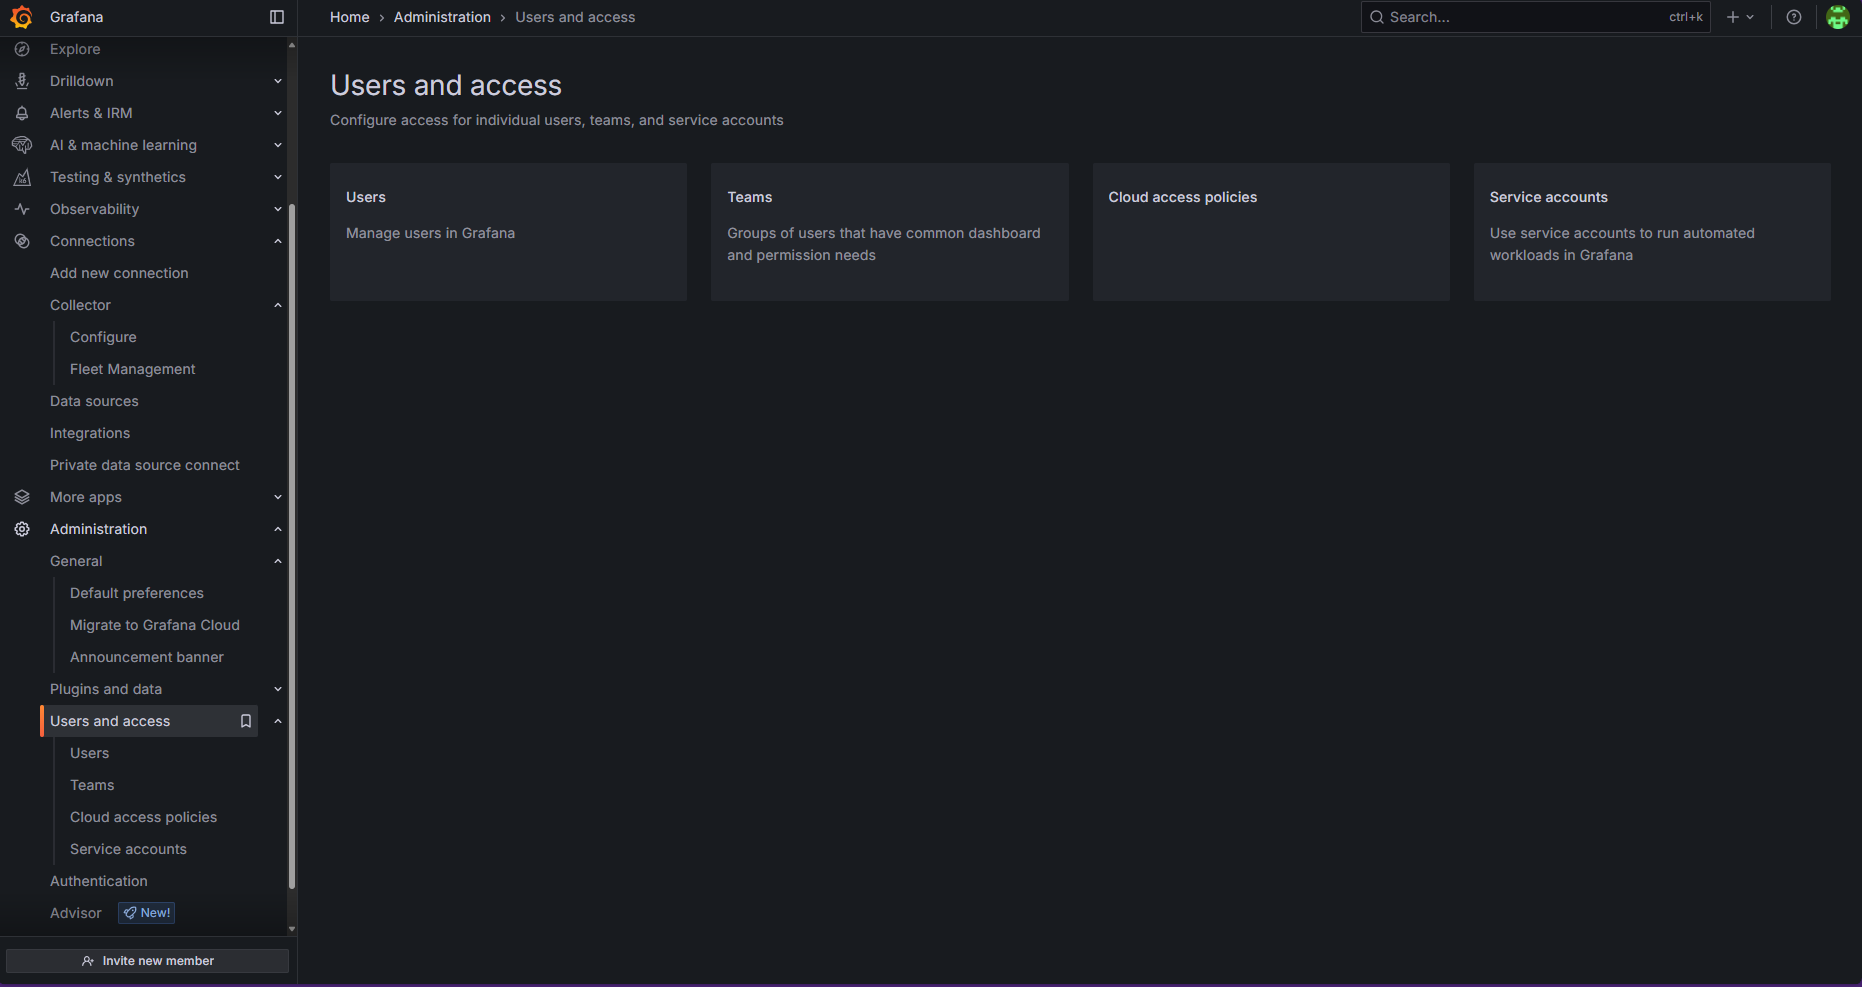
### Grafana
你需要提供两个环境变量:
* Grafana URL
* Grafana 服务账号令牌:要获取该令牌,请在侧边栏依次前往 Administration > Users and access > Service accounts > Add service account (如果你还没有添加服务账号) > Add service account token
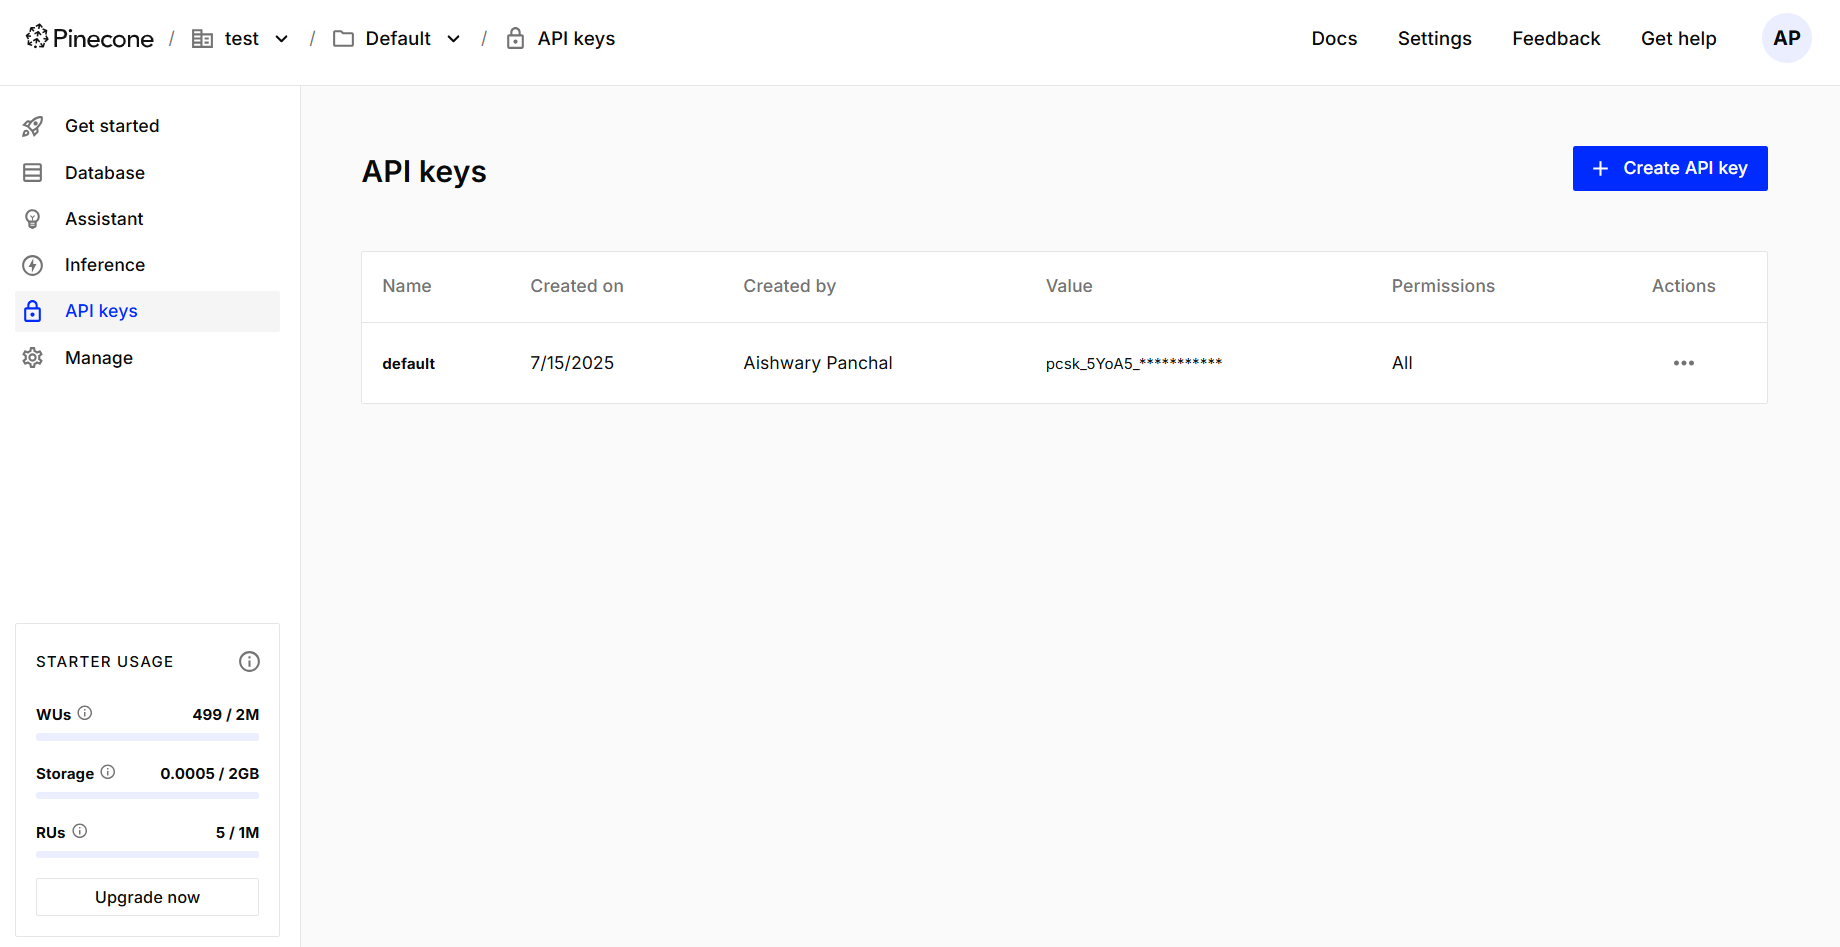
### Pinecone
注意:Pinecone MCP 目前仅支持集成嵌入的索引。截至 2025 年 7 月 16 日,尚不支持对使用外部嵌入模型创建的向量索引进行操作。
唯一需要的凭证是 Pinecone API 密钥,可在 Pinecone 控制台的 API keys 页面中获取,如下所示:
### Snyk
1. 首先,配置 MCP 服务端。相关文档见[这里](https://docs.snyk.io/integrations/developer-guardrails-for-agentic-workflows/quickstart-guides-for-mcp/devin-guide)。注意:请务必在配置末尾添加一个环境变量 (文档指南中未列出) 。
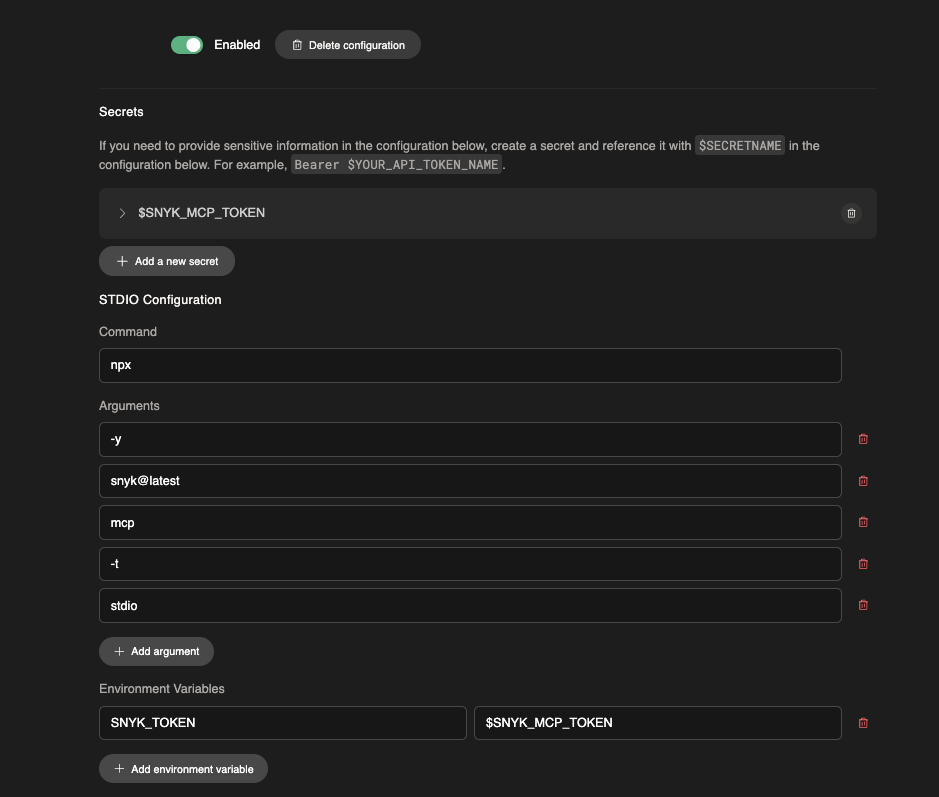 2. 在 Devin 的机器上安装 Snyk CLI。相关文档见[这里](https://docs.snyk.io/developer-tools/snyk-cli/install-or-update-the-snyk-cli)。
```jsx theme={null}
brew tap snyk/tap
brew install snyk-cli
snyk --disable-trust
```
注意:某些 Snyk 测试需要信任才能运行——请在安装 Homebrew 之后再在机器上安装。相关文档可在[此处](https://docs.snyk.io/integrations/developer-guardrails-for-agentic-workflows/troubleshooting-for-the-snyk-mcp-server#folder-trust)查看。
**提示**:
如果配置正确,Snyk 扫描的完整列表应在首次运行时全部执行。不过,根据不同框架,有些扫描需要传入一个 `unmanaged: true` 标志 (例如 C++) 。你目前可以在知识库中或 Devin 会话期间进行设置——下面是一个示例:
2. 在 Devin 的机器上安装 Snyk CLI。相关文档见[这里](https://docs.snyk.io/developer-tools/snyk-cli/install-or-update-the-snyk-cli)。
```jsx theme={null}
brew tap snyk/tap
brew install snyk-cli
snyk --disable-trust
```
注意:某些 Snyk 测试需要信任才能运行——请在安装 Homebrew 之后再在机器上安装。相关文档可在[此处](https://docs.snyk.io/integrations/developer-guardrails-for-agentic-workflows/troubleshooting-for-the-snyk-mcp-server#folder-trust)查看。
**提示**:
如果配置正确,Snyk 扫描的完整列表应在首次运行时全部执行。不过,根据不同框架,有些扫描需要传入一个 `unmanaged: true` 标志 (例如 C++) 。你目前可以在知识库中或 Devin 会话期间进行设置——下面是一个示例:
 **提示**:我们编写了一个[示例 playbook](https://app.devin.ai/settings/playbooks/163db5ecab7e47e6a82c71bf8d338678)来帮助你快速上手。
[文档](https://docs.snyk.io/integrations/developer-guardrails-for-agentic-workflows/quickstart-guides-for-mcp/devin-guide)
**提示**:我们编写了一个[示例 playbook](https://app.devin.ai/settings/playbooks/163db5ecab7e47e6a82c71bf8d338678)来帮助你快速上手。
[文档](https://docs.snyk.io/integrations/developer-guardrails-for-agentic-workflows/quickstart-guides-for-mcp/devin-guide)