> ## Documentation Index
> Fetch the complete documentation index at: https://docs.devin.ai/llms.txt
> Use this file to discover all available pages before exploring further.
# 设置 SSO 与 SCIM
> 使用 Google Workspace、Microsoft Entra ID、Okta 或其他 SAML 身份提供商,为你的组织配置单点登录(SSO)和 SCIM 预配。
此功能仅适用于 Enterprise 用户。
此功能不适用于 Cognition Platform 套餐。对于 Cognition Platform,请改为在 Cognition Platform 设置中配置和管理 SSO。
Devin Desktop 现已支持通过 SAML 使用单点登录 (SSO) 。如果你的组织使用 Microsoft Entra、Okta、Google Workspaces 或其他支持 SAML 的身份提供商,你就可以在 Devin Desktop 中使用 SSO。
Devin Desktop 仅支持由 SP 发起的 SSO;目前**不**支持由 IDP 发起的 SSO。
### 配置 IDP 应用
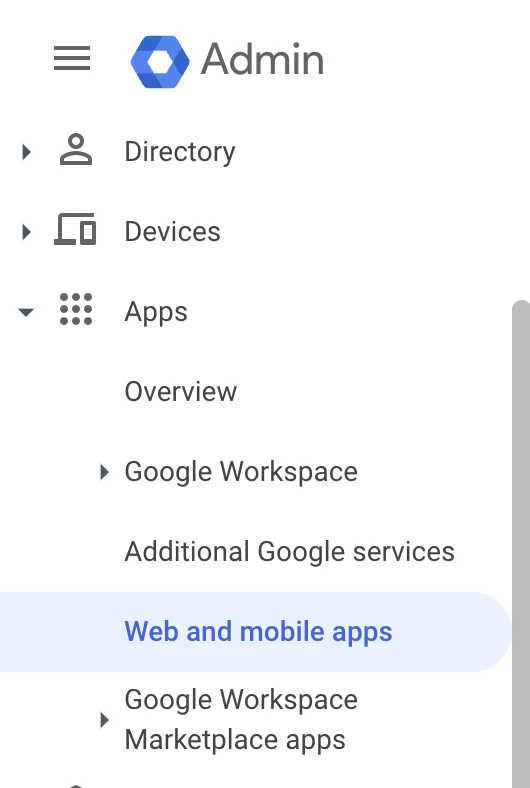
在 Google 管理控制台 (admin.google.com) 中,点击左侧的 **Apps -> Web and mobile apps**。
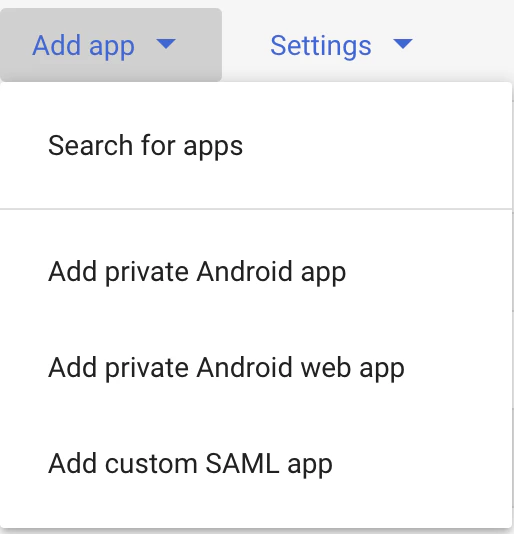
 点击 **Add app**,然后点击 **Add custom SAML app**。
 在 **App name** 中填写 `Windsurf`,然后点击 **Next**。
Google 控制台页面上的下一个界面 (Google Identity Provider details) 包含你需要复制到 Devin Desktop 的 SSO 设置页面 ([https://windsurf.com/team/settings](https://windsurf.com/team/settings)) 的数据。
* 将 Google 控制台页面中的 **SSO URL** 复制到 Devin Desktop 设置中的 **SSO URL**
* 将 Google 控制台页面中的 **Entity ID** 复制到 Devin Desktop 设置中的 **Idp Entity ID**
* 将 Google 控制台页面中的 **Certificate** 复制到 Devin Desktop 设置中的 **X509 Certificate**
* 在 Google 控制台页面上点击 **Continue**
Google 控制台页面上的下一个界面需要你从 Codeium 设置页面复制数据。
* 将 Codeium 设置页面中的 **Callback URL** 复制到 Google 控制台页面中的 **ACS URL**
* 将 Codeium 设置页面中的 **SP Entity ID** 复制到 Google 控制台页面中的 **SP Entity ID**
* 将 **Name ID** 格式更改为 **EMAIL**
* 在 Google 控制台页面上点击 **Continue**
Google 控制台页面上的下一个界面需要进行一些配置。
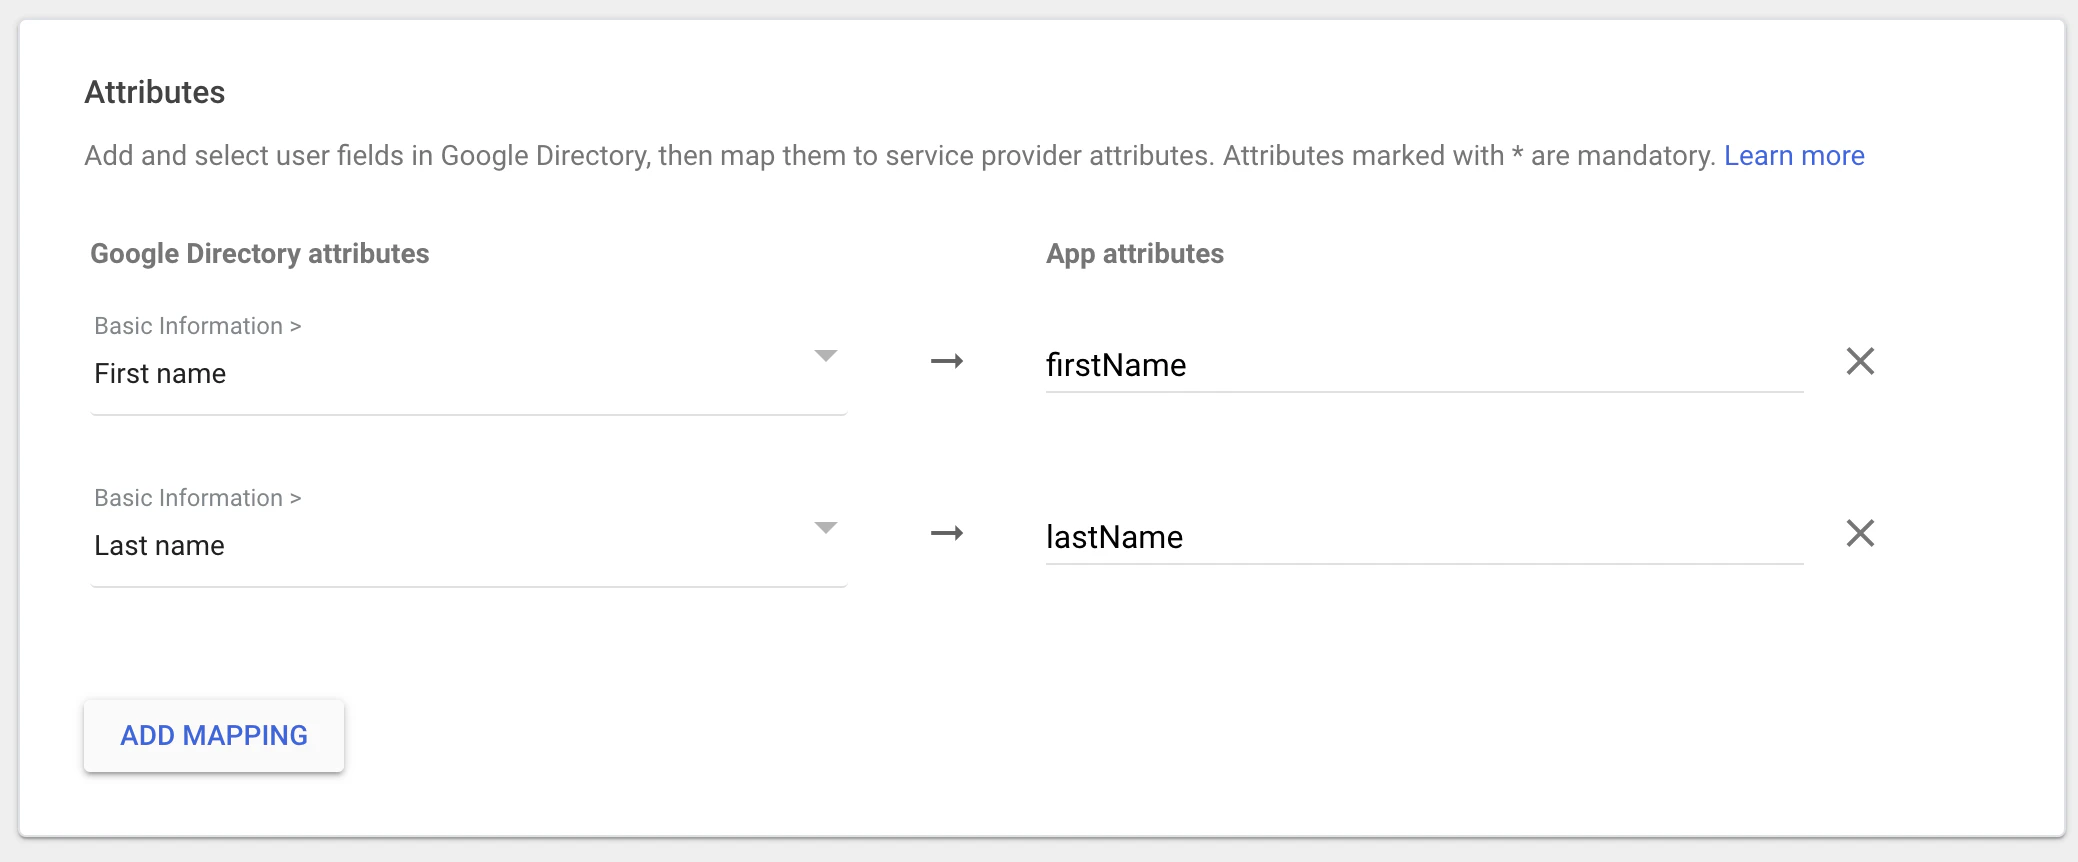
* 点击 **Add Mapping**,选择 **First name**,并将 **App attributes** 设置为 **firstName**
* 点击 **Add Mapping**,选择 **Last name**,并将 **App attributes** 设置为 **lastName**
* 点击 **Finish**
在 **App name** 中填写 `Windsurf`,然后点击 **Next**。
Google 控制台页面上的下一个界面 (Google Identity Provider details) 包含你需要复制到 Devin Desktop 的 SSO 设置页面 ([https://windsurf.com/team/settings](https://windsurf.com/team/settings)) 的数据。
* 将 Google 控制台页面中的 **SSO URL** 复制到 Devin Desktop 设置中的 **SSO URL**
* 将 Google 控制台页面中的 **Entity ID** 复制到 Devin Desktop 设置中的 **Idp Entity ID**
* 将 Google 控制台页面中的 **Certificate** 复制到 Devin Desktop 设置中的 **X509 Certificate**
* 在 Google 控制台页面上点击 **Continue**
Google 控制台页面上的下一个界面需要你从 Codeium 设置页面复制数据。
* 将 Codeium 设置页面中的 **Callback URL** 复制到 Google 控制台页面中的 **ACS URL**
* 将 Codeium 设置页面中的 **SP Entity ID** 复制到 Google 控制台页面中的 **SP Entity ID**
* 将 **Name ID** 格式更改为 **EMAIL**
* 在 Google 控制台页面上点击 **Continue**
Google 控制台页面上的下一个界面需要进行一些配置。
* 点击 **Add Mapping**,选择 **First name**,并将 **App attributes** 设置为 **firstName**
* 点击 **Add Mapping**,选择 **Last name**,并将 **App attributes** 设置为 **lastName**
* 点击 **Finish**
 在 Codeium 设置页面上,点击 **Enable Login with SAML**,然后点击 **Save**。请务必点击 **Test Login**,确认登录功能是否正常。完成后,所有用户都将被强制使用 SSO 登录。
Devin Desktop Enterprise 现已支持通过 SAML 使用单点登录 (SSO) 进行登录。如果你的组织使用 Microsoft Entra ID (原 Azure AD) ,即可在 Devin Desktop 中使用 SSO。
Devin Desktop 仅支持 SP 发起的 SSO;目前**不**支持 IDP 发起的 SSO。
## 第 1 部分:在 Microsoft Entra ID 中创建企业应用程序
本节中的所有步骤均在 **Microsoft Entra ID 管理中心** 中完成。
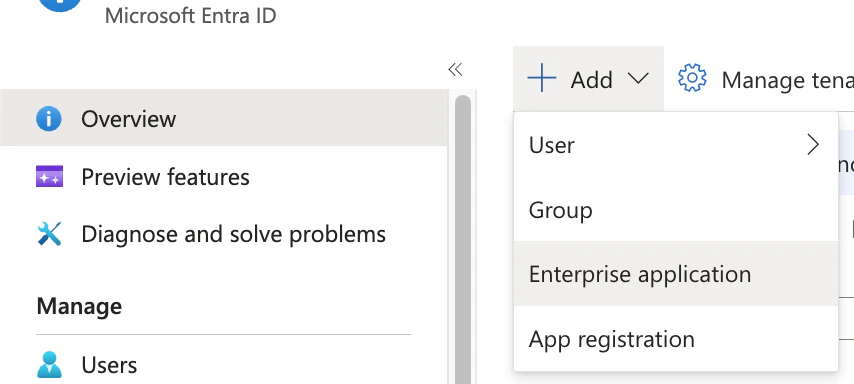
1. 在 Microsoft Entra ID 中,点击 **添加**,然后点击 **企业应用程序**。
在 Codeium 设置页面上,点击 **Enable Login with SAML**,然后点击 **Save**。请务必点击 **Test Login**,确认登录功能是否正常。完成后,所有用户都将被强制使用 SSO 登录。
Devin Desktop Enterprise 现已支持通过 SAML 使用单点登录 (SSO) 进行登录。如果你的组织使用 Microsoft Entra ID (原 Azure AD) ,即可在 Devin Desktop 中使用 SSO。
Devin Desktop 仅支持 SP 发起的 SSO;目前**不**支持 IDP 发起的 SSO。
## 第 1 部分:在 Microsoft Entra ID 中创建企业应用程序
本节中的所有步骤均在 **Microsoft Entra ID 管理中心** 中完成。
1. 在 Microsoft Entra ID 中,点击 **添加**,然后点击 **企业应用程序**。
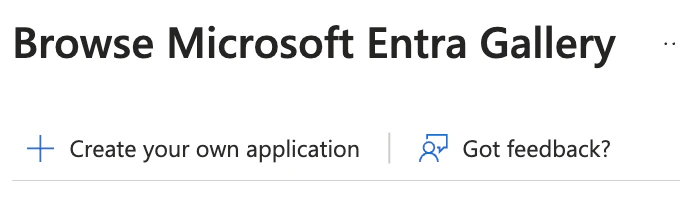
 2. 点击 **创建你自己的应用程序**。
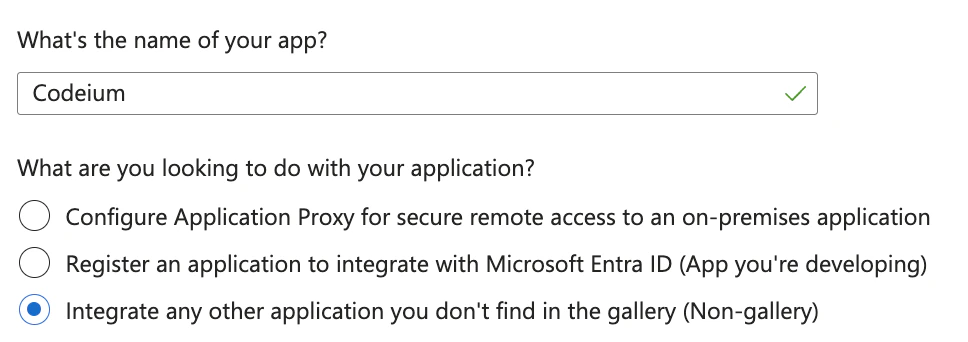
 3. 将应用程序命名为 **Devin Desktop**,选择 *集成库中未找到的任何其他应用程序*,然后点击 **创建**。
 ## 第 2 部分:在 Microsoft Entra ID 中配置 SAML 和用户属性
本节中的所有步骤均在 **Microsoft Entra ID 管理中心** 中完成。
4. 在新建的 Devin Desktop 应用程序中,点击 **设置单点登录**,然后点击 **SAML**。
5. 在 **基本 SAML 配置** 下,点击 **编辑**。
6. **保持此 Entra ID 选项卡处于打开状态**,然后新开一个选项卡,前往 **Devin Desktop Teams SSO 设置**:[https://windsurf.com/team/settings。](https://windsurf.com/team/settings。)
7. 在 **Microsoft Entra ID** 的 SAML 配置表单中:
* **标识符 (实体 ID) **:从 **Devin Desktop SSO 设置页面** 复制 **SP 实体 ID** 的值
* **回复 URL (断言使用者服务 URL) **:从 **Devin Desktop SSO 设置页面** 复制 **回调 URL** 的值
* 点击顶部的 **保存**
8. 配置用户属性,以正确显示姓名。在 **Microsoft Entra ID** 中,进入 **属性和声明**,点击 **编辑**。
9. 点击 **添加新声明**,分别创建 2 个新声明:
* **第一个声明**:名称 = `firstName`,源属性 = `user.givenname`
* **第二个声明**:名称 = `lastName`,源属性 = `user.surname`
## 第 3 部分:在 Devin Desktop Portal 中配置 SSO 设置
请在 **Devin Desktop portal** ([https://windsurf.com/team/settings](https://windsurf.com/team/settings)) 中完成配置。
10. 在 **Devin Desktop SSO 设置页面** 中:
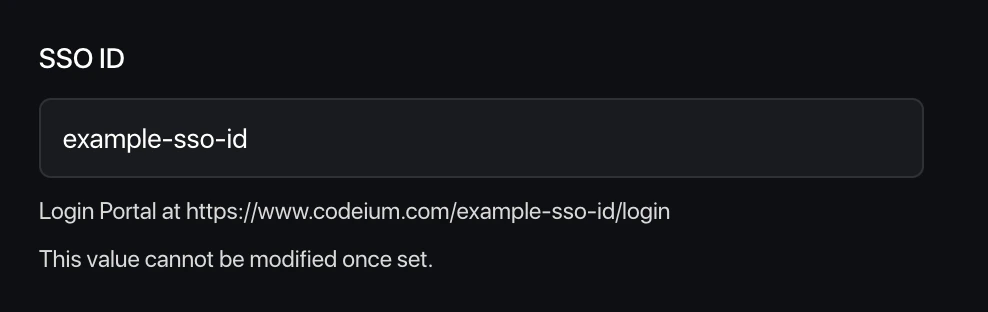
* **选择你的 SSO ID**:为团队的登录门户选择一个唯一标识符 (后续无法更改)
* **IdP 实体 ID**:从 **Microsoft Entra ID** 的 **设置 Devin Desktop** → **Microsoft Entra 标识符** 中复制该值
IdP 实体 ID URL 必须以尾随的 `/` 结尾 (例如 `https://sts.windows.net/{tenant-id}/`) 。如果该 URL 不包含末尾斜杠,请手动补上。
* **SSO URL**:从 **Microsoft Entra ID** 复制 **登录 URL** 的值
* **X509 证书**:从 **Microsoft Entra ID** 下载 **SAML 证书 (Base64) **,打开文件后,将其中的文本内容粘贴到这里
11. 在 **Devin Desktop portal** 中,点击 **启用使用 SAML 登录**,然后点击 **保存**。
12. **测试配置**:点击 **测试登录**,验证 SSO 配置是否正常生效。
**重要**:在成功完成登录测试之前,请勿退出登录或关闭 Devin Desktop 设置页面。如果测试失败,你可能需要先排查配置问题,再继续操作。
Devin Desktop Enterprise 现已支持通过 SAML 使用单点登录 (SSO) 进行登录。如果你的组织使用 Microsoft Entra、Okta、Google Workspaces 或其他支持 SAML 的身份提供商,你就可以在 Devin Desktop 中使用 SSO。
Devin Desktop 仅支持 SP 发起的 SSO;目前**不**支持 IDP 发起的 SSO。
### 配置 IDP 应用
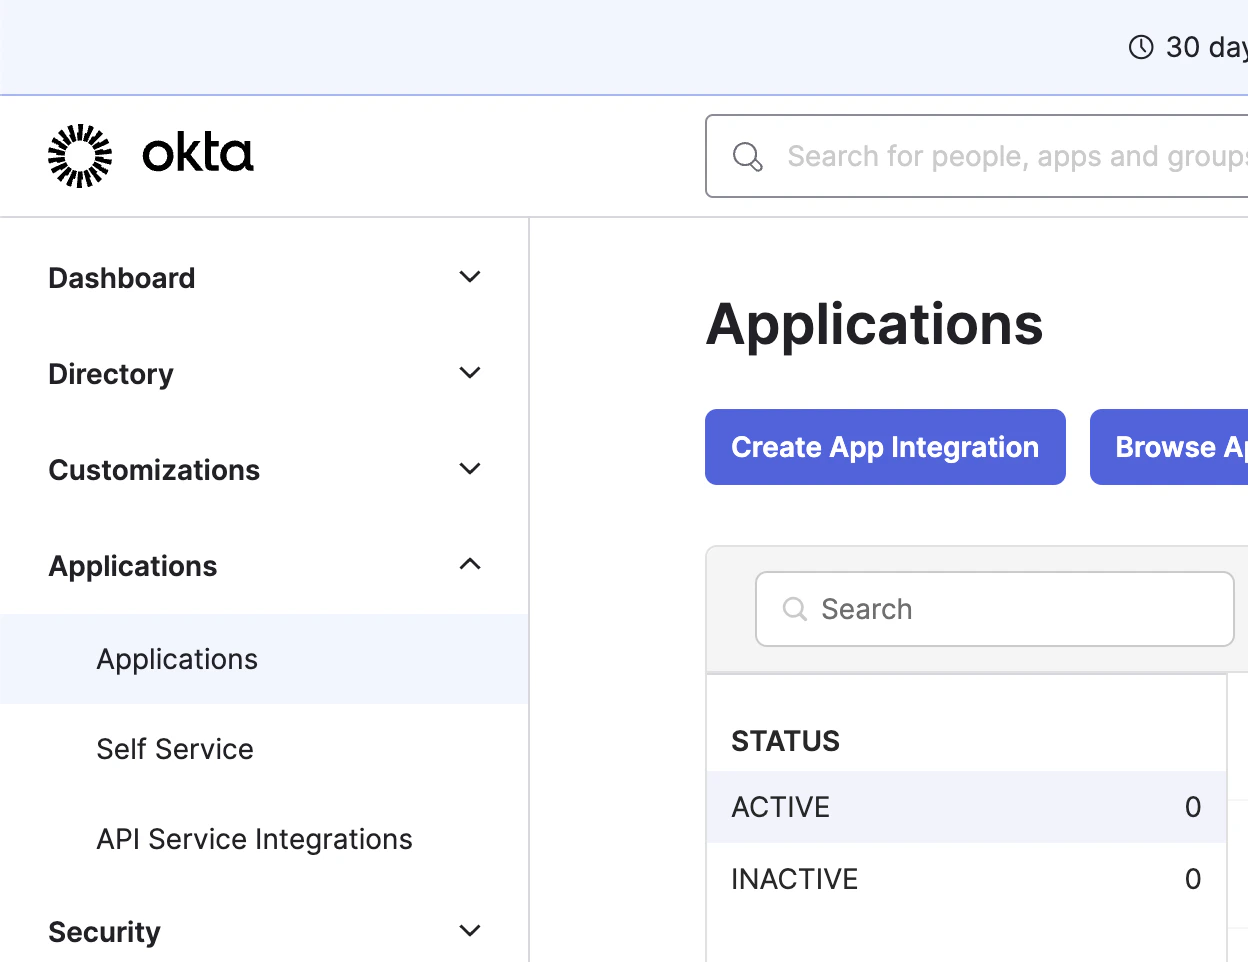
点击左侧边栏中的 Applications,然后点击 Create App Integration
## 第 2 部分:在 Microsoft Entra ID 中配置 SAML 和用户属性
本节中的所有步骤均在 **Microsoft Entra ID 管理中心** 中完成。
4. 在新建的 Devin Desktop 应用程序中,点击 **设置单点登录**,然后点击 **SAML**。
5. 在 **基本 SAML 配置** 下,点击 **编辑**。
6. **保持此 Entra ID 选项卡处于打开状态**,然后新开一个选项卡,前往 **Devin Desktop Teams SSO 设置**:[https://windsurf.com/team/settings。](https://windsurf.com/team/settings。)
7. 在 **Microsoft Entra ID** 的 SAML 配置表单中:
* **标识符 (实体 ID) **:从 **Devin Desktop SSO 设置页面** 复制 **SP 实体 ID** 的值
* **回复 URL (断言使用者服务 URL) **:从 **Devin Desktop SSO 设置页面** 复制 **回调 URL** 的值
* 点击顶部的 **保存**
8. 配置用户属性,以正确显示姓名。在 **Microsoft Entra ID** 中,进入 **属性和声明**,点击 **编辑**。
9. 点击 **添加新声明**,分别创建 2 个新声明:
* **第一个声明**:名称 = `firstName`,源属性 = `user.givenname`
* **第二个声明**:名称 = `lastName`,源属性 = `user.surname`
## 第 3 部分:在 Devin Desktop Portal 中配置 SSO 设置
请在 **Devin Desktop portal** ([https://windsurf.com/team/settings](https://windsurf.com/team/settings)) 中完成配置。
10. 在 **Devin Desktop SSO 设置页面** 中:
* **选择你的 SSO ID**:为团队的登录门户选择一个唯一标识符 (后续无法更改)
* **IdP 实体 ID**:从 **Microsoft Entra ID** 的 **设置 Devin Desktop** → **Microsoft Entra 标识符** 中复制该值
IdP 实体 ID URL 必须以尾随的 `/` 结尾 (例如 `https://sts.windows.net/{tenant-id}/`) 。如果该 URL 不包含末尾斜杠,请手动补上。
* **SSO URL**:从 **Microsoft Entra ID** 复制 **登录 URL** 的值
* **X509 证书**:从 **Microsoft Entra ID** 下载 **SAML 证书 (Base64) **,打开文件后,将其中的文本内容粘贴到这里
11. 在 **Devin Desktop portal** 中,点击 **启用使用 SAML 登录**,然后点击 **保存**。
12. **测试配置**:点击 **测试登录**,验证 SSO 配置是否正常生效。
**重要**:在成功完成登录测试之前,请勿退出登录或关闭 Devin Desktop 设置页面。如果测试失败,你可能需要先排查配置问题,再继续操作。
Devin Desktop Enterprise 现已支持通过 SAML 使用单点登录 (SSO) 进行登录。如果你的组织使用 Microsoft Entra、Okta、Google Workspaces 或其他支持 SAML 的身份提供商,你就可以在 Devin Desktop 中使用 SSO。
Devin Desktop 仅支持 SP 发起的 SSO;目前**不**支持 IDP 发起的 SSO。
### 配置 IDP 应用
点击左侧边栏中的 Applications,然后点击 Create App Integration
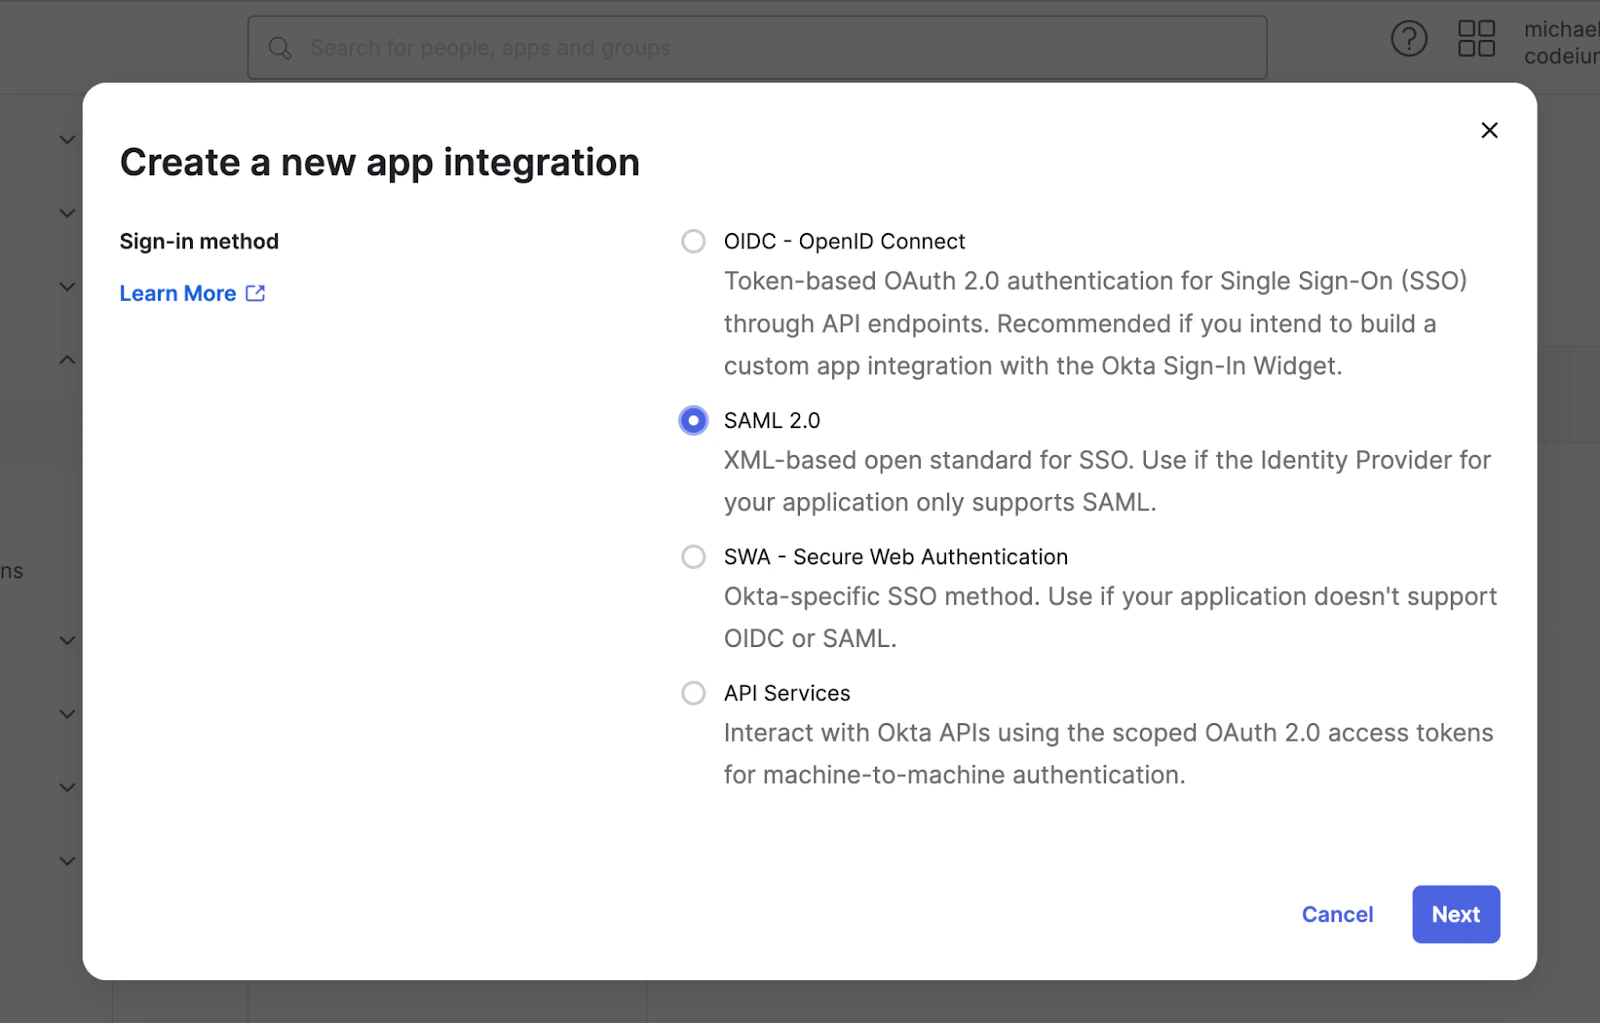
 选择 SAML 2.0 作为登录方式
 将应用名称设置为 Devin Desktop (或其他任意名称) ,然后点击 Next
将 SAML 设置配置如下
* 将 Single sign-on URL 设为 [https://auth.windsurf.com/\_\_/auth/handler](https://auth.windsurf.com/\_\_/auth/handler)
* 将 Audience URI (SP Entity ID) 设为 [www.codeium.com](http://www.codeium.com)
* 将 NameID format 设为 EmailAddress
* 将 Application username 设为 Email
按如下方式配置 attribute statements,然后点击 **Next**。
将应用名称设置为 Devin Desktop (或其他任意名称) ,然后点击 Next
将 SAML 设置配置如下
* 将 Single sign-on URL 设为 [https://auth.windsurf.com/\_\_/auth/handler](https://auth.windsurf.com/\_\_/auth/handler)
* 将 Audience URI (SP Entity ID) 设为 [www.codeium.com](http://www.codeium.com)
* 将 NameID format 设为 EmailAddress
* 将 Application username 设为 Email
按如下方式配置 attribute statements,然后点击 **Next**。
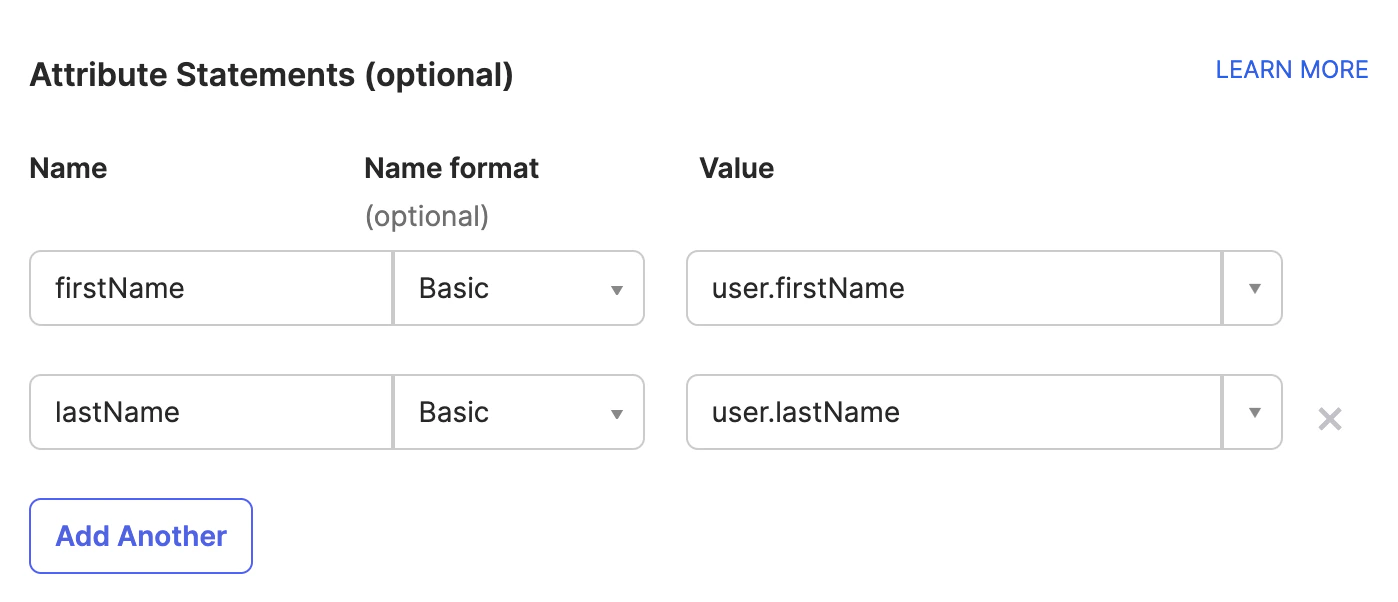 在反馈部分,选择“这是我们创建的内部应用”,然后点击 **Finish**。
### 将 Okta 注册为 SAML 提供商
你应该会被重定向到自定义 SAML 应用下的 Sign on 选项卡。接下来,你需要将此页面中的信息填写到 Devin Desktop 的 SSO 设置中。
* 打开 [https://windsurf.com/team/settings,然后点击](https://windsurf.com/team/settings,然后点击) Configure SAML
* 复制 Okta 应用页面中 ‘Issuer’ 后面的文本,并粘贴到 Idp Entity ID 中
* 复制 Okta 应用页面中 ‘Sign on URL’ 后面的文本,并粘贴到 SSO URL 中
* 下载 Signing Certificate,并将其粘贴到 X509 certificate 中
* 勾选 Enable Login with SAML,然后点击 Save
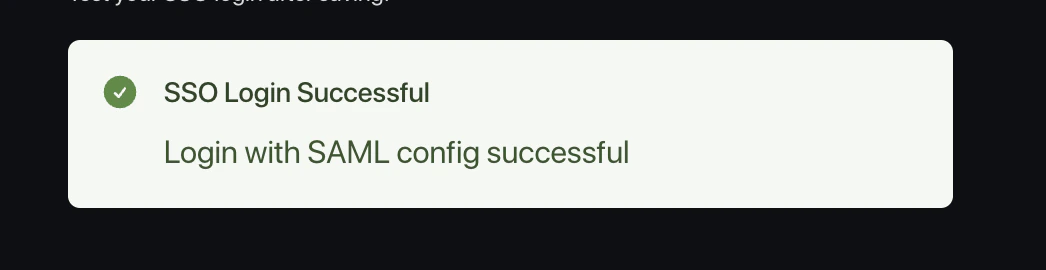
* 使用 Test Login 按钮测试登录。你应该会看到一条成功消息:
在反馈部分,选择“这是我们创建的内部应用”,然后点击 **Finish**。
### 将 Okta 注册为 SAML 提供商
你应该会被重定向到自定义 SAML 应用下的 Sign on 选项卡。接下来,你需要将此页面中的信息填写到 Devin Desktop 的 SSO 设置中。
* 打开 [https://windsurf.com/team/settings,然后点击](https://windsurf.com/team/settings,然后点击) Configure SAML
* 复制 Okta 应用页面中 ‘Issuer’ 后面的文本,并粘贴到 Idp Entity ID 中
* 复制 Okta 应用页面中 ‘Sign on URL’ 后面的文本,并粘贴到 SSO URL 中
* 下载 Signing Certificate,并将其粘贴到 X509 certificate 中
* 勾选 Enable Login with SAML,然后点击 Save
* 使用 Test Login 按钮测试登录。你应该会看到一条成功消息:
 此时应该已经完成全部配置,现在可以将用户添加到新的 Devin Desktop Okta 应用中。
你应将你的组织的自定义 Login Portal URL 分享给用户,并让他们通过该链接登录。
此时应该已经完成全部配置,现在可以将用户添加到新的 Devin Desktop Okta 应用中。
你应将你的组织的自定义 Login Portal URL 分享给用户,并让他们通过该链接登录。
 通过 SSO 登录 Devin Desktop 的用户会自动获批加入团队。
### 注意事项
请注意,Devin Desktop 目前不支持 IDP 发起的登录流程。
我们也暂不支持 OIDC。
# 故障排查
### 使用 SAML 配置登录失败:Firebase: Error (auth/operation-not-allowed)
通过 SSO 登录 Devin Desktop 的用户会自动获批加入团队。
### 注意事项
请注意,Devin Desktop 目前不支持 IDP 发起的登录流程。
我们也暂不支持 OIDC。
# 故障排查
### 使用 SAML 配置登录失败:Firebase: Error (auth/operation-not-allowed)
 这表明你的 SSO ID 无效,或者 SSO URL 不正确。请确保它仅包含字母数字字符,且没有多余空格或无效字符。请再次检查本指南中的步骤,并确认你使用了正确的值。
### 使用 SAML 配置登录失败:Firebase: SAML Response \ mismatch. (auth/invalid-credential)
这表明你的 SSO ID 无效,或者 SSO URL 不正确。请确保它仅包含字母数字字符,且没有多余空格或无效字符。请再次检查本指南中的步骤,并确认你使用了正确的值。
### 使用 SAML 配置登录失败:Firebase: SAML Response \ mismatch. (auth/invalid-credential)
 这表明你的 IdP entity ID 无效。请确认你已从 Okta 门户正确复制该值,且字符串前后没有多余字符或空格。
### 无法验证 samlresponse 中的签名
这表明你的 X509 certificate 值不正确,请确保你复制了正确的密钥,并且其格式如下:
```
-----BEGIN CERTIFICATE-----
value
------END CERTIFICATE------
```
Devin Desktop 支持通过 Microsoft Entra ID 对用户和组进行 SCIM 同步。使用 SCIM 同步无需配置 SSO (单点登录) ,但强烈建议启用。
你需要:
* Microsoft Entra ID 的 Admin 权限
* Devin Desktop 的 Admin 访问权限
* Entra ID 中现有的 Devin Desktop Application (通常是你现有的 SSO 应用)
**服务密钥所需权限**
用于 SCIM 预配的服务密钥必须具备以下权限:
* **Team User Read** - 必须具备,用于读取用户和组信息
* **Team User Update** - 必须具备,用于创建和更新用户及组
* **Team User Delete** - 必须具备,用于停用/删除用户及组
你可以创建一个包含这些权限的自定义角色,或使用包含这些权限的现有 Admin 角色。
## 步骤 1:创建具有 SCIM 权限的角色
在设置 SCIM 预配之前,你需要创建一个具有所需权限的角色。
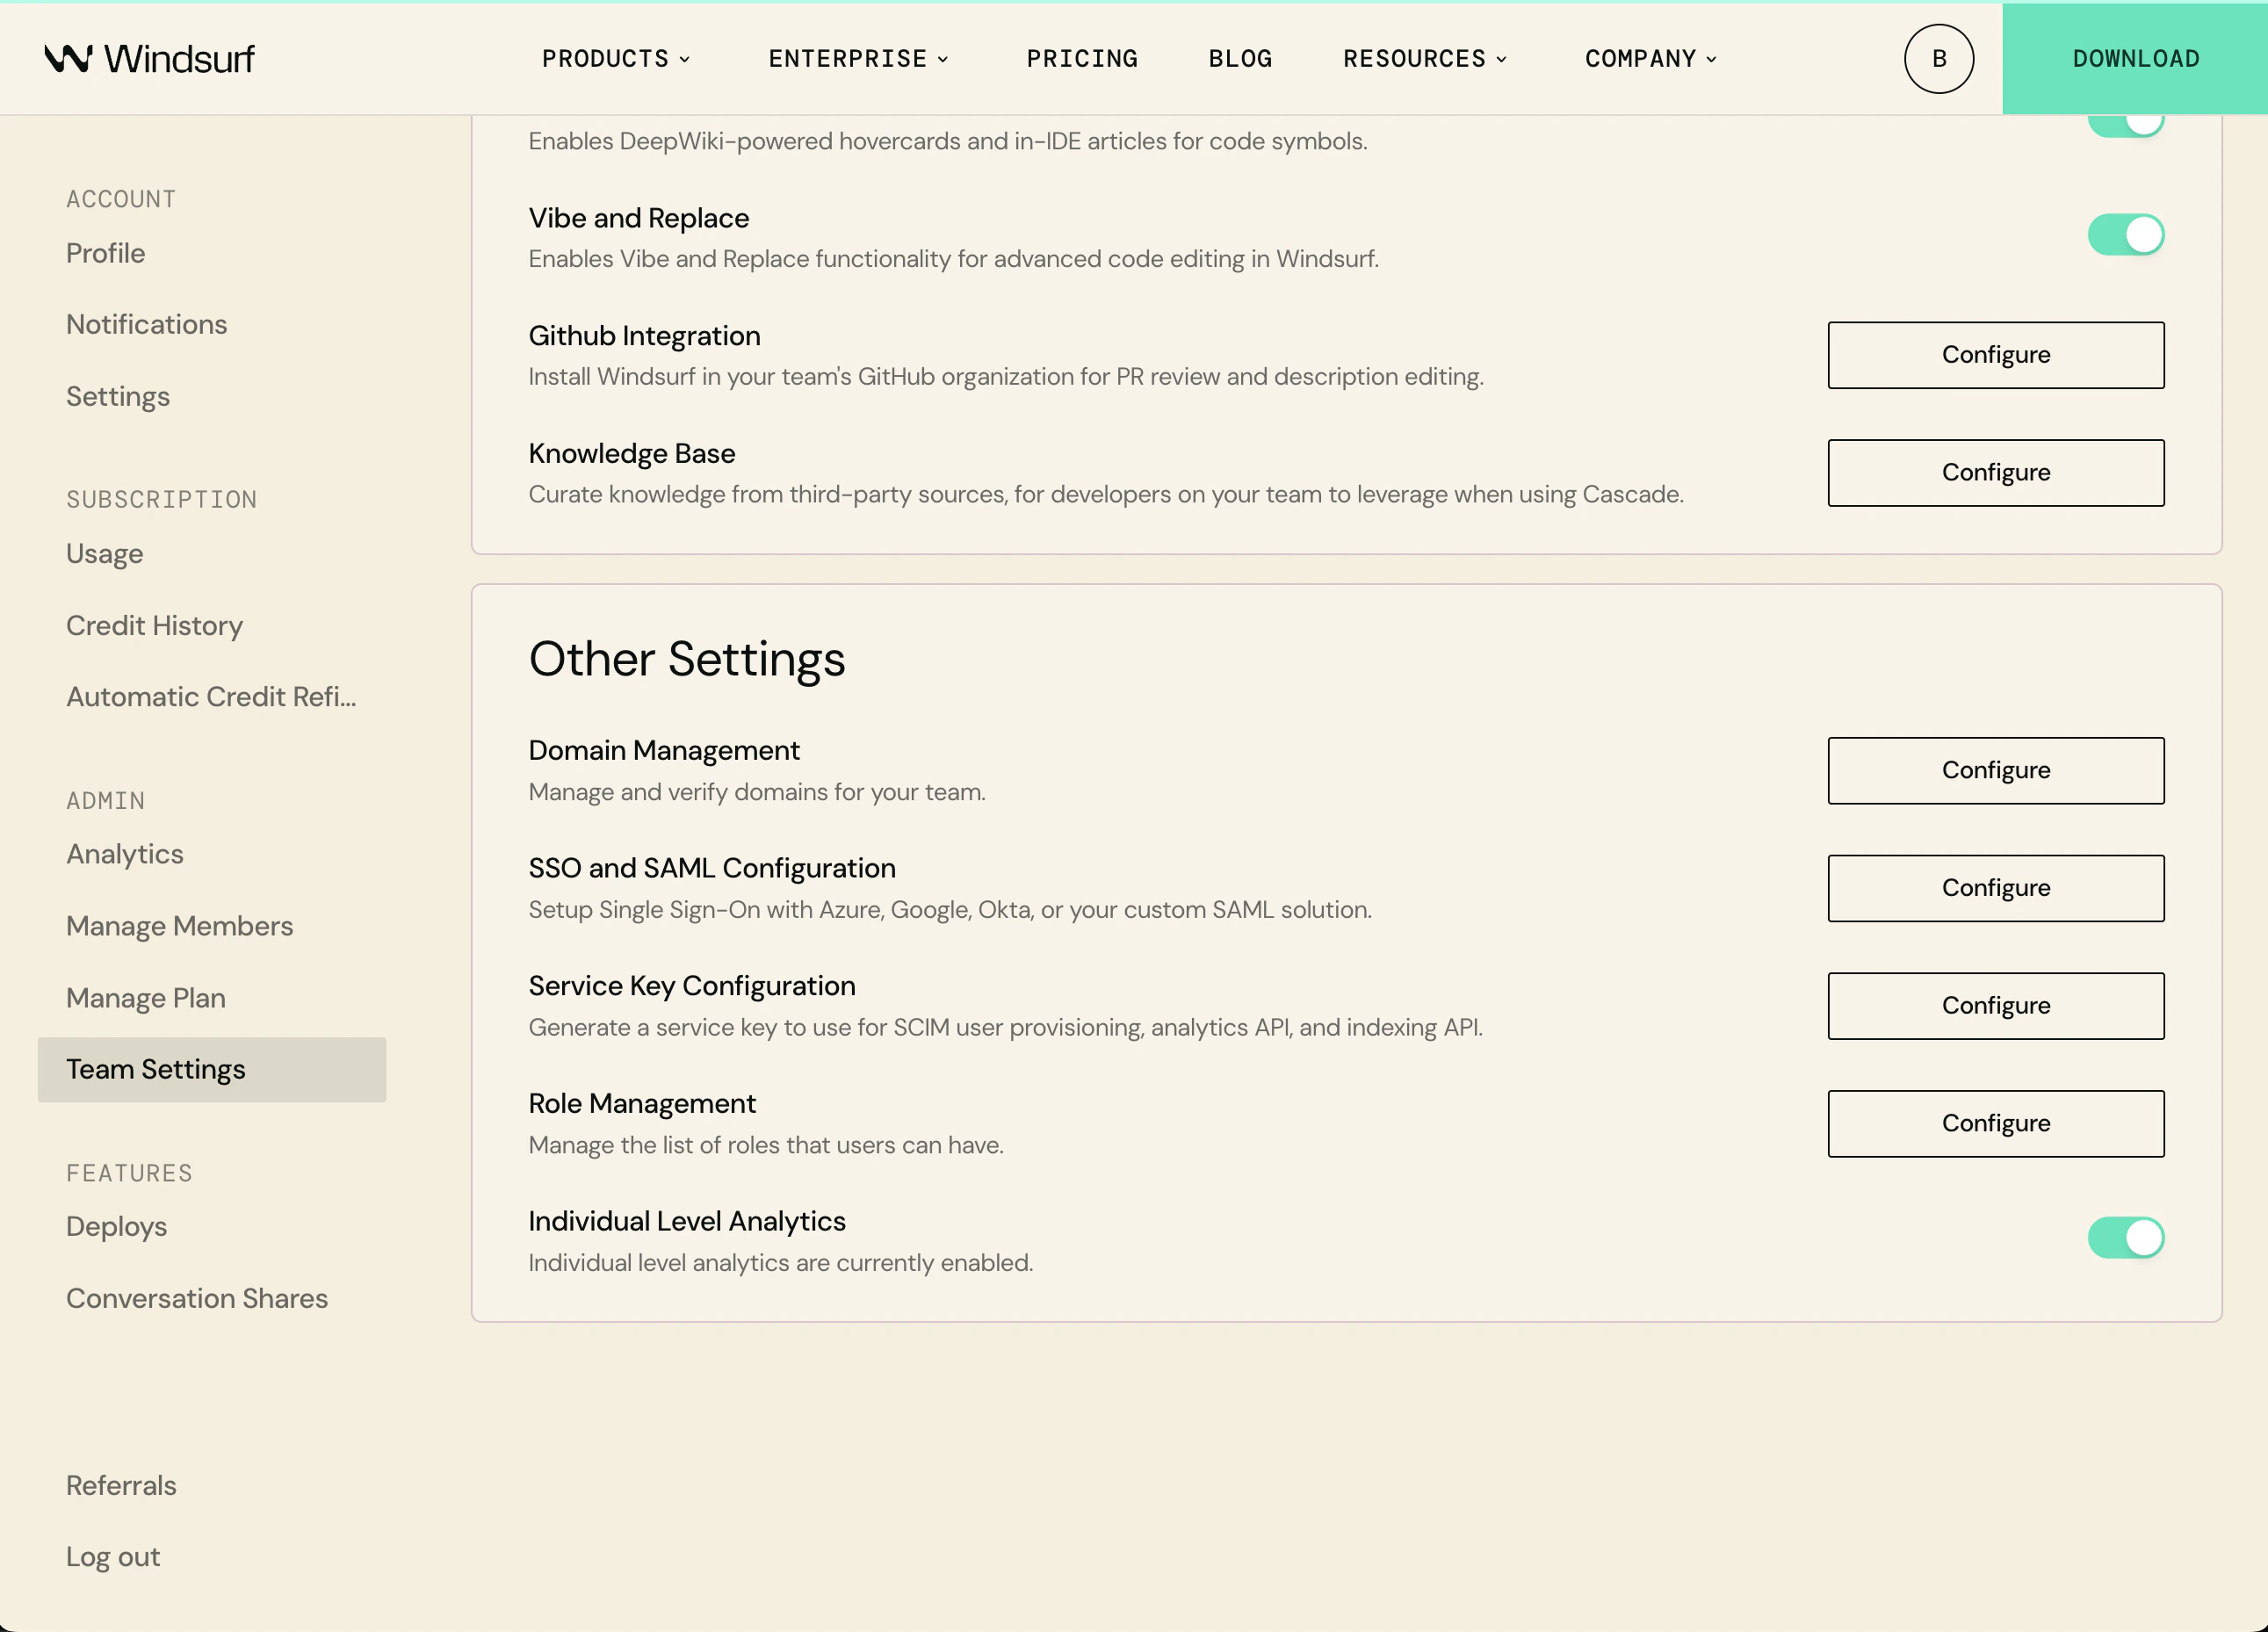
1. 前往 [Windsurf 团队设置](https://windsurf.com/team/settings)
2. 在“其他设置”中,点击 **角色管理** 旁边的 **配置**
3. 点击 **添加角色**,并将其命名为 "SCIM 预配"
4. 添加以下权限:
* 读取团队用户
* 更新团队用户
* 删除团队用户
5. 点击 **保存**
## 步骤 2:前往现有的 Devin Desktop Application
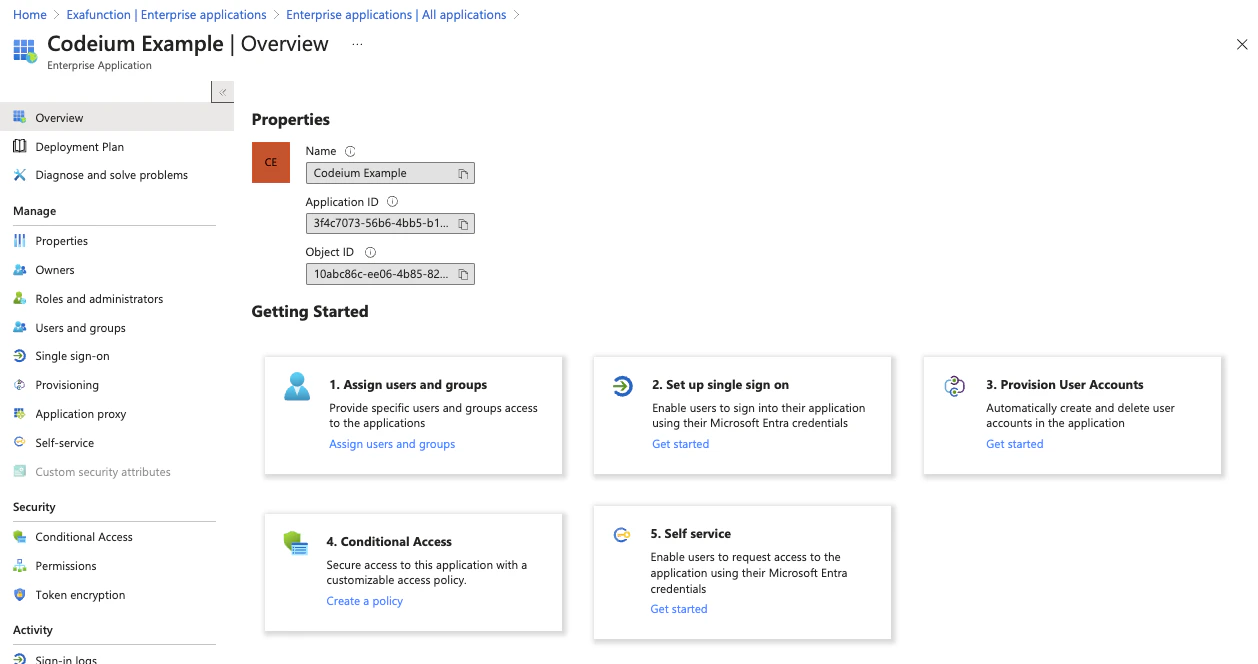
前往 Azure 上的 Microsoft Entra ID,点击左侧边栏中的 Enterprise applications,然后在列表中点击现有的 Devin Desktop 应用。
这表明你的 IdP entity ID 无效。请确认你已从 Okta 门户正确复制该值,且字符串前后没有多余字符或空格。
### 无法验证 samlresponse 中的签名
这表明你的 X509 certificate 值不正确,请确保你复制了正确的密钥,并且其格式如下:
```
-----BEGIN CERTIFICATE-----
value
------END CERTIFICATE------
```
Devin Desktop 支持通过 Microsoft Entra ID 对用户和组进行 SCIM 同步。使用 SCIM 同步无需配置 SSO (单点登录) ,但强烈建议启用。
你需要:
* Microsoft Entra ID 的 Admin 权限
* Devin Desktop 的 Admin 访问权限
* Entra ID 中现有的 Devin Desktop Application (通常是你现有的 SSO 应用)
**服务密钥所需权限**
用于 SCIM 预配的服务密钥必须具备以下权限:
* **Team User Read** - 必须具备,用于读取用户和组信息
* **Team User Update** - 必须具备,用于创建和更新用户及组
* **Team User Delete** - 必须具备,用于停用/删除用户及组
你可以创建一个包含这些权限的自定义角色,或使用包含这些权限的现有 Admin 角色。
## 步骤 1:创建具有 SCIM 权限的角色
在设置 SCIM 预配之前,你需要创建一个具有所需权限的角色。
1. 前往 [Windsurf 团队设置](https://windsurf.com/team/settings)
2. 在“其他设置”中,点击 **角色管理** 旁边的 **配置**
3. 点击 **添加角色**,并将其命名为 "SCIM 预配"
4. 添加以下权限:
* 读取团队用户
* 更新团队用户
* 删除团队用户
5. 点击 **保存**
## 步骤 2:前往现有的 Devin Desktop Application
前往 Azure 上的 Microsoft Entra ID,点击左侧边栏中的 Enterprise applications,然后在列表中点击现有的 Devin Desktop 应用。
 ## 步骤 3:设置 SCIM 预配
点击中间"Provision User Accounts"下方的"Get started" (步骤 3) ,然后再次点击"Get started"。
## 步骤 3:设置 SCIM 预配
点击中间"Provision User Accounts"下方的"Get started" (步骤 3) ,然后再次点击"Get started"。
 在"预配"设置页面中,选择以下选项。
预配模式:自动
Admin 凭据 > Tenant URL: [https://server.codeium.com/scim/v2](https://server.codeium.com/scim/v2)
在"预配"设置页面中,选择以下选项。
预配模式:自动
Admin 凭据 > Tenant URL: [https://server.codeium.com/scim/v2](https://server.codeium.com/scim/v2)
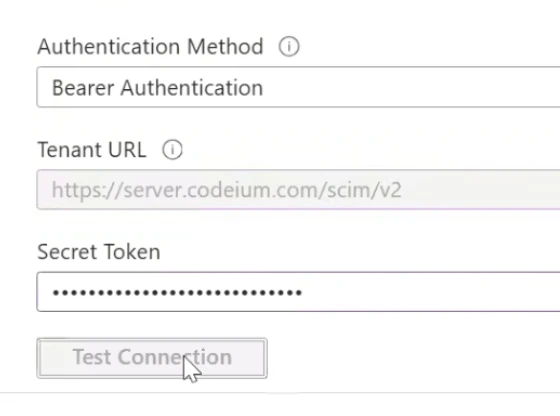 保持 Azure 预配页面处于打开状态,前往 Devin Desktop 网页门户,点击页面顶部导航栏中的 Profile 图标。在团队设置下,选择 Service Key,然后点击 Add Service Key。输入任意密钥名称 (例如"Azure SCIM Provisioning") ,**选择你之前创建的"SCIM Provisioning"角色**,然后点击 Create Service Key。复制生成的密钥,返回 Azure 页面,将其粘贴到 Secret Token 字段中。
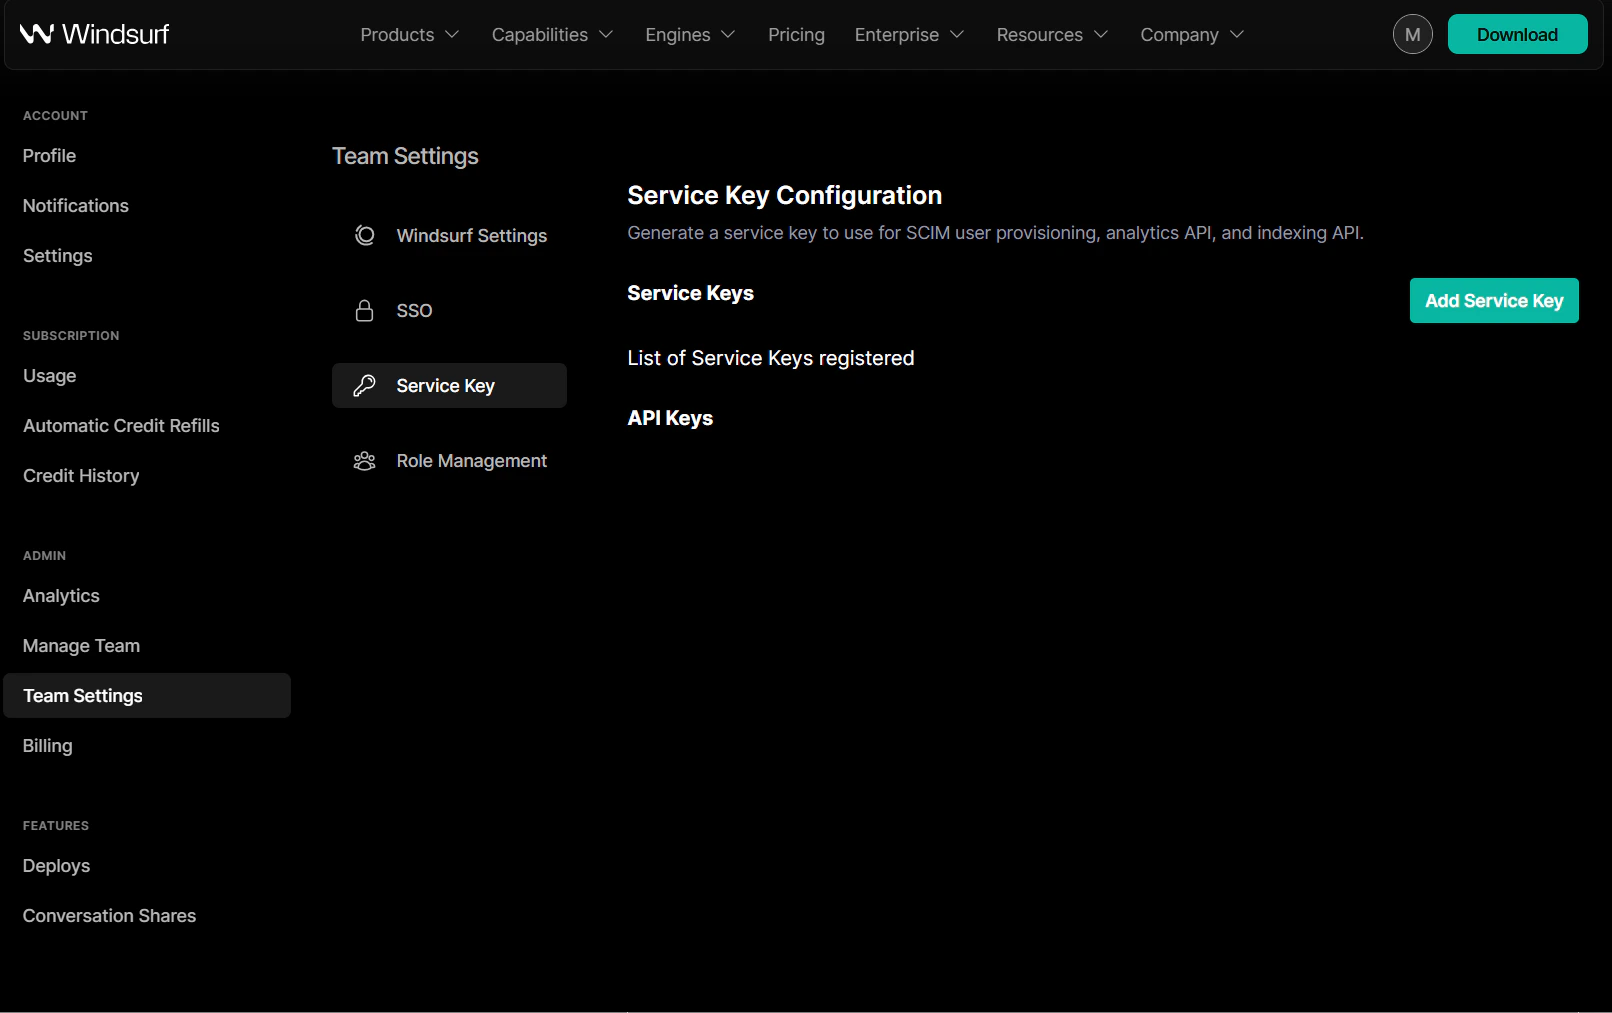 (在 Devin Desktop 上创建密钥后你应看到的内容)
在预配页面上,点击"Test Connection",验证 SCIM 连接。
现在点击预配表单上方的"保存"。
## 步骤 4:配置 SCIM 预配
点击"保存"后,预配页面中应出现一个新选项"映射"。展开"映射",然后点击"预配 Microsoft Entra ID 用户"
(在 Devin Desktop 上创建密钥后你应看到的内容)
在预配页面上,点击"Test Connection",验证 SCIM 连接。
现在点击预配表单上方的"保存"。
## 步骤 4:配置 SCIM 预配
点击"保存"后,预配页面中应出现一个新选项"映射"。展开"映射",然后点击"预配 Microsoft Entra ID 用户"
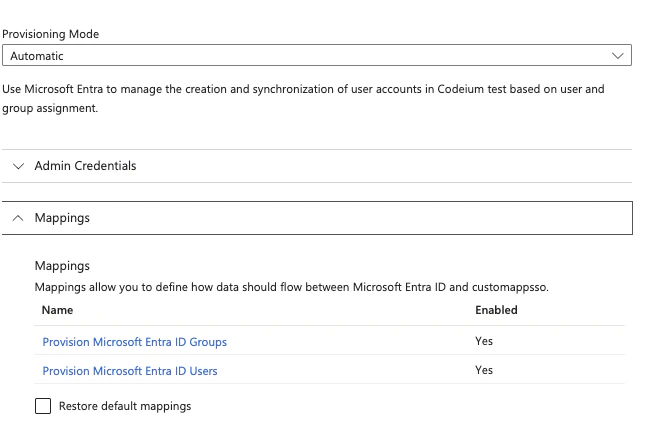 在属性映射下,删除 displayName 下的所有字段,仅保留 userName、active 和 displayName 字段。
 对于 active,点击"编辑"。在"表达式"下,将字段修改为
```
NOT([IsSoftDeleted])
```
然后点击确定。
你的用户属性应如下所示
对于 active,点击"编辑"。在"表达式"下,将字段修改为
```
NOT([IsSoftDeleted])
```
然后点击确定。
你的用户属性应如下所示
 在属性映射页面中,点击顶部的"保存",然后返回预配页面。
在同一页面上,点击 Mappings 下的 Provision Microsoft Entra ID Groups。仅点击 externalId 对应的删除按钮,然后点击顶部的 Save。返回预配页面。
在属性映射页面中,点击顶部的"保存",然后返回预配页面。
在同一页面上,点击 Mappings 下的 Provision Microsoft Entra ID Groups。仅点击 externalId 对应的删除按钮,然后点击顶部的 Save。返回预配页面。
 在"预配"页面底部,还应有一个"预配状态"开关。将其设置为"开"以启用 SCIM 同步。此后,Entra ID 应用程序中的用户和组将每隔 40 分钟自动同步到 Devin Desktop。
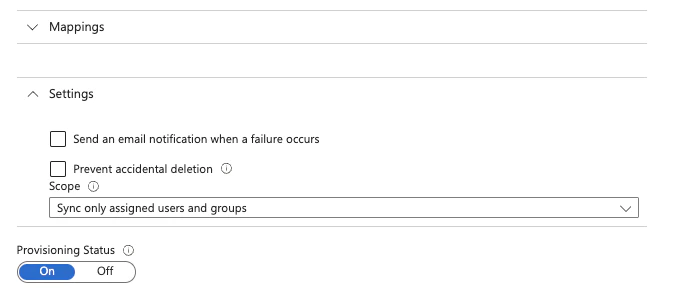 点击"保存"完成设置,你已成功为 SCIM 启用用户和组同步。只有分配给该应用的用户和组才会同步到 Devin Desktop。请注意,由于 Azure SCIM 的设计机制,移除用户只会禁用其对 Devin Desktop 的访问权限 (并释放其占用的席位) ,而不会将其删除。
Devin Desktop 支持通过 Okta 对用户和组进行 SCIM 同步。使用 SCIM 同步不一定需要设置 SSO,但强烈建议配置。
你需要:
* 拥有 Okta 的 Admin 访问权限
* 拥有 Devin Desktop 的 Admin 访问权限
* Okta 上已有一个 Devin Desktop Application (通常是你现有 SSO 应用的一部分)
## 步骤 1:前往现有的 Devin Desktop Application
前往 Okta,点击左侧边栏中的 Applications,然后在应用列表中点击现有的 Devin Desktop application。
## 步骤 2:启用 SCIM 预配
在 general 选项卡下的 App Settings 中,点击右上角的 Edit。然后勾选 'Enable SCIM Provisioning' 复选框,再点击 Save。顶部应会出现一个新的 provisioning 选项卡。
现在前往 provisioning,点击 Edit,并在以下字段中输入:
SCIM connector base URL: [https://server.codeium.com/scim/v2](https://server.codeium.com/scim/v2)
用户的唯一标识字段:email
支持的预配操作:Push New Users、Push Profile Updates、Push Groups
身份验证模式:HTTP Header
对于 HTTP Header - Authorization,你可以在以下位置生成令牌:
* 前往 [https://windsurf.com/team/settings](https://windsurf.com/team/settings) 并进入 Service Key Configuration
* 点击 Configure,然后点击 Add Service Key,并为你的 API key 命名
* 复制 API key,返回 Okta 并将其粘贴到 HTTP Header - Authorization 中
填写完 Provisioning Integration 后,点击 Save。
## 步骤 3:设置预配
在 provisioning 选项卡下,左侧应该会出现两个新选项卡。点击 To App,然后点击 Edit Provisioning to App。勾选 Create Users、Update User Attributes 和 Deactivate Users 对应的复选框,然后点击 Save。
完成此步骤后,分配到该组的所有用户都会同步到 Devin Desktop。
## 步骤 4:设置组预配 (可选)
要将组同步到 Devin Desktop,你需要指定要推送的组。在该应用中,点击顶部的 Push Groups 选项卡。然后点击 + Push Groups -> Find Groups by name。筛选出你要添加的组,确保已勾选 Push group memberships immediately,然后点击 Save。该组将被创建,组成员也会同步到 Devin Desktop。之后,这些组可用于在 analytics 页面中按组筛选 analytics 数据。
本指南介绍如何使用 SCIM API 在 Devin Desktop 中创建和管理组。
在某些情况下,企业可能希望手动配置组,而非通过 Identity Provider (Azure/Okta) 进行配置。例如,企业可能希望从 Devin Desktop 无法访问的其他内部系统 (如 HR 网站、源代码管理工具等) 同步组信息,或者需要比 Identity Provider 更精细的组管理控制。此时,可以通过 API 以 HTTP 请求的方式创建组。以下提供了通过 CURL 发起 HTTP 请求的示例。
此处共有 5 个主要 API:创建组、添加组成员、替换组成员、删除组以及列出组中的用户。
### 创建组
```
curl -k -X POST https://server.codeium.com/scim/v2/Groups -d '{
"displayName": "",
"schemas": ["urn:ietf:params:scim:schemas:core:2.0:Group"]
}' -H "Authorization: Bearer " -H "Content-Type: application/scim+json"
```
### 添加组成员
```
curl -X PATCH https://server.codeium.com/scim/v2/Groups/ -d '{"schemas": ["urn:ietf:params:scim:api:messages:2.0:PatchOp"],
"Operations":[
{
"op": "add",
"path":"members",
"value": [{"value": ""}, {"value": ""}]
}]}' -H "Authorization: Bearer " -H "Content-Type: application/scim+json"
```
### 替换组成员
```
curl -X PATCH https://server.codeium.com/scim/v2/Groups/ -d '{"schemas": ["urn:ietf:params:scim:api:messages:2.0:PatchOp"],
"Operations":[
{
"op": "replace",
"path":"members",
"value": [{"value": ""}, {"value": ""}]
}]}' -H "Authorization: Bearer " -H "Content-Type: application/scim+json"
```
### 删除组
```
curl -X DELETE https://server.codeium.com/scim/v2/Groups/ -H "Authorization: Bearer " -H "Content-Type: application/scim+json"
```
### 列出组
```
curl -X GET -H "Authorization: Bearer " "https://server.codeium.com/scim/v2/Groups"
```
### 列出组中的用户
```
curl -X GET -H "Authorization: Bearer " "https://server.codeium.com/scim/v2/Groups/"
```
你至少需要先创建组,然后再替换组以创建包含成员的组。如果组名中含有空格等特殊字符,还需要对组名进行 URL 编码,例如组名 'Engineering Group' 在 URL 中需写为 'Engineering%20Group'。
请注意,用户需要先在 Devin Desktop 中完成账户创建 (通过 SCIM 或手动创建) ,之后才能被添加到组中。
## 用户 API
此外,也提供面向用户的 API。以下是 Devin Desktop 支持的一些常用 SCIM API。
禁用用户 (如需启用,将 false 替换为 true) :
```
curl -X PATCH \
https://server.codeium.com/scim/v2/Users/ \
-H 'Content-Type: application/scim+json' \
-H 'Authorization: Bearer ' \
-d '{
"schemas": ["urn:ietf:params:scim:api:messages:2.0:PatchOp"],
"Operations": [
{
"op": "replace",
"path": "active",
"value": false
}
]
}'
```
禁用用户的 CLI 访问权限 (将 `cliActive` 设置为 `true` 可重新启用) :
```
curl -X PATCH \
https://server.codeium.com/scim/v2/Users/ \
-H 'Content-Type: application/scim+json' \
-H 'Authorization: Bearer ' \
-d '{
"schemas": ["urn:ietf:params:scim:api:messages:2.0:PatchOp"],
"Operations": [
{
"op": "replace",
"path": "cliActive",
"value": false
}
]
}'
```
`cliActive` 属性用于控制用户是否可以访问 Devin CLI。它与 `active` 属性相互独立——禁用 CLI 访问权限不会影响用户的席位或其对其他 Devin Desktop 产品的访问权限。如果未为用户设置 `cliActive`,则该用户将沿用团队的默认 CLI 访问策略。
创建用户:
```
curl -X POST \
https://server.codeium.com/scim/v2/Users \
-H 'Content-Type: application/scim+json' \
-H 'Authorization: Bearer ' \
-d '{
"schemas": ["urn:ietf:params:scim:schemas:core:2.0:User"],
"userName": "",
"displayName": "",
"active": true
}'
```
更新名称:
```
curl -X PATCH \
'https:///_route/api_server/scim/v2/Users/' \
-H 'Authorization: Bearer ' \
-H 'Content-Type: application/scim+json' \
-d '{
"schemas": ["urn:ietf:params:scim:api:messages:2.0:PatchOp"],
"Operations": [
{
"op": "Replace",
"path": "displayName",
"value": ""
}
]
}'
```
## 创建 API 密钥
前往 [https://windsurf.com/team/settings。在](https://windsurf.com/team/settings。在) Service Key Configuration 下,点击 Add Service Key。输入任意密钥名称 (例如"Azure Provisioning Key") ,然后点击 Create Service Key。复制生成的密钥并妥善保存,之后即可使用该密钥对上述 API 进行授权。
## 前提条件
本指南假设你已配置 Duo,并将其作为你的组织 IdP,或者已配置外部 IdP。
你需要同时拥有 Duo 和 Devin Desktop 账户的管理员权限。
## 为 Devin Desktop 配置 Duo
1. 前往 Applications,添加一个 Generic SAML service provider
点击"保存"完成设置,你已成功为 SCIM 启用用户和组同步。只有分配给该应用的用户和组才会同步到 Devin Desktop。请注意,由于 Azure SCIM 的设计机制,移除用户只会禁用其对 Devin Desktop 的访问权限 (并释放其占用的席位) ,而不会将其删除。
Devin Desktop 支持通过 Okta 对用户和组进行 SCIM 同步。使用 SCIM 同步不一定需要设置 SSO,但强烈建议配置。
你需要:
* 拥有 Okta 的 Admin 访问权限
* 拥有 Devin Desktop 的 Admin 访问权限
* Okta 上已有一个 Devin Desktop Application (通常是你现有 SSO 应用的一部分)
## 步骤 1:前往现有的 Devin Desktop Application
前往 Okta,点击左侧边栏中的 Applications,然后在应用列表中点击现有的 Devin Desktop application。
## 步骤 2:启用 SCIM 预配
在 general 选项卡下的 App Settings 中,点击右上角的 Edit。然后勾选 'Enable SCIM Provisioning' 复选框,再点击 Save。顶部应会出现一个新的 provisioning 选项卡。
现在前往 provisioning,点击 Edit,并在以下字段中输入:
SCIM connector base URL: [https://server.codeium.com/scim/v2](https://server.codeium.com/scim/v2)
用户的唯一标识字段:email
支持的预配操作:Push New Users、Push Profile Updates、Push Groups
身份验证模式:HTTP Header
对于 HTTP Header - Authorization,你可以在以下位置生成令牌:
* 前往 [https://windsurf.com/team/settings](https://windsurf.com/team/settings) 并进入 Service Key Configuration
* 点击 Configure,然后点击 Add Service Key,并为你的 API key 命名
* 复制 API key,返回 Okta 并将其粘贴到 HTTP Header - Authorization 中
填写完 Provisioning Integration 后,点击 Save。
## 步骤 3:设置预配
在 provisioning 选项卡下,左侧应该会出现两个新选项卡。点击 To App,然后点击 Edit Provisioning to App。勾选 Create Users、Update User Attributes 和 Deactivate Users 对应的复选框,然后点击 Save。
完成此步骤后,分配到该组的所有用户都会同步到 Devin Desktop。
## 步骤 4:设置组预配 (可选)
要将组同步到 Devin Desktop,你需要指定要推送的组。在该应用中,点击顶部的 Push Groups 选项卡。然后点击 + Push Groups -> Find Groups by name。筛选出你要添加的组,确保已勾选 Push group memberships immediately,然后点击 Save。该组将被创建,组成员也会同步到 Devin Desktop。之后,这些组可用于在 analytics 页面中按组筛选 analytics 数据。
本指南介绍如何使用 SCIM API 在 Devin Desktop 中创建和管理组。
在某些情况下,企业可能希望手动配置组,而非通过 Identity Provider (Azure/Okta) 进行配置。例如,企业可能希望从 Devin Desktop 无法访问的其他内部系统 (如 HR 网站、源代码管理工具等) 同步组信息,或者需要比 Identity Provider 更精细的组管理控制。此时,可以通过 API 以 HTTP 请求的方式创建组。以下提供了通过 CURL 发起 HTTP 请求的示例。
此处共有 5 个主要 API:创建组、添加组成员、替换组成员、删除组以及列出组中的用户。
### 创建组
```
curl -k -X POST https://server.codeium.com/scim/v2/Groups -d '{
"displayName": "",
"schemas": ["urn:ietf:params:scim:schemas:core:2.0:Group"]
}' -H "Authorization: Bearer " -H "Content-Type: application/scim+json"
```
### 添加组成员
```
curl -X PATCH https://server.codeium.com/scim/v2/Groups/ -d '{"schemas": ["urn:ietf:params:scim:api:messages:2.0:PatchOp"],
"Operations":[
{
"op": "add",
"path":"members",
"value": [{"value": ""}, {"value": ""}]
}]}' -H "Authorization: Bearer " -H "Content-Type: application/scim+json"
```
### 替换组成员
```
curl -X PATCH https://server.codeium.com/scim/v2/Groups/ -d '{"schemas": ["urn:ietf:params:scim:api:messages:2.0:PatchOp"],
"Operations":[
{
"op": "replace",
"path":"members",
"value": [{"value": ""}, {"value": ""}]
}]}' -H "Authorization: Bearer " -H "Content-Type: application/scim+json"
```
### 删除组
```
curl -X DELETE https://server.codeium.com/scim/v2/Groups/ -H "Authorization: Bearer " -H "Content-Type: application/scim+json"
```
### 列出组
```
curl -X GET -H "Authorization: Bearer " "https://server.codeium.com/scim/v2/Groups"
```
### 列出组中的用户
```
curl -X GET -H "Authorization: Bearer " "https://server.codeium.com/scim/v2/Groups/"
```
你至少需要先创建组,然后再替换组以创建包含成员的组。如果组名中含有空格等特殊字符,还需要对组名进行 URL 编码,例如组名 'Engineering Group' 在 URL 中需写为 'Engineering%20Group'。
请注意,用户需要先在 Devin Desktop 中完成账户创建 (通过 SCIM 或手动创建) ,之后才能被添加到组中。
## 用户 API
此外,也提供面向用户的 API。以下是 Devin Desktop 支持的一些常用 SCIM API。
禁用用户 (如需启用,将 false 替换为 true) :
```
curl -X PATCH \
https://server.codeium.com/scim/v2/Users/ \
-H 'Content-Type: application/scim+json' \
-H 'Authorization: Bearer ' \
-d '{
"schemas": ["urn:ietf:params:scim:api:messages:2.0:PatchOp"],
"Operations": [
{
"op": "replace",
"path": "active",
"value": false
}
]
}'
```
禁用用户的 CLI 访问权限 (将 `cliActive` 设置为 `true` 可重新启用) :
```
curl -X PATCH \
https://server.codeium.com/scim/v2/Users/ \
-H 'Content-Type: application/scim+json' \
-H 'Authorization: Bearer ' \
-d '{
"schemas": ["urn:ietf:params:scim:api:messages:2.0:PatchOp"],
"Operations": [
{
"op": "replace",
"path": "cliActive",
"value": false
}
]
}'
```
`cliActive` 属性用于控制用户是否可以访问 Devin CLI。它与 `active` 属性相互独立——禁用 CLI 访问权限不会影响用户的席位或其对其他 Devin Desktop 产品的访问权限。如果未为用户设置 `cliActive`,则该用户将沿用团队的默认 CLI 访问策略。
创建用户:
```
curl -X POST \
https://server.codeium.com/scim/v2/Users \
-H 'Content-Type: application/scim+json' \
-H 'Authorization: Bearer ' \
-d '{
"schemas": ["urn:ietf:params:scim:schemas:core:2.0:User"],
"userName": "",
"displayName": "",
"active": true
}'
```
更新名称:
```
curl -X PATCH \
'https:///_route/api_server/scim/v2/Users/' \
-H 'Authorization: Bearer ' \
-H 'Content-Type: application/scim+json' \
-d '{
"schemas": ["urn:ietf:params:scim:api:messages:2.0:PatchOp"],
"Operations": [
{
"op": "Replace",
"path": "displayName",
"value": ""
}
]
}'
```
## 创建 API 密钥
前往 [https://windsurf.com/team/settings。在](https://windsurf.com/team/settings。在) Service Key Configuration 下,点击 Add Service Key。输入任意密钥名称 (例如"Azure Provisioning Key") ,然后点击 Create Service Key。复制生成的密钥并妥善保存,之后即可使用该密钥对上述 API 进行授权。
## 前提条件
本指南假设你已配置 Duo,并将其作为你的组织 IdP,或者已配置外部 IdP。
你需要同时拥有 Duo 和 Devin Desktop 账户的管理员权限。
## 为 Devin Desktop 配置 Duo
1. 前往 Applications,添加一个 Generic SAML service provider
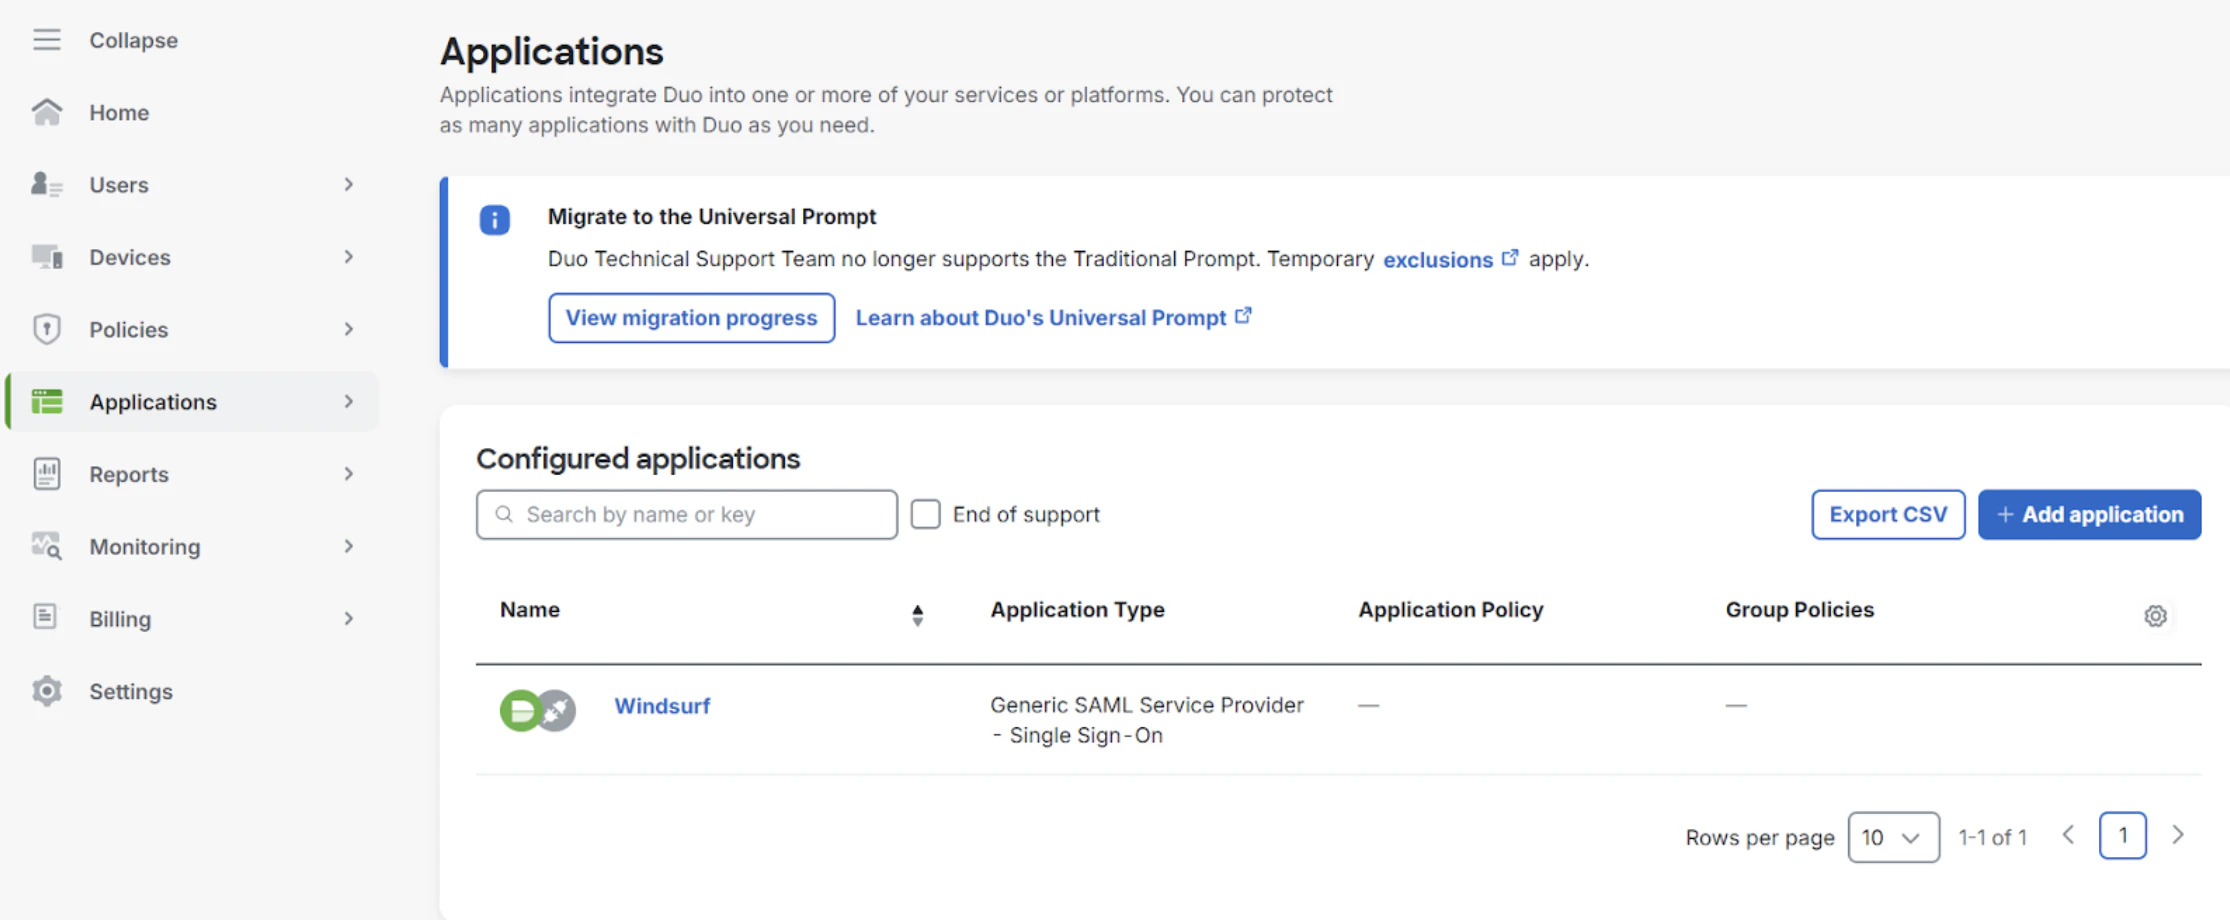 2. 前往团队设置中的 SSO
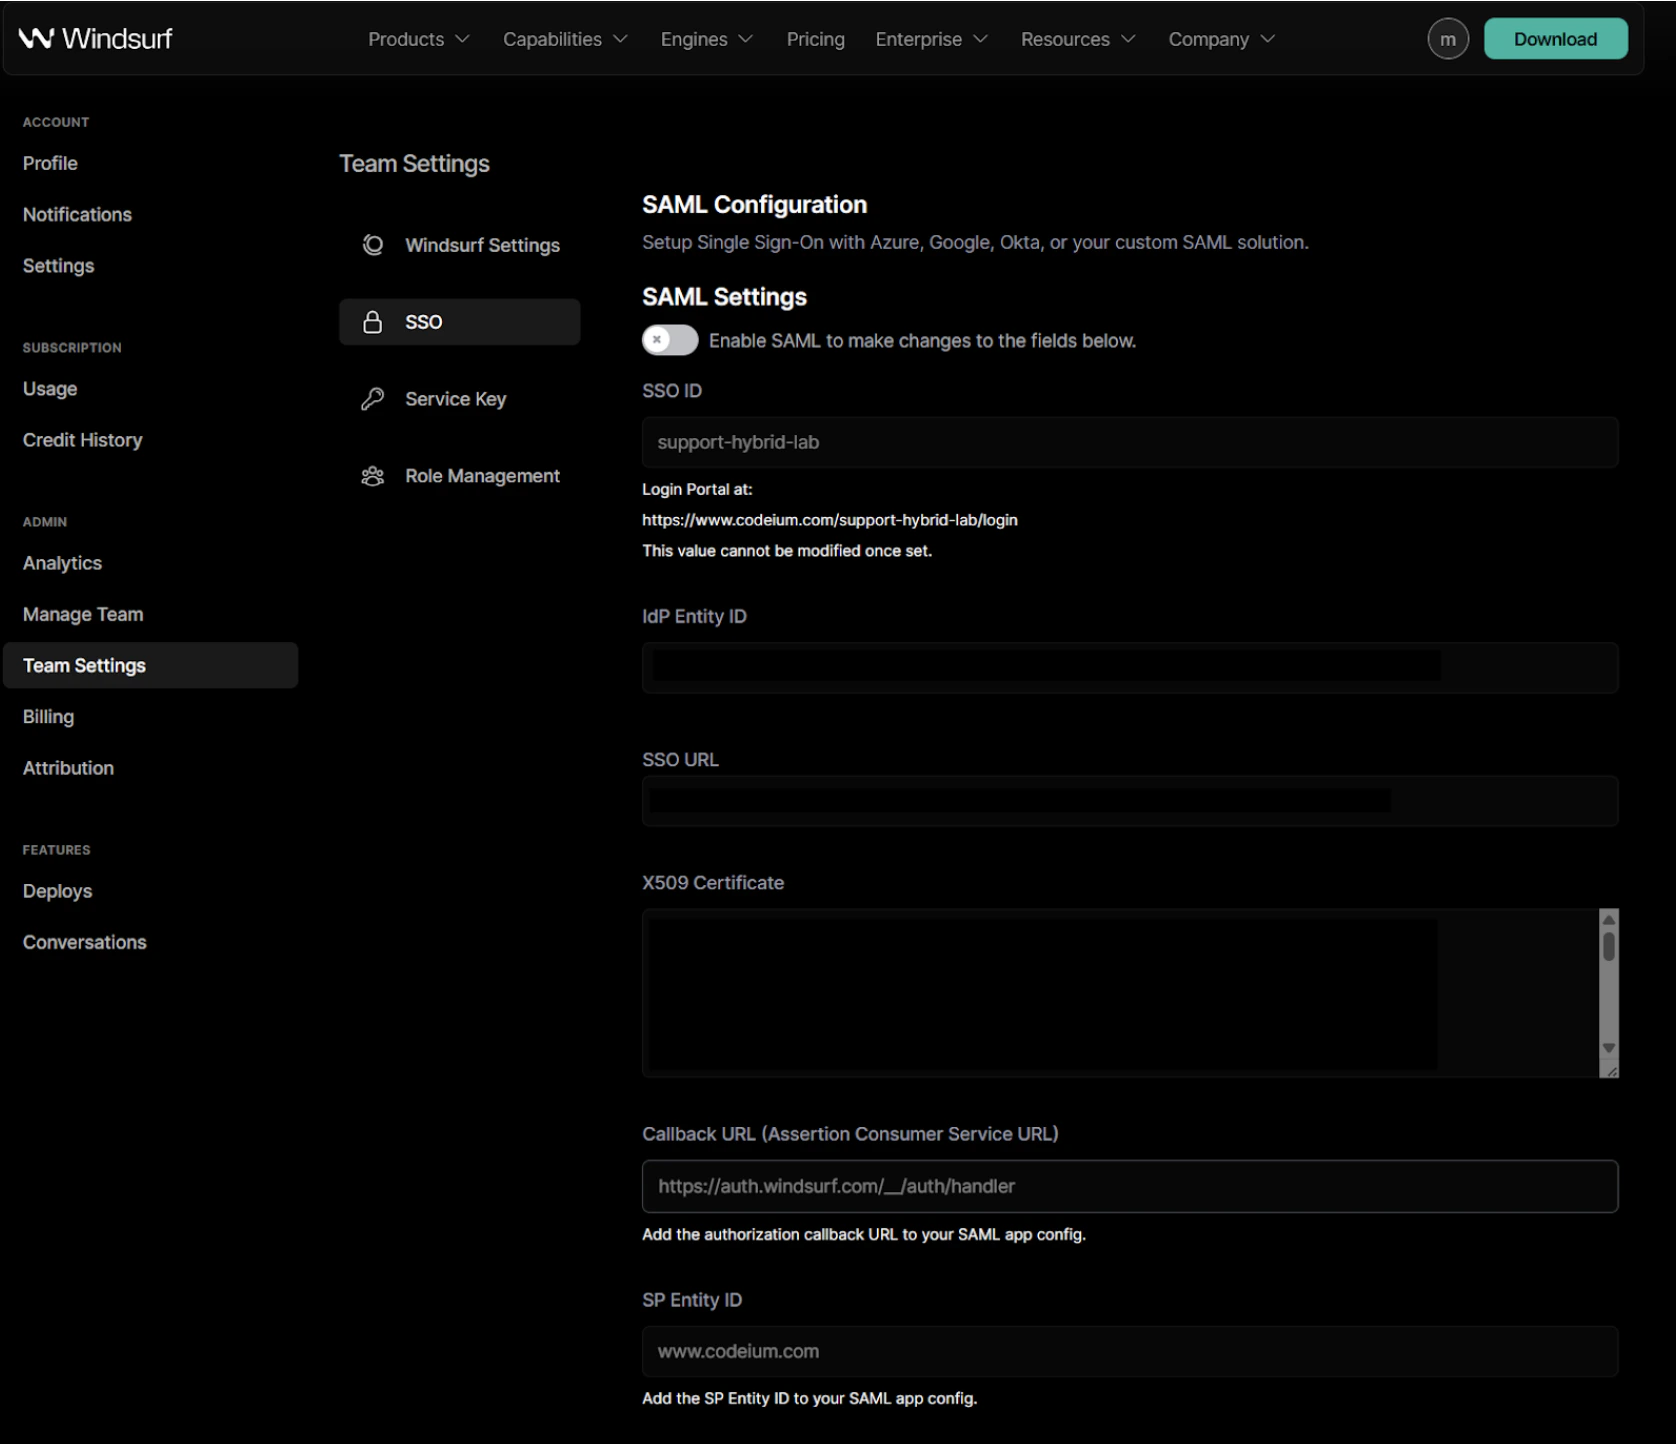 3. 首次启用 SAML 时,你需要设置 SSO ID。**设置后将无法更改。**
建议将其设为你的组织或团队名称,并且仅使用字母和数字。
4. 从 Duo 门户复制 `Entity ID` 值,并将其粘贴到 Devin Desktop 门户中的 `IdP Entity ID` 字段。
5. 从 Duo 门户复制 `Single Sign-On URL` 值,并将其粘贴到 Devin Desktop 门户中的 `SSO URL` 字段。
6. 从 Duo 门户复制证书值,并将其粘贴到 Devin Desktop 门户中的 `X509 Certificate` 字段
3. 首次启用 SAML 时,你需要设置 SSO ID。**设置后将无法更改。**
建议将其设为你的组织或团队名称,并且仅使用字母和数字。
4. 从 Duo 门户复制 `Entity ID` 值,并将其粘贴到 Devin Desktop 门户中的 `IdP Entity ID` 字段。
5. 从 Duo 门户复制 `Single Sign-On URL` 值,并将其粘贴到 Devin Desktop 门户中的 `SSO URL` 字段。
6. 从 Duo 门户复制证书值,并将其粘贴到 Devin Desktop 门户中的 `X509 Certificate` 字段
 7. 从 Devin Desktop 门户复制 `SP Identity ID` 值,并将其粘贴到 Duo 门户中的 `Entity ID` 字段。
8. 从 Devin Desktop 门户复制 `Callback URL (Assertion Consumer Service URL)`,并将其粘贴到 Duo 门户中的 `Assertion Consumer Service (ACS) URL` 字段。
9. 在 Duo 门户中,按如下方式配置属性语句:
7. 从 Devin Desktop 门户复制 `SP Identity ID` 值,并将其粘贴到 Duo 门户中的 `Entity ID` 字段。
8. 从 Devin Desktop 门户复制 `Callback URL (Assertion Consumer Service URL)`,并将其粘贴到 Duo 门户中的 `Assertion Consumer Service (ACS) URL` 字段。
9. 在 Duo 门户中,按如下方式配置属性语句:
 10. 在 Devin Desktop 门户中启用 SAML 登录,以便进行测试。
**注意:此时请勿登出或关闭窗口。**
如果出现错误或超时,请排查你的设置;否则,你必须在 Devin Desktop 门户中禁用 SAML 设置。
**如果你在未确认测试成功前登出或关闭窗口,可能会被锁定在外。**
11. 测试成功后,你就可以登出了。现在,访问你的团队/组织页面时,即可使用你在第 3 步中配置的 SSO ID 通过 SSO 登录。
[https://www.codeium.com/yourssoid/login](https://www.codeium.com/yourssoid/login)
## 先决条件
本指南假设你已配置 PingID,并将其作为你的组织 IdP,或者已配置外部 IdP。
你需要同时拥有 PingID 和 Devin Desktop 账户的管理员权限。
## 为 Devin Desktop 配置 PingID
1. 前往 Applications,将 Devin Desktop 添加为 SAML 应用程序
10. 在 Devin Desktop 门户中启用 SAML 登录,以便进行测试。
**注意:此时请勿登出或关闭窗口。**
如果出现错误或超时,请排查你的设置;否则,你必须在 Devin Desktop 门户中禁用 SAML 设置。
**如果你在未确认测试成功前登出或关闭窗口,可能会被锁定在外。**
11. 测试成功后,你就可以登出了。现在,访问你的团队/组织页面时,即可使用你在第 3 步中配置的 SSO ID 通过 SSO 登录。
[https://www.codeium.com/yourssoid/login](https://www.codeium.com/yourssoid/login)
## 先决条件
本指南假设你已配置 PingID,并将其作为你的组织 IdP,或者已配置外部 IdP。
你需要同时拥有 PingID 和 Devin Desktop 账户的管理员权限。
## 为 Devin Desktop 配置 PingID
1. 前往 Applications,将 Devin Desktop 添加为 SAML 应用程序
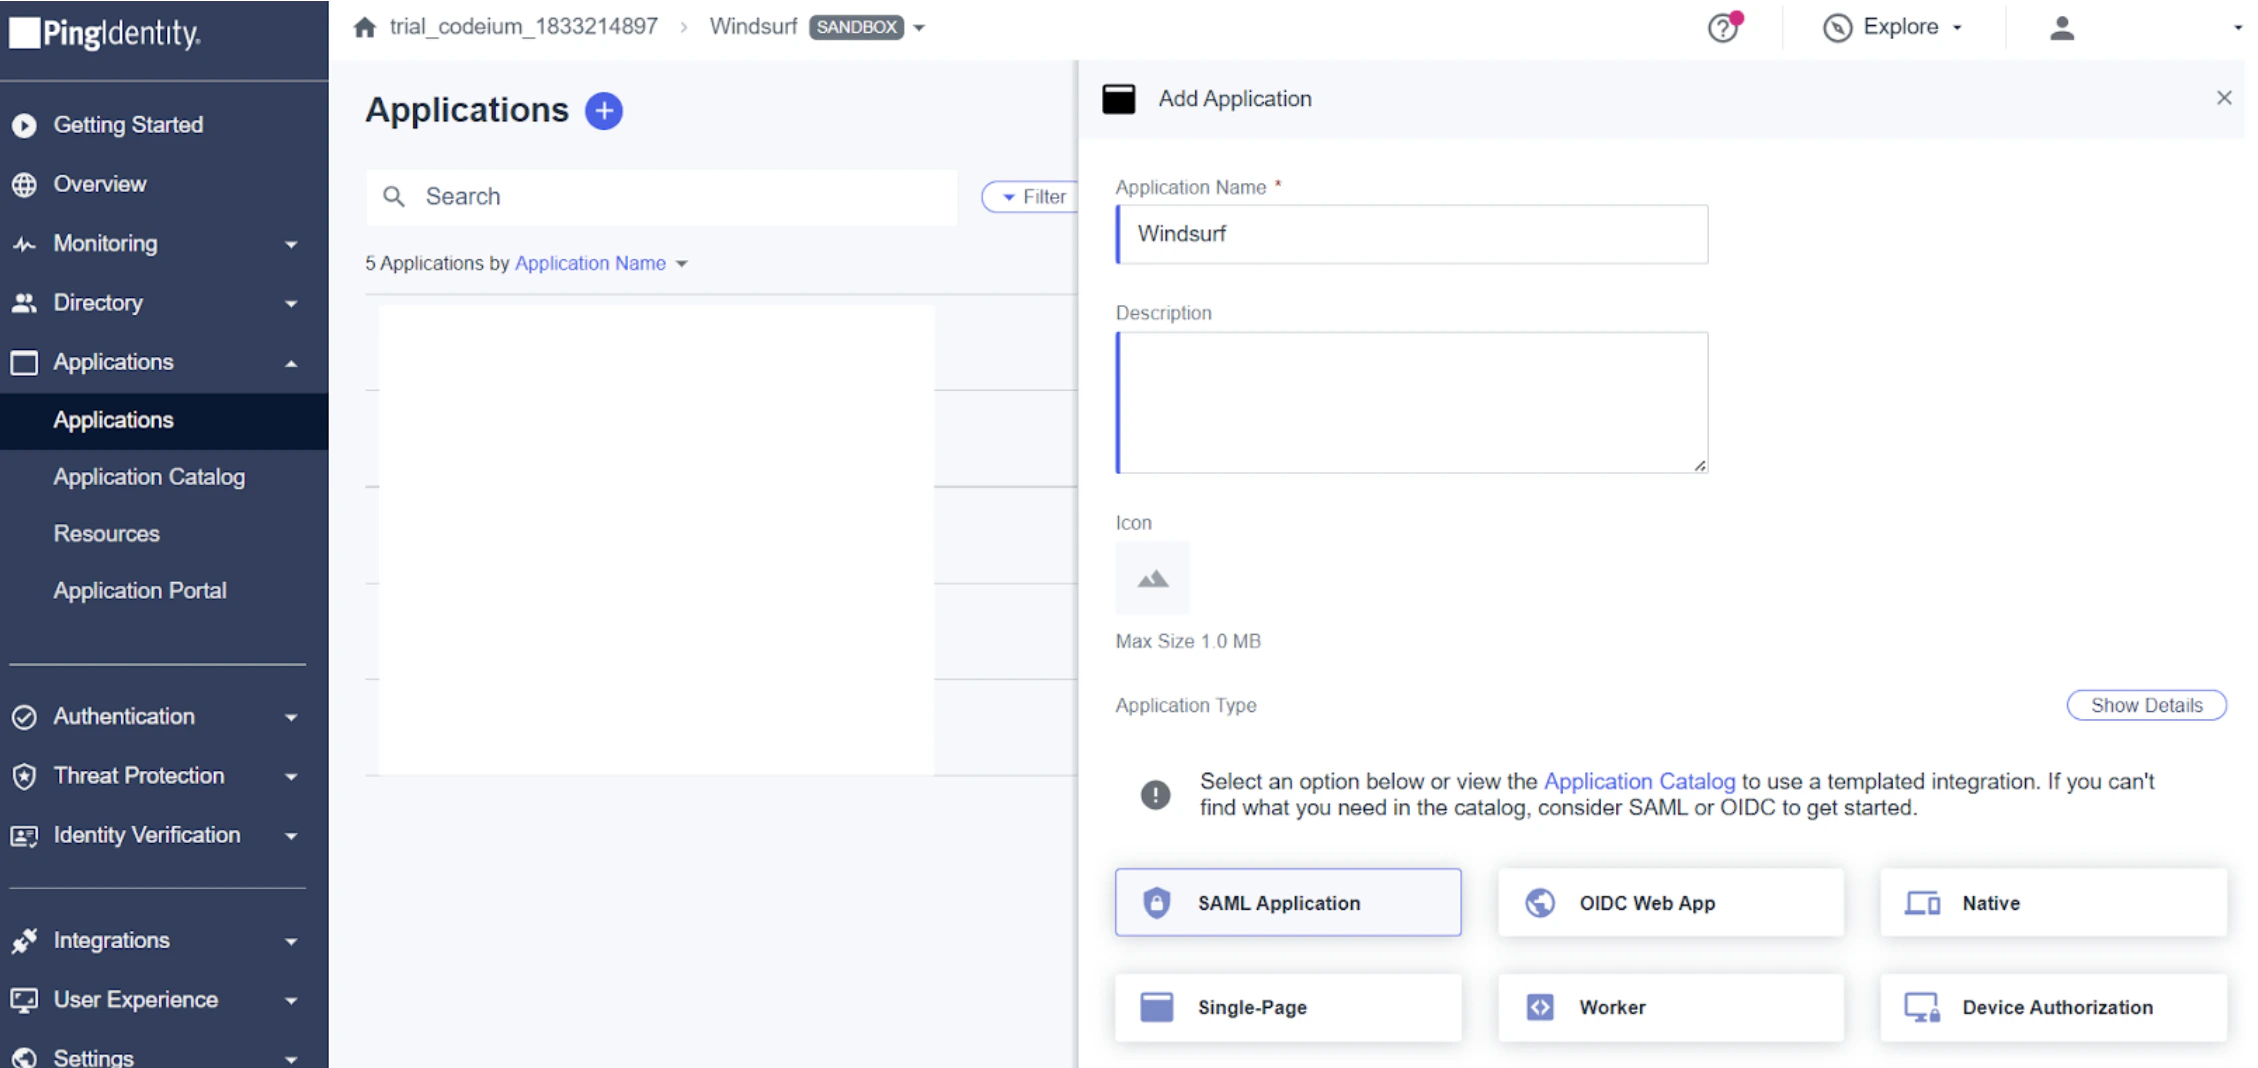 2. 前往团队设置中的 SSO
3. 首次启用 SAML 时,系统会要求你设置 SSO ID。**设置后将无法更改。**
建议将其设置为你的组织名称或团队名称,并且仅使用字母和数字。
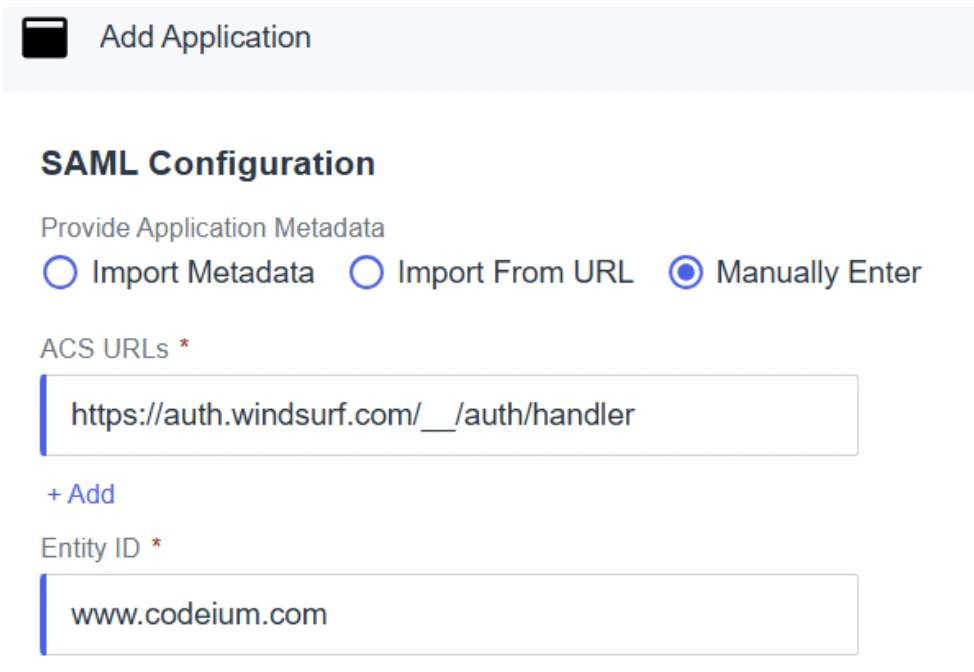
4. 在 PingID 中,选择手动输入配置,并按以下值填写字段:
* ACS URLs - 即 Devin Desktop 门户中的 `Callback URL (Assertion Consumer Service URL)`
* Entity ID - 即 Devin Desktop 门户中的 `SP Entity ID`
2. 前往团队设置中的 SSO
3. 首次启用 SAML 时,系统会要求你设置 SSO ID。**设置后将无法更改。**
建议将其设置为你的组织名称或团队名称,并且仅使用字母和数字。
4. 在 PingID 中,选择手动输入配置,并按以下值填写字段:
* ACS URLs - 即 Devin Desktop 门户中的 `Callback URL (Assertion Consumer Service URL)`
* Entity ID - 即 Devin Desktop 门户中的 `SP Entity ID`
 5. 将 PingID 中的 `Issuer ID` 复制到 Devin Desktop 门户中的 `IdP Entity ID` 字段。
6. 将 PingID 中的 `Single Signon Service` 值复制到 Devin Desktop 门户中的 `SSO URL` 字段。
7. 从 PingID 下载 Signing Certificate,格式选择 X509 PEM (.crt),打开文件并将其内容复制到 Devin Desktop 门户中的 `X509 Certificate` 字段。
**注意**:请确保复制了包含 5 个短横线 (-) 的开头和结尾两行,且不要复制任何其他字符!
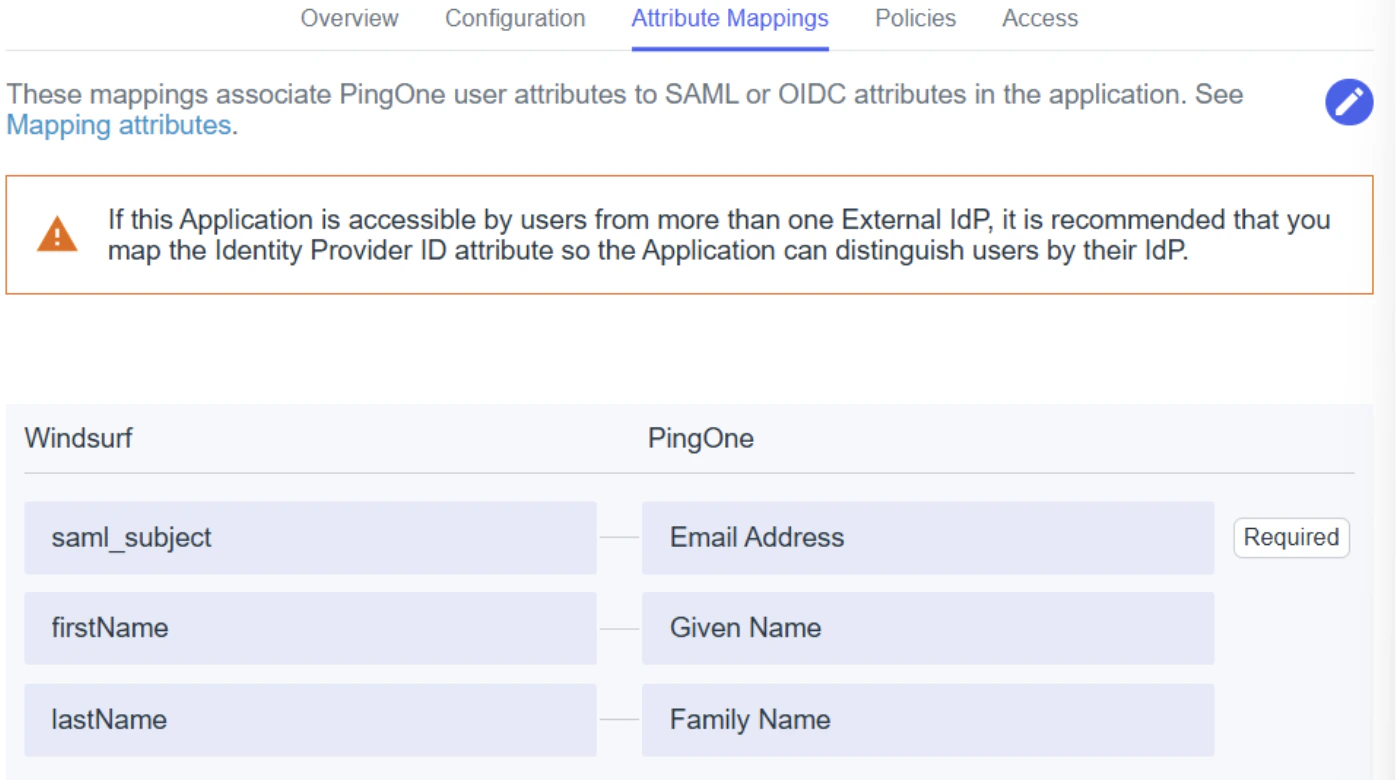
8. 在属性映射中,确保映射以下字段:
* `saml_subject` - 电子邮件地址
* `firstName` - 名
* `lastName` - 姓
5. 将 PingID 中的 `Issuer ID` 复制到 Devin Desktop 门户中的 `IdP Entity ID` 字段。
6. 将 PingID 中的 `Single Signon Service` 值复制到 Devin Desktop 门户中的 `SSO URL` 字段。
7. 从 PingID 下载 Signing Certificate,格式选择 X509 PEM (.crt),打开文件并将其内容复制到 Devin Desktop 门户中的 `X509 Certificate` 字段。
**注意**:请确保复制了包含 5 个短横线 (-) 的开头和结尾两行,且不要复制任何其他字符!
8. 在属性映射中,确保映射以下字段:
* `saml_subject` - 电子邮件地址
* `firstName` - 名
* `lastName` - 姓
 9. 根据你的设置或组织要求,添加/编辑其他策略和访问权限
10. 在 Devin Desktop 门户中启用 SAML 登录,以便进行测试。
**注意:此时不要登出,也不要关闭窗口。**
如果出现错误或超时,请检查你的设置;否则,你必须在 Devin Desktop 门户中禁用 SAML 设置。
**如果你在未确认测试成功的情况下登出或关闭窗口,可能会被锁定。**
11. 测试成功完成后,你就可以登出了。现在,访问带有你在步骤 3 中配置的 SSO ID 的团队/组织页面时,即可使用 SSO 登录。
[https://www.codeium.com/yourssoid/login](https://www.codeium.com/yourssoid/login)
9. 根据你的设置或组织要求,添加/编辑其他策略和访问权限
10. 在 Devin Desktop 门户中启用 SAML 登录,以便进行测试。
**注意:此时不要登出,也不要关闭窗口。**
如果出现错误或超时,请检查你的设置;否则,你必须在 Devin Desktop 门户中禁用 SAML 设置。
**如果你在未确认测试成功的情况下登出或关闭窗口,可能会被锁定。**
11. 测试成功完成后,你就可以登出了。现在,访问带有你在步骤 3 中配置的 SSO ID 的团队/组织页面时,即可使用 SSO 登录。
[https://www.codeium.com/yourssoid/login](https://www.codeium.com/yourssoid/login)