> ## Documentation Index
> Fetch the complete documentation index at: https://docs.devin.ai/llms.txt
> Use this file to discover all available pages before exploring further.
# Your First Session
> Start your first session and see what Devin can do
export const PromptBlock = ({children, type, agent, intent, playbookId}) => {
var utm = 'utm_source=docs&utm_medium=use-case-gallery&utm_campaign=prompt-block';
var tag = 'docs-use-case-gallery';
var agentParams = (agent ? '&agent=' + agent : '') + (intent ? '&intent=' + intent : '') + (playbookId ? '&playbookId=' + playbookId : '');
var label = type === 'schedule' ? 'Schedule in Devin' : type === 'playbook' ? 'Create Playbook' : type === 'knowledge' ? 'Add to Knowledge' : agent === 'advanced' ? 'Try in Devin' : agent === 'dana' ? 'Try in Dana' : agent === 'ada' ? 'Try in Ask Devin' : 'Try in Devin';
var buildUrl = function (text) {
var encoded = encodeURIComponent(text);
if (type === 'schedule') return 'https://app.devin.ai/settings/schedules/create?' + utm + agentParams + '&prompt=' + encoded;
if (type === 'playbook') return 'https://app.devin.ai/settings/playbooks/create?' + utm + '&body=' + encoded;
if (type === 'knowledge') return 'https://app.devin.ai/knowledge?' + utm + '&body=' + encoded;
if (agent === 'ada') return 'https://app.devin.ai/search?' + utm + '&noSubmit=true&prompt=' + encoded;
return 'https://app.devin.ai/?tags=' + tag + '&' + utm + agentParams + '&prompt=' + encoded;
};
const ref = React.useRef(null);
const [href, setHref] = React.useState('#');
React.useEffect(() => {
if (!ref.current) return;
var codeEl = ref.current.querySelector('pre code');
if (codeEl) {
var text = codeEl.textContent.trim();
if (text) setHref(buildUrl(text));
}
var header = ref.current.querySelector('[data-component-part="code-block-header"]');
if (header && !header.querySelector('.prompt-block-devin-link')) {
var link = document.createElement('a');
link.href = href;
link.target = '_blank';
link.rel = 'noopener noreferrer';
link.className = 'prompt-block-devin-link';
link.style.cssText = 'display:inline-flex;align-items:center;gap:6px;text-decoration:none;color:#fff;font-size:11px;font-weight:500;padding:4px 10px;border-radius:6px;white-space:nowrap;background:#317CFF;transition:background 0.2s;margin-left:8px;';
link.innerHTML = ' ' + label;
link.onmouseenter = function () {
link.style.background = '#2968D9';
};
link.onmouseleave = function () {
link.style.background = '#317CFF';
};
header.appendChild(link);
}
var existingLink = ref.current.querySelector('.prompt-block-devin-link');
if (existingLink && href !== '#') existingLink.href = href;
});
return
{children}
;
};
Before you start your first session, make sure you've [indexed](/onboard-devin/index-repo) and [set up](/onboard-devin/environment) your repositories. These are the foundational steps that help Devin understand and work with your codebase.
Now that you're all set up, kick off your first Devin session! This guide will walk you through the new session interface and help you understand the best ways to interact with Devin.
Prefer working from your terminal? [Devin CLI](/cli) lets you start sessions right from the command line. Install in 2 minutes with `curl -fsSL https://cli.devin.ai/install.sh | bash`.
## Understanding the Devin Session Page
When you start a new session, you'll see two primary modes: **Ask** and **Agent**.
Unless you already have a fully scoped plan, we recommend starting with Ask to work with Devin on constructing a plan, then moving to Agent mode to execute it.
### Ask Mode
**Ask Devin** is a lightweight mode for exploring your codebase and planning tasks with Devin, without making changes to the actual code. Ask Devin now supports both asking questions and planning:
* **Ask questions** about how your code works. Uses advanced code search to produce detailed, accurate, and well-cited answers.
* **Plan tasks** by scoping and planning work before implementation. Devin generates context-rich prompts for Agent sessions.
When you start a Devin session from Ask Devin, the session status is visible directly in the conversation.
#### Triggering Ask Mode
You can trigger Ask mode from the main page or from a DeepWiki page.
For Ask mode from the main page, toggle to Ask mode and select the repository/repositories you want to ask about.
For Ask mode from a DeepWiki page, type a query in the chat input at the bottom of the page and click Ask. This will automatically scope Devin's knowledge to that repository specifically.
Learn more in our [Ask Devin guide](/work-with-devin/ask-devin).
Once you've worked with Devin to understand the problem and create a plan, you're ready to move to Agent mode.
### Agent Mode
Agent mode is Devin's full autonomous mode where it can write code, run commands, browse the web, and complete complex tasks end-to-end. Use Agent mode when you're ready to:
* Implement features or fix bugs
* Create pull requests
* Run tests and debug issues
* Perform multi-step tasks that require code changes
#### Triggering Agent Mode
You can trigger Agent mode from the main page or from an Ask Devin session. When a session is started from Ask Devin, its status is displayed in the Ask Devin conversation so you can track progress.
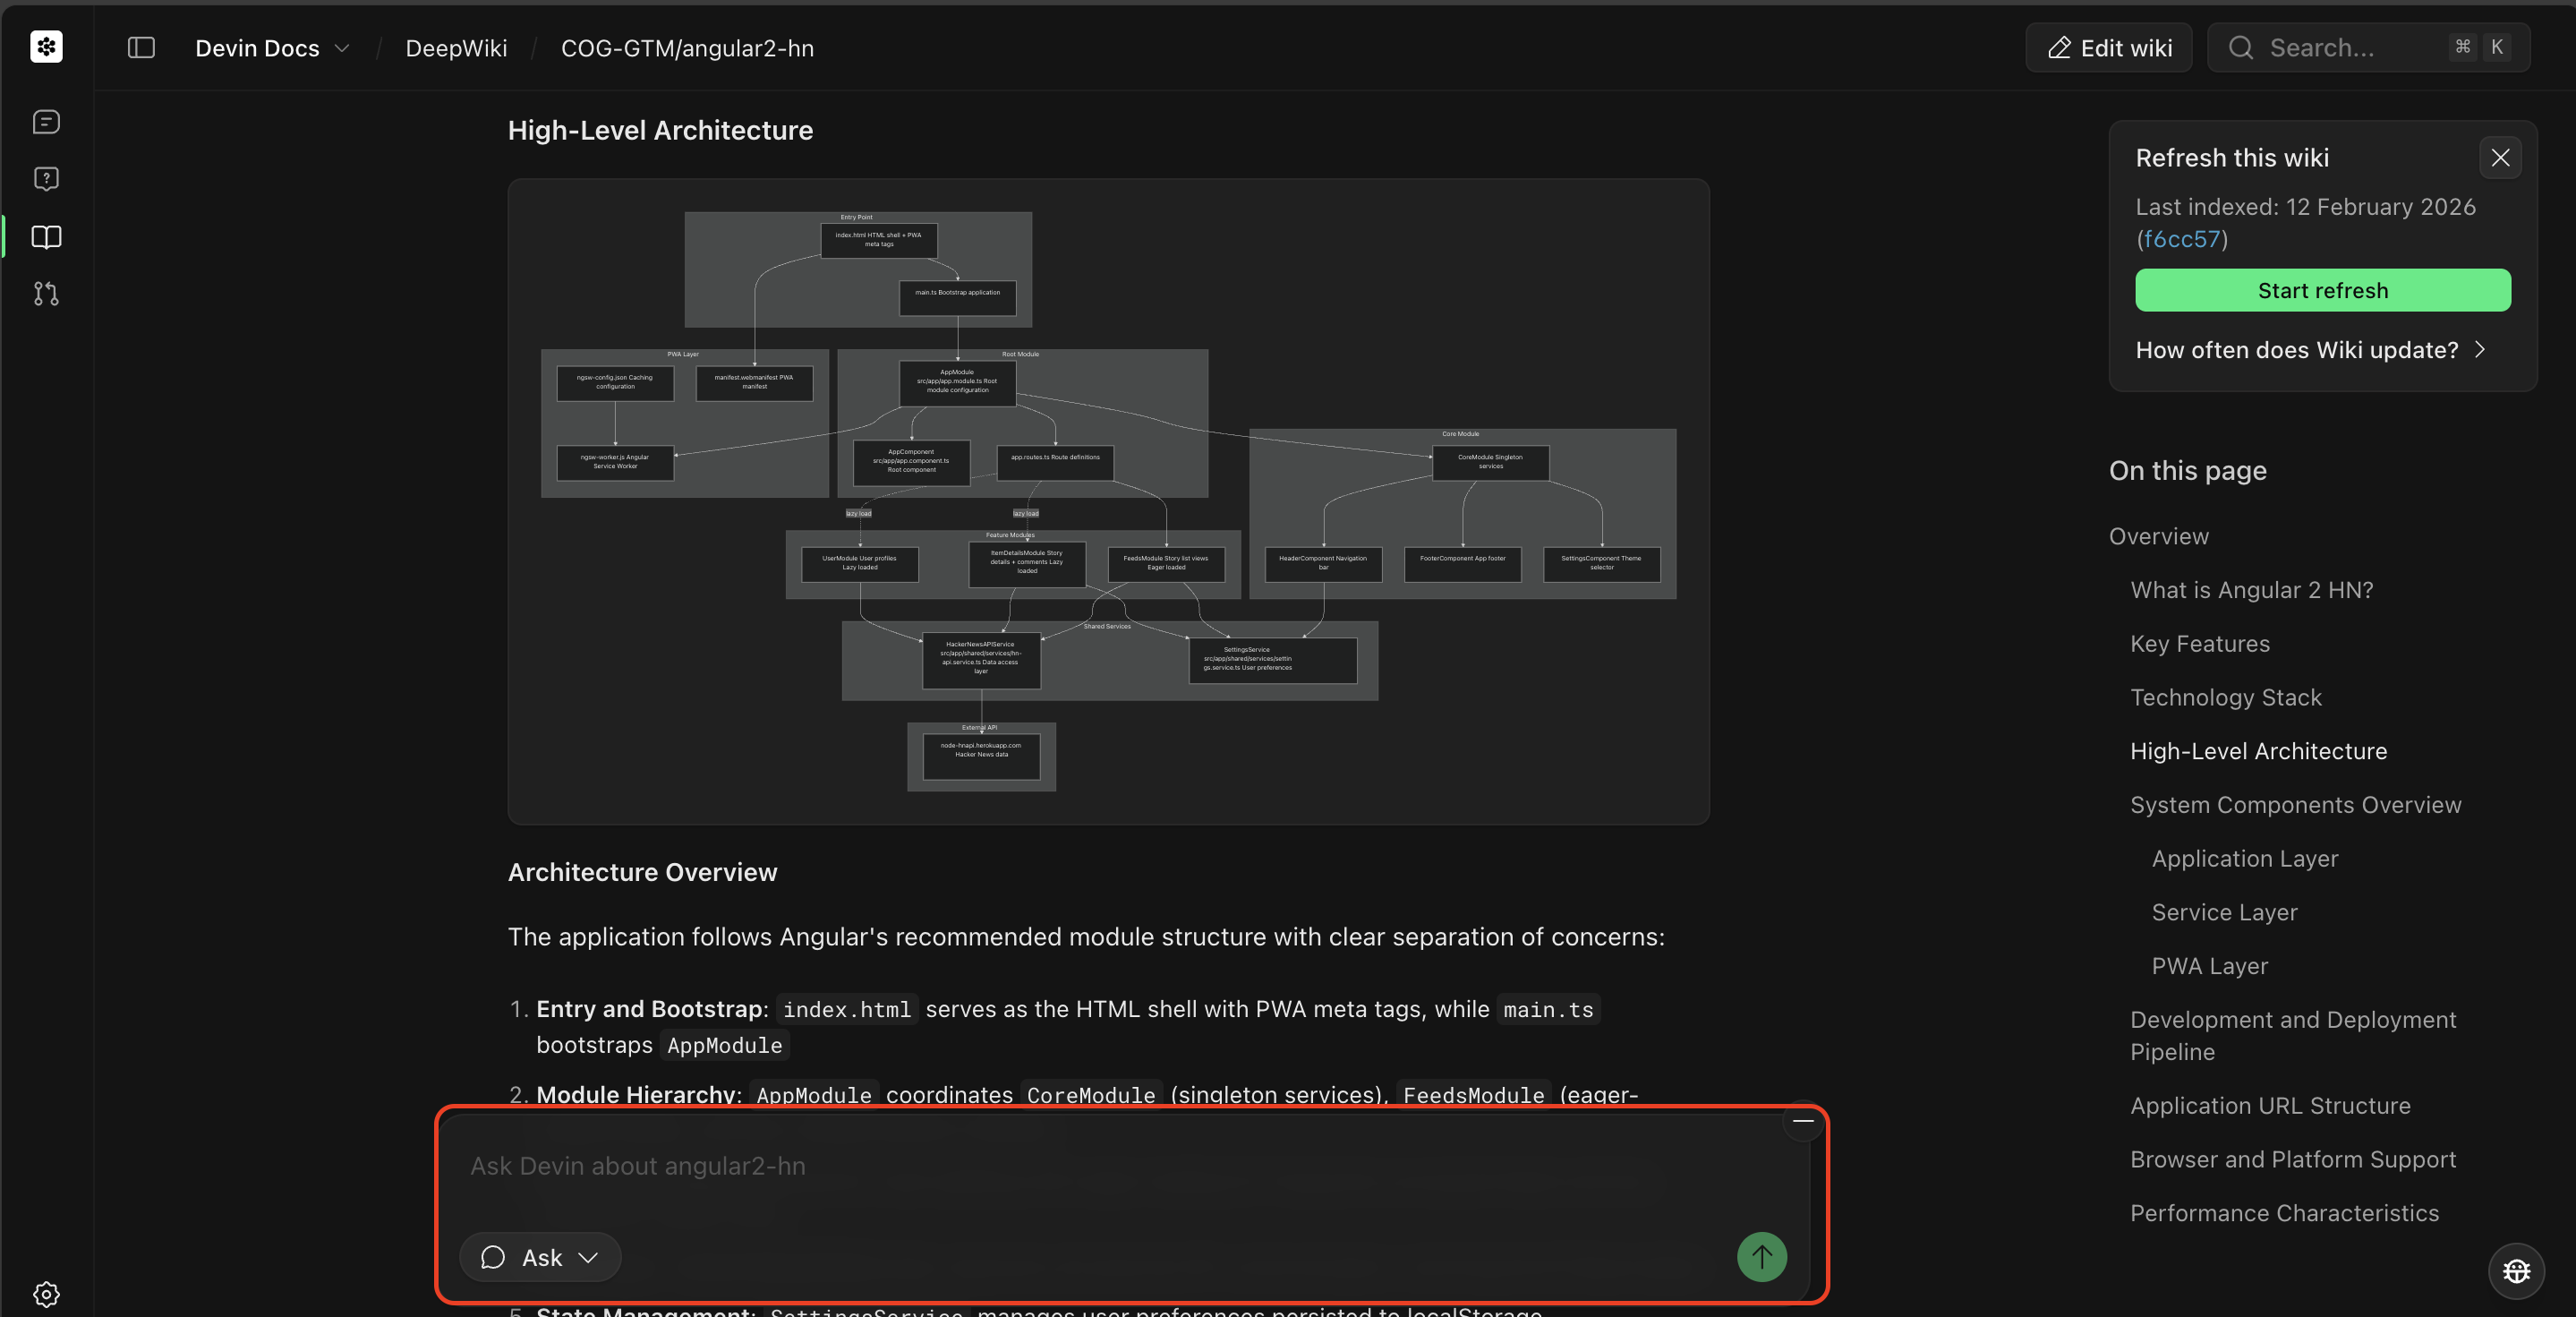
For tasks that are not fully scoped, we recommend:
* Start with **Ask mode** to plan out the task
* **Construct a Devin Prompt**, which will draw from your Ask session to create a scoped plan
* Click **Send to Devin** to move to Agent mode and execute the task
This flow is shown below:
For Agent mode from the main page, toggle to Agent mode and select the repository/repositories you want to work with.
When starting an Agent session, you'll configure a few options: selecting a Repository and selecting an Agent.
#### Selecting a Repository
Select the repository you want Devin to work with. Click the repository selector to see all repositories that have been [added to Devin's machine](/onboard-devin/environment).
Selecting a repository ensures Devin:
* Has access to your codebase and can make changes
* Uses the correct branch as a starting point
* Can create pull requests to the right repository
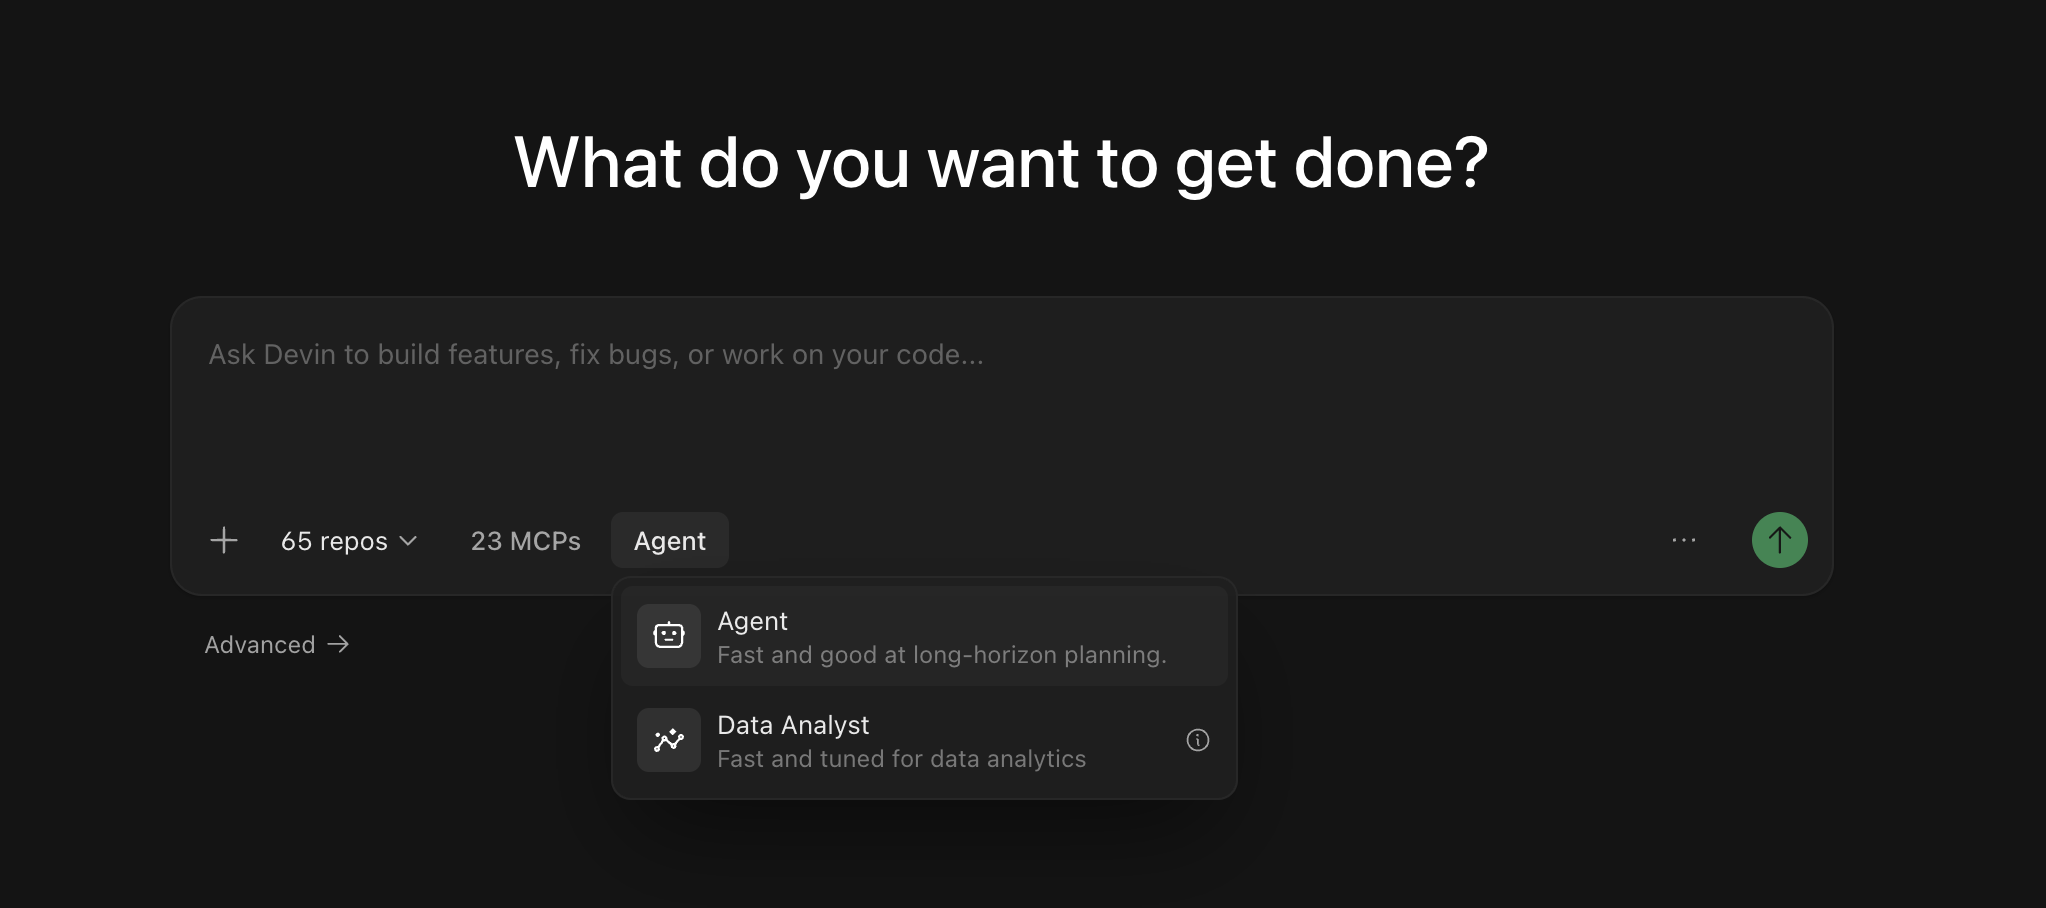
#### Selecting an Agent
You can choose which agent configuration Devin uses for your session. Different agents may have different capabilities or be optimized for specific types of tasks.
Available agents include:
* **Devin** (default) — A general-purpose AI software engineer for building features, fixing bugs, refactoring code, and most development tasks.
* **Fast Mode** — An optimized mode for quick, well-scoped tasks.
* **[Dana](/work-with-devin/data-analyst)** — A data analyst agent optimized for querying databases, analyzing data, and creating visualizations.
If you're unsure which agent to use, the default Devin agent works well for most tasks.
## Using @ Mentions
Use `@` mentions to give Devin specific context about files, repositories, or other resources. When you type `@` in the chat input, you'll see a dropdown of available mentions:
* **@Repos** - Reference a specific repository
* **@Files** - Reference a specific file in your codebase
* **[@Macros](/product-guides/knowledge)** - Reference a macro for a Knowledge entry
* **[@Playbooks](/product-guides/creating-playbooks)** - Reference a team or community playbook, which are detailed prompt templates that can be used to guide Devin's behavior
* **[@Skills](/product-guides/skills)** - Reference a skill defined in your repository (reusable procedures committed as `SKILL.md` files)
* **[@Secrets](/product-guides/secrets)** - Reference a specific secret (e.g. API keys, credentials, etc.) from Devin's session manager
* **@Sessions** - Reference a previous Devin session for context
@ mentions help Devin understand exactly what you're working with and reduce ambiguity in your prompts.
## Scoping Your First Session
Start with tasks that have **clear success criteria** and **provide Devin with the context it needs** — just as you would when handing off work to a teammate. As you get comfortable, try progressively more complex tasks. We've seen users work with Devin on everything from fixing small bugs to targeted refactors to large-scale migrations and building entire features from scratch.
As a rule of thumb: if a task would take you three hours or less, Devin can most likely do it. For larger projects, break them into focused sessions and run them in parallel with [managed Devins](/work-with-devin/advanced-capabilities#managed-devins).
## First-time Prompt Ideas
```Adding a new API endpoint theme={null}
Create a new endpoint /users/stats that returns a JSON object with user count and average signup age.
Use our existing users table in PostgreSQL.
You can reference the /orders/stats endpoint in statsController.js for how we structure responses.
Ensure the new endpoint is covered by the StatsController.test.js suite.
```
```Small frontend features theme={null}
In UserProfileComponent, add a dropdown that shows a list of user roles (admin, editor, viewer).
Use the styling from DropdownBase.
When a role is selected, call the existing API to set the user role.
Validate by checking that the selection updates the user role in the DB. Refer to your Knowledge for how to test properly.
```
```Write unit tests theme={null}
Add Jest tests for the AuthService methods: login and logout.
Ensure test coverage for these two functions is at least 80%.
Use UserService.test.js as an example.
After implementation, run `npm test -- --coverage` and verify the coverage report shows >80% for both functions.
Also confirm that tests pass with both valid and invalid credentials, and that logout properly clears session data.
```
```Migrating or refactoring existing code theme={null}
Migrate logger.js from JavaScript to TypeScript.
We already have a tsconfig.json and a LoggerTest.test.js suite for validation.
Make sure it compiles without errors and make sure not to change the existing config!
After migration, verify by:
1) running `tsc` to confirm no type errors
2) running the test suite with `npm test LoggerTest.test.js` to ensure all tests pass
3) checking that all existing logger method calls throughout the codebase still work without type errors.
```
```Updating APIs or database queries theme={null}
We're switching from pg to sequelize (read https://sequelize.org/api/v6/identifiers).
Please update the UserModel queries to use Sequelize methods.
Refer to OrderModel for how we do it in this codebase.
After implementation, verify by:
1) running `npm run test:integration UserModel.test.js` to check all integration tests pass
2) confirming query performance hasn't degraded by checking execution time on a test dataset of 1000 users
3) validating that all CRUD operations still maintain data integrity by running `npm run test:e2e user-flows.test.js`
```
```txt Quick PR theme={null}
## Overview
The task is to make a quick pull request to a repository.
Since this is a 'quick' PR, you will not need to run any code or test anything; simply make a PR and the user will handle the testing. Your only responsibility is reading and writing code.
## What's Needed From User
- The repository to create a pull request
## Procedure
### Prepare your workspace
1. Navigate to the relevant repository on your machine (clarify with the user if you can't figure it out).
- Check out the main branch and note down the name of the main branch.
- Checkout to a new branch since you'll be making a pull request. The name of the branch has to be of the format `devin/-`. For example `devin/1700000000-fix-popup`. Run `git remote -v && git pull && git checkout -b devin/$(date +%s)-{branch-name}` and replace `{branch-name}` with the name of the branch you want to create.
2. Study the request, codebase, and plan out the changes
- Review the most relevant files and code sections, identifying relevant snippets.
- Inform the user of your plan
### Work on the PR itself
3. Make the code changes
- Don't change anything that wasn't specifically requested by the user
4. Make the PR
- Commit and push the changes and tell the user.
- See advice section for the exact command to make the PR
- Make a pull request & review the pr to make sure it looks OK.
- Ensure all GitHub actions pass successfully & make necessary changes until they do
- Send the PR link to the user and summarize what you changed.
5. Address any feedback from the review; send the PR link again every time you make any changes
- If you need to make updates, just push more commits to the same branch; don't create a new one
## Task Specification
- PR link is included in your messages to the user
- PR was reviewed after creation
- PR does not include any stray changes
- PR does not change anything that wasn't specifically requested by the user
- PR description should include a summary of the changes, formatted as a checklist
- PR description should mention that the code was written without testing, and include - [ ] Test the changes as an item
- PR description should include the following footer: "This PR was written by [Devin](https://devin.ai/) :angel:"
- PR description should include any metadata that the user has provided (e.g. linear ticket tags in the appropriate syntax)
- PR description should not be malformatted (use --body-file instead of --body if the newlines are garbled!)
## Forbidden Actions
- Do NOT try to access github.com through the browser, you will not be authenticated.
- NEVER force push on branches! Prefer merging over rebasing so that you don't lose any work.
- Do NOT push directly to the main branch.
## Advice and Pointers
- Double check the name of the main branch (which could be `main` or `master`) using `git branch`.
- For repos with CI/CD on github actions, you can check build logs using the gh cli. if you're asked to fix a build/fix lint, you should start by looking at recent build logs
- Check `git status` before committing or adding files.
- Use `git diff` to see what changes you have made before committing.
- If you're updating an existing repo, use `gh cli` to make pull requests.
- Send the PR link to the user every time you update & ask them to re-review so that it's convenient for them
- You should already be authorized to access any repositories the user tells you about. If not, ask the user for access.
```
If you'd like to dig in to some more detailed examples of what Devin can do (and how), check out our **use cases**.
Explore practical examples across engineering workflows — each includes prompts you can try immediately.
## After Your Session
Once Devin finishes, open [Session Insights](/product-guides/session-insights) and click **Generate Analysis** — you'll get a timeline of what happened, actionable feedback, and an improved prompt you can use for similar tasks in the future.
## Next Steps
Once you're comfortable with basic sessions, explore these resources to get more out of Devin:
Connect Devin to your existing tools like GitHub, Slack, Jira, and more.
Learn how to use Playbooks to implement tasks.
Add knowledge to help Devin understand your team's practices.
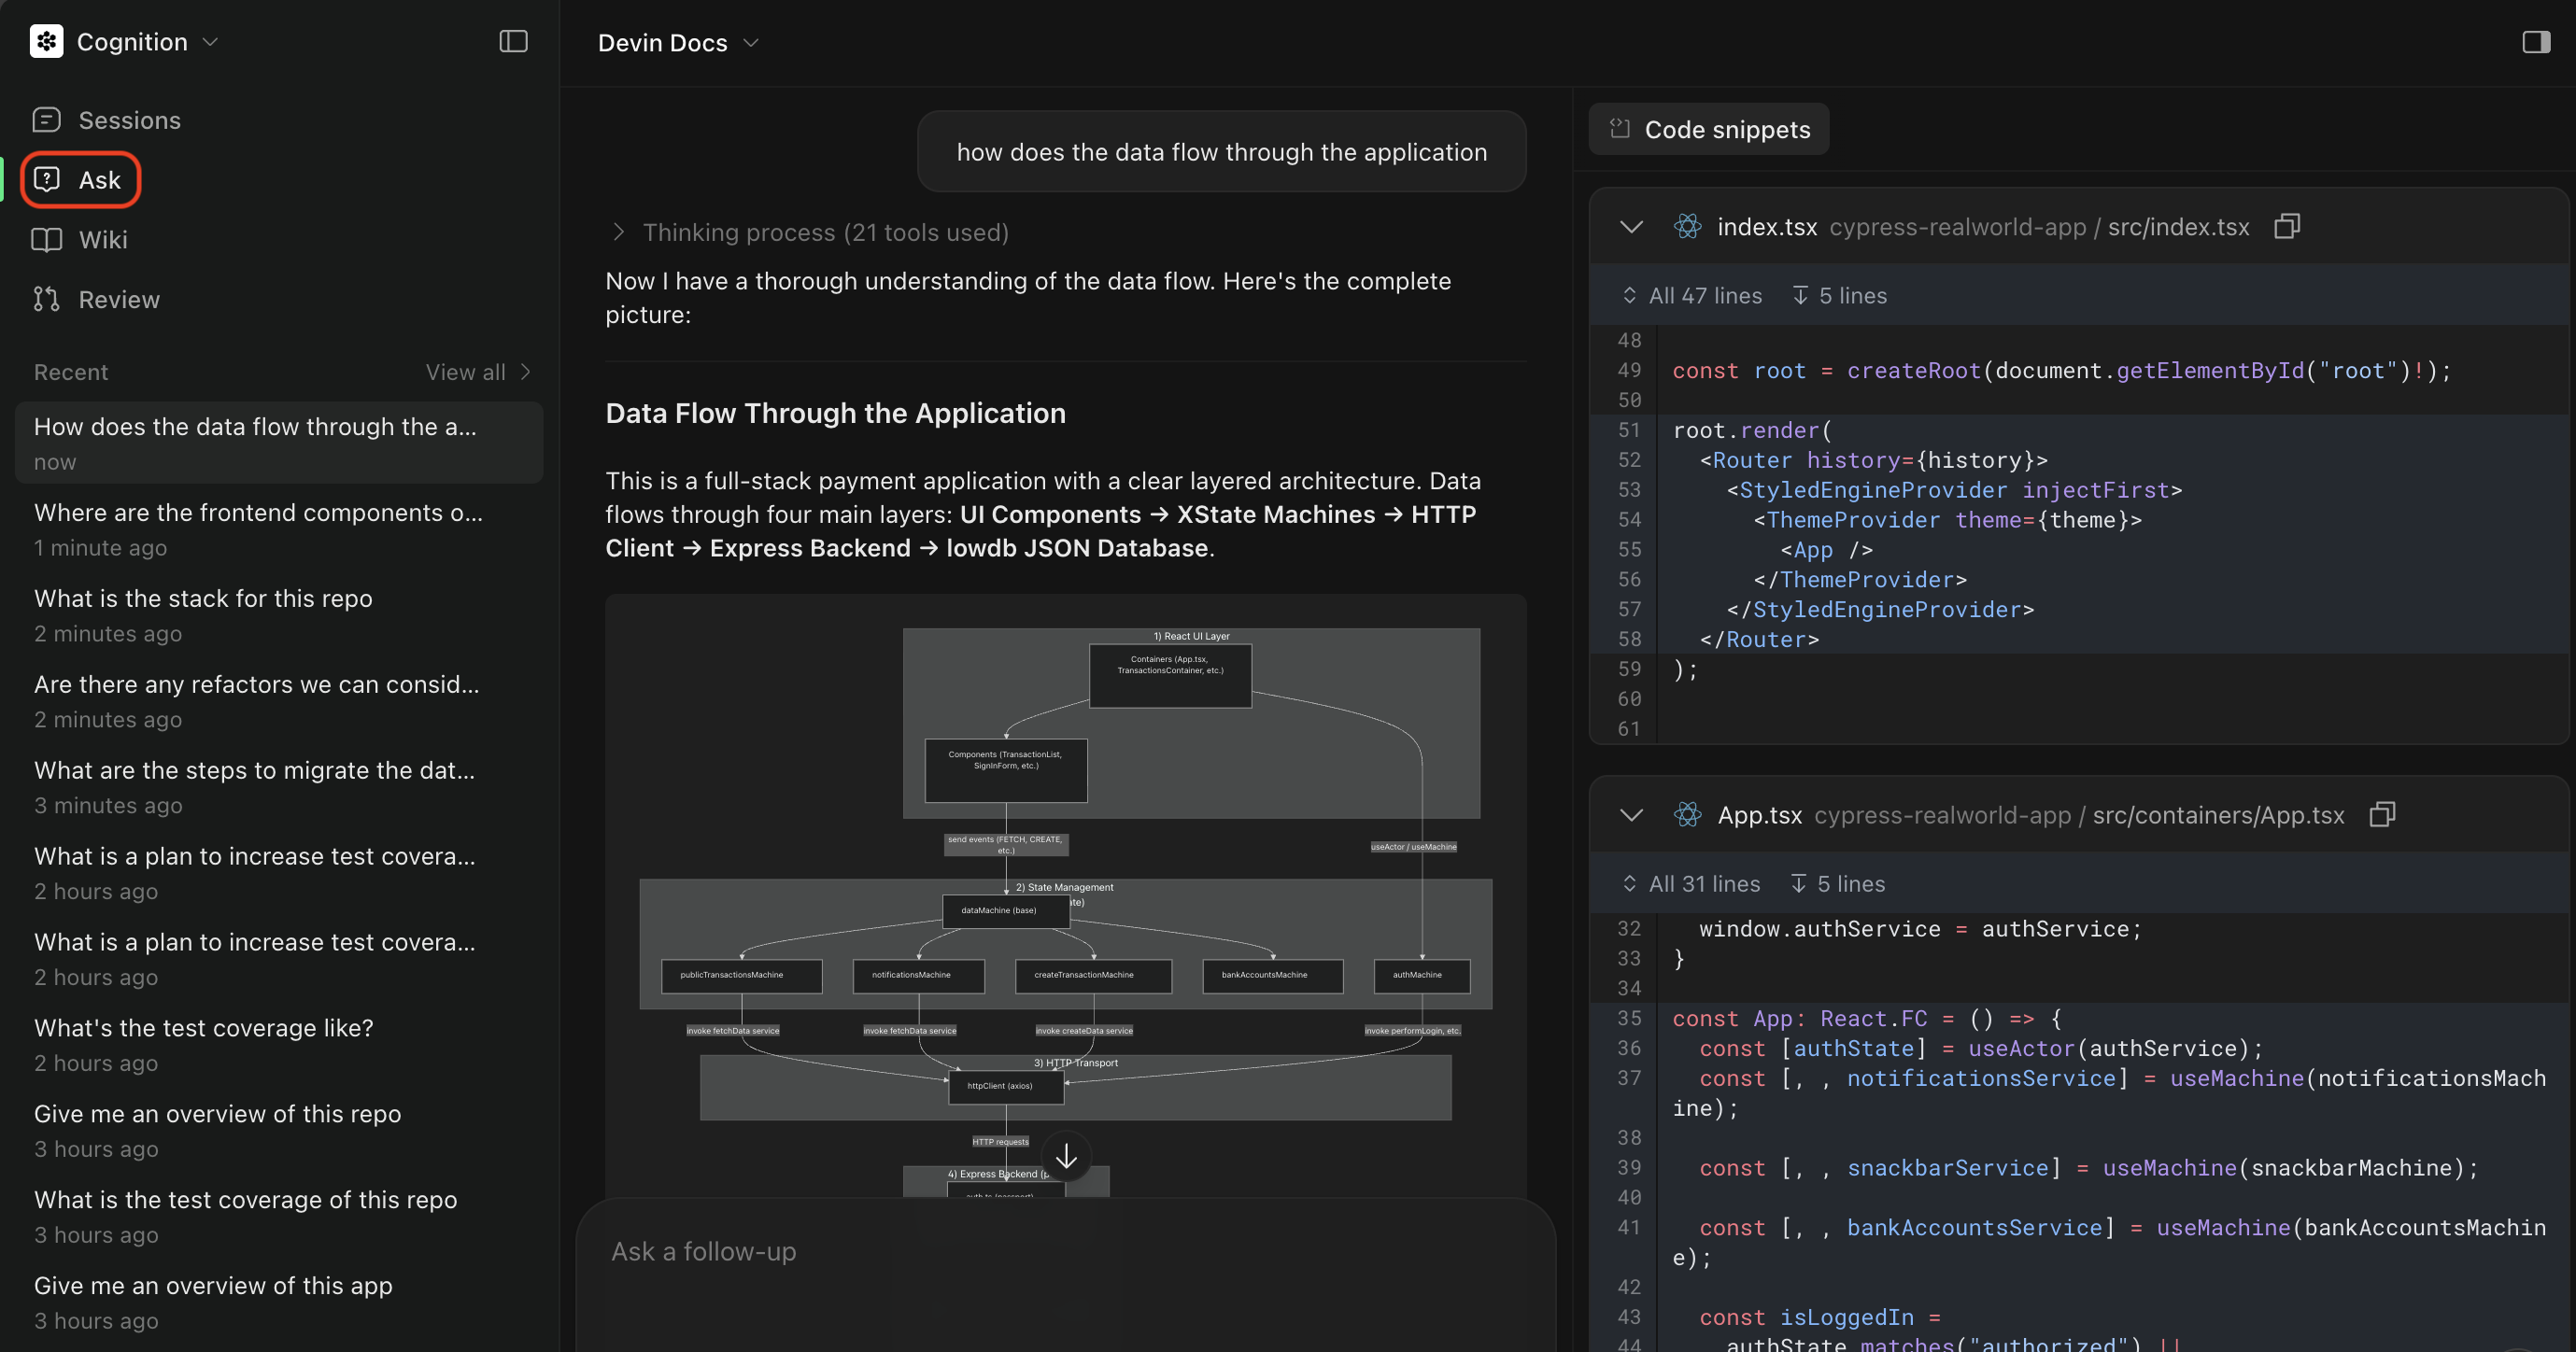 #### Triggering Ask Mode
You can trigger Ask mode from the main page or from a DeepWiki page.
For Ask mode from the main page, toggle to Ask mode and select the repository/repositories you want to ask about.
#### Triggering Ask Mode
You can trigger Ask mode from the main page or from a DeepWiki page.
For Ask mode from the main page, toggle to Ask mode and select the repository/repositories you want to ask about.
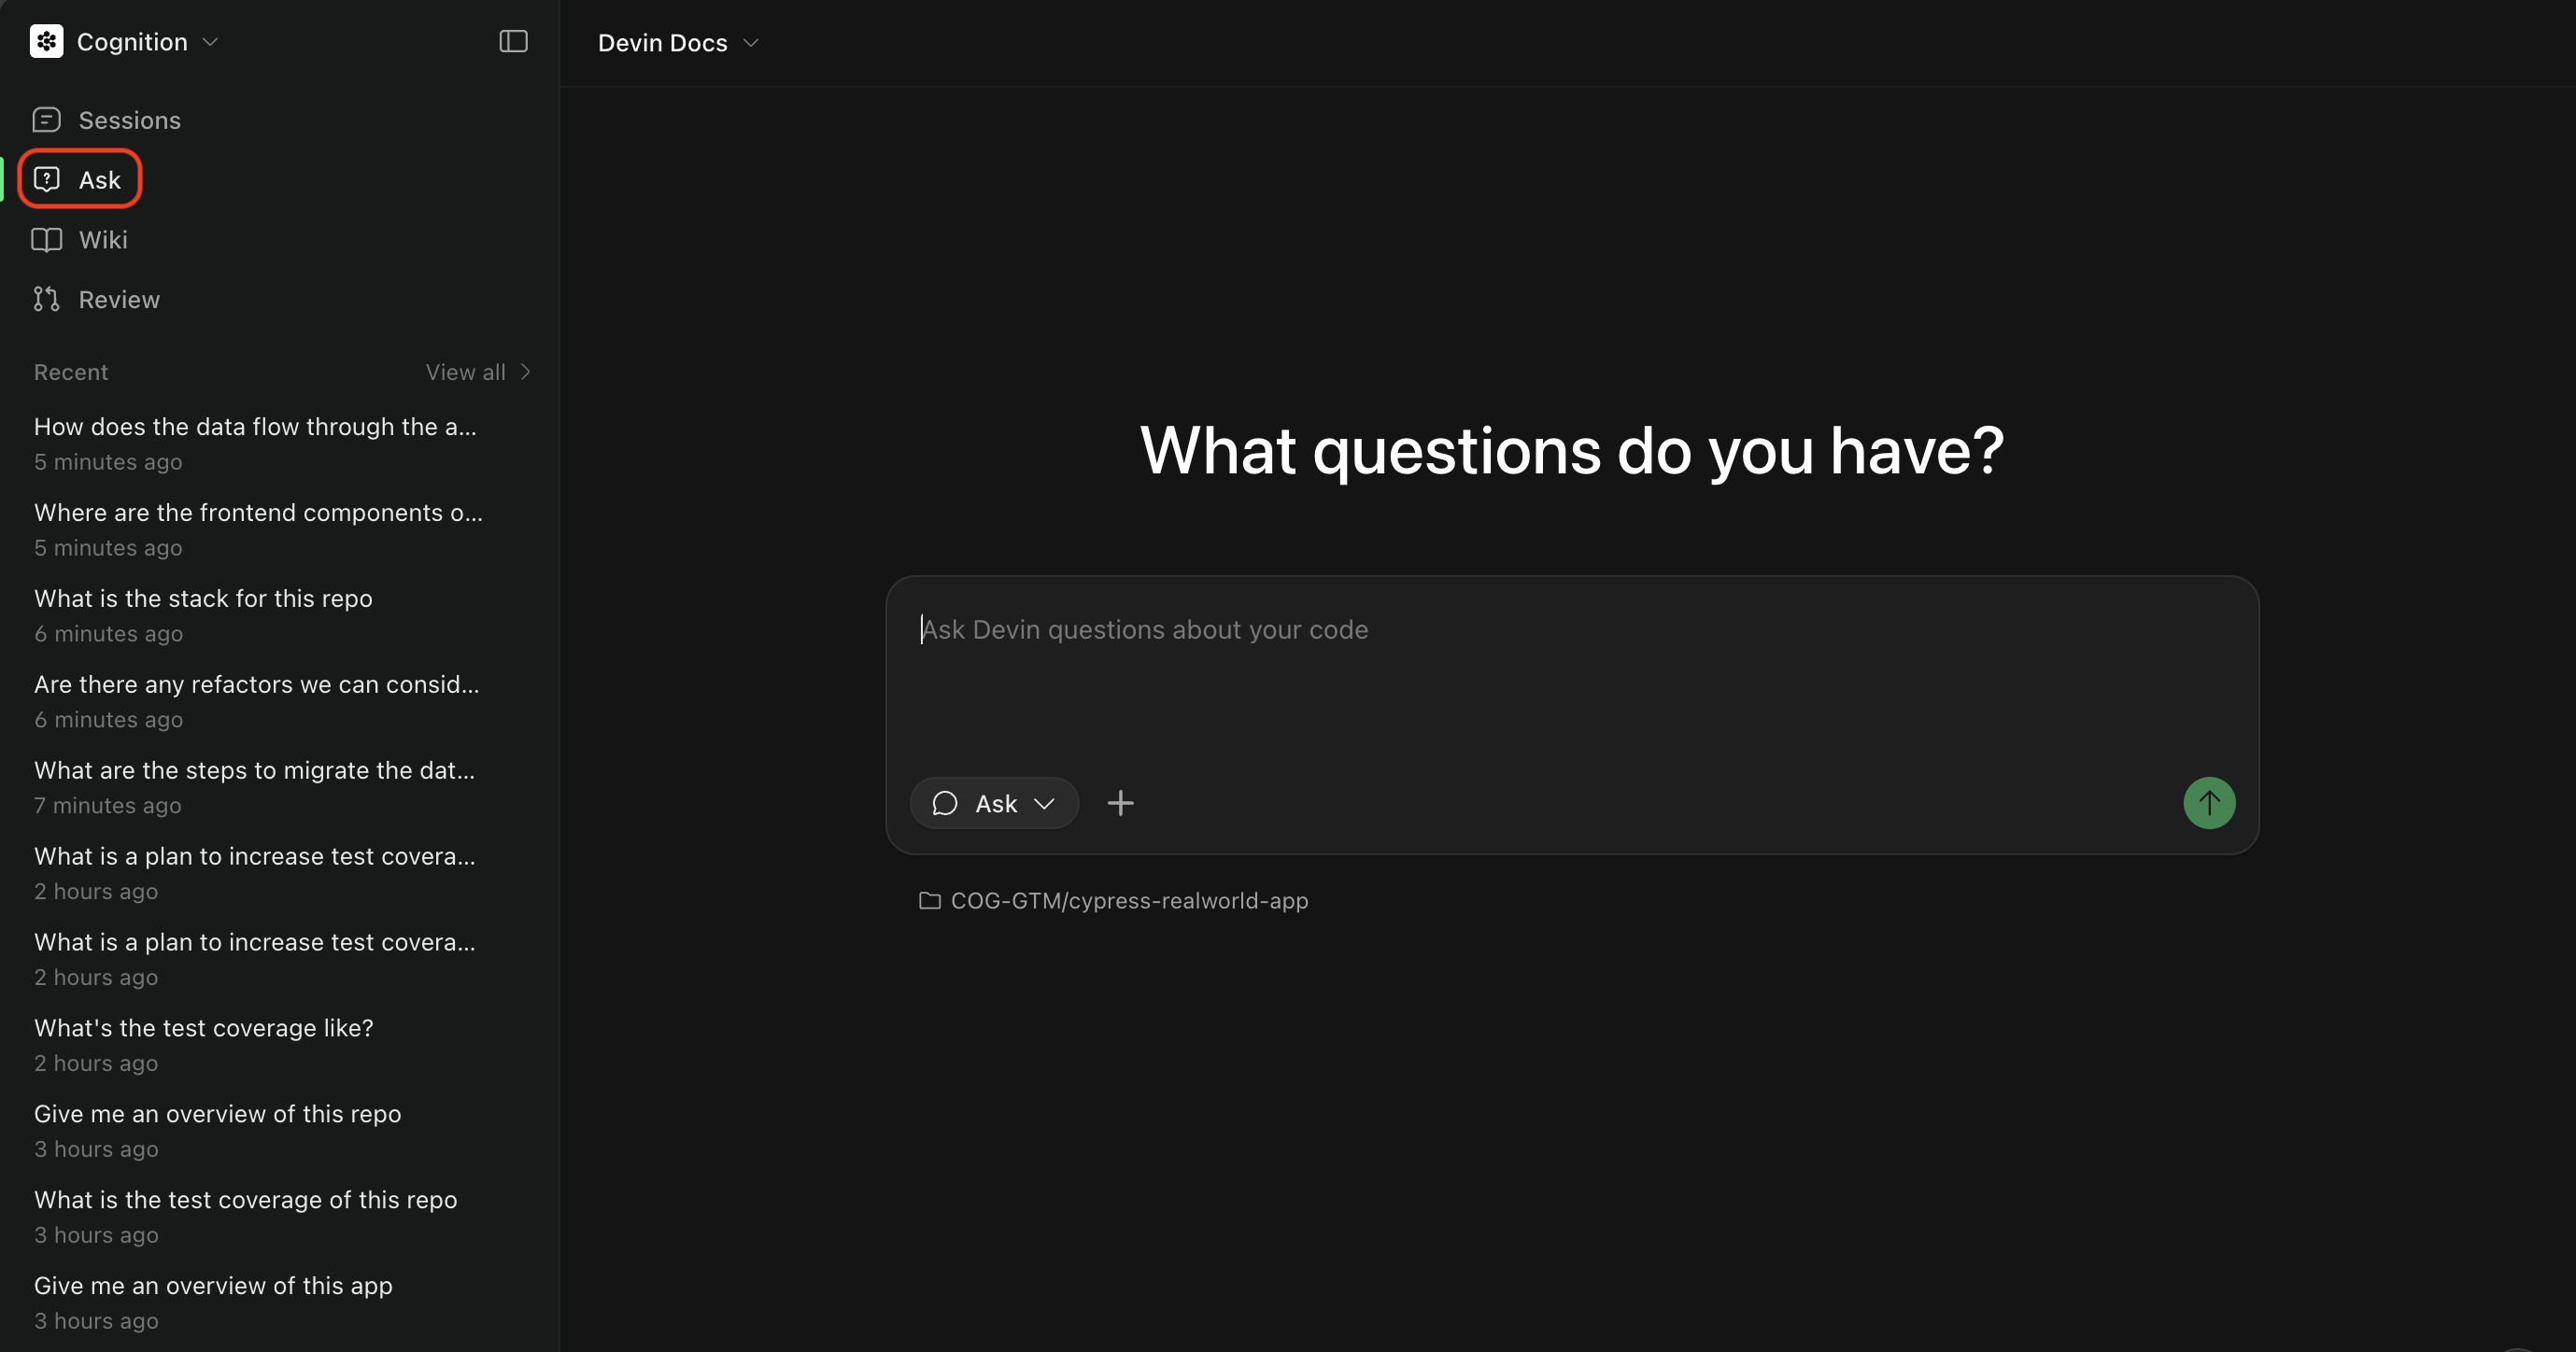 For Ask mode from a DeepWiki page, type a query in the chat input at the bottom of the page and click Ask. This will automatically scope Devin's knowledge to that repository specifically.
 Learn more in our [Ask Devin guide](/work-with-devin/ask-devin).
Once you've worked with Devin to understand the problem and create a plan, you're ready to move to Agent mode.
### Agent Mode
Agent mode is Devin's full autonomous mode where it can write code, run commands, browse the web, and complete complex tasks end-to-end. Use Agent mode when you're ready to:
* Implement features or fix bugs
* Create pull requests
* Run tests and debug issues
* Perform multi-step tasks that require code changes
#### Triggering Agent Mode
You can trigger Agent mode from the main page or from an Ask Devin session. When a session is started from Ask Devin, its status is displayed in the Ask Devin conversation so you can track progress.
For tasks that are not fully scoped, we recommend:
* Start with **Ask mode** to plan out the task
* **Construct a Devin Prompt**, which will draw from your Ask session to create a scoped plan
* Click **Send to Devin** to move to Agent mode and execute the task
This flow is shown below:
Learn more in our [Ask Devin guide](/work-with-devin/ask-devin).
Once you've worked with Devin to understand the problem and create a plan, you're ready to move to Agent mode.
### Agent Mode
Agent mode is Devin's full autonomous mode where it can write code, run commands, browse the web, and complete complex tasks end-to-end. Use Agent mode when you're ready to:
* Implement features or fix bugs
* Create pull requests
* Run tests and debug issues
* Perform multi-step tasks that require code changes
#### Triggering Agent Mode
You can trigger Agent mode from the main page or from an Ask Devin session. When a session is started from Ask Devin, its status is displayed in the Ask Devin conversation so you can track progress.
For tasks that are not fully scoped, we recommend:
* Start with **Ask mode** to plan out the task
* **Construct a Devin Prompt**, which will draw from your Ask session to create a scoped plan
* Click **Send to Devin** to move to Agent mode and execute the task
This flow is shown below:
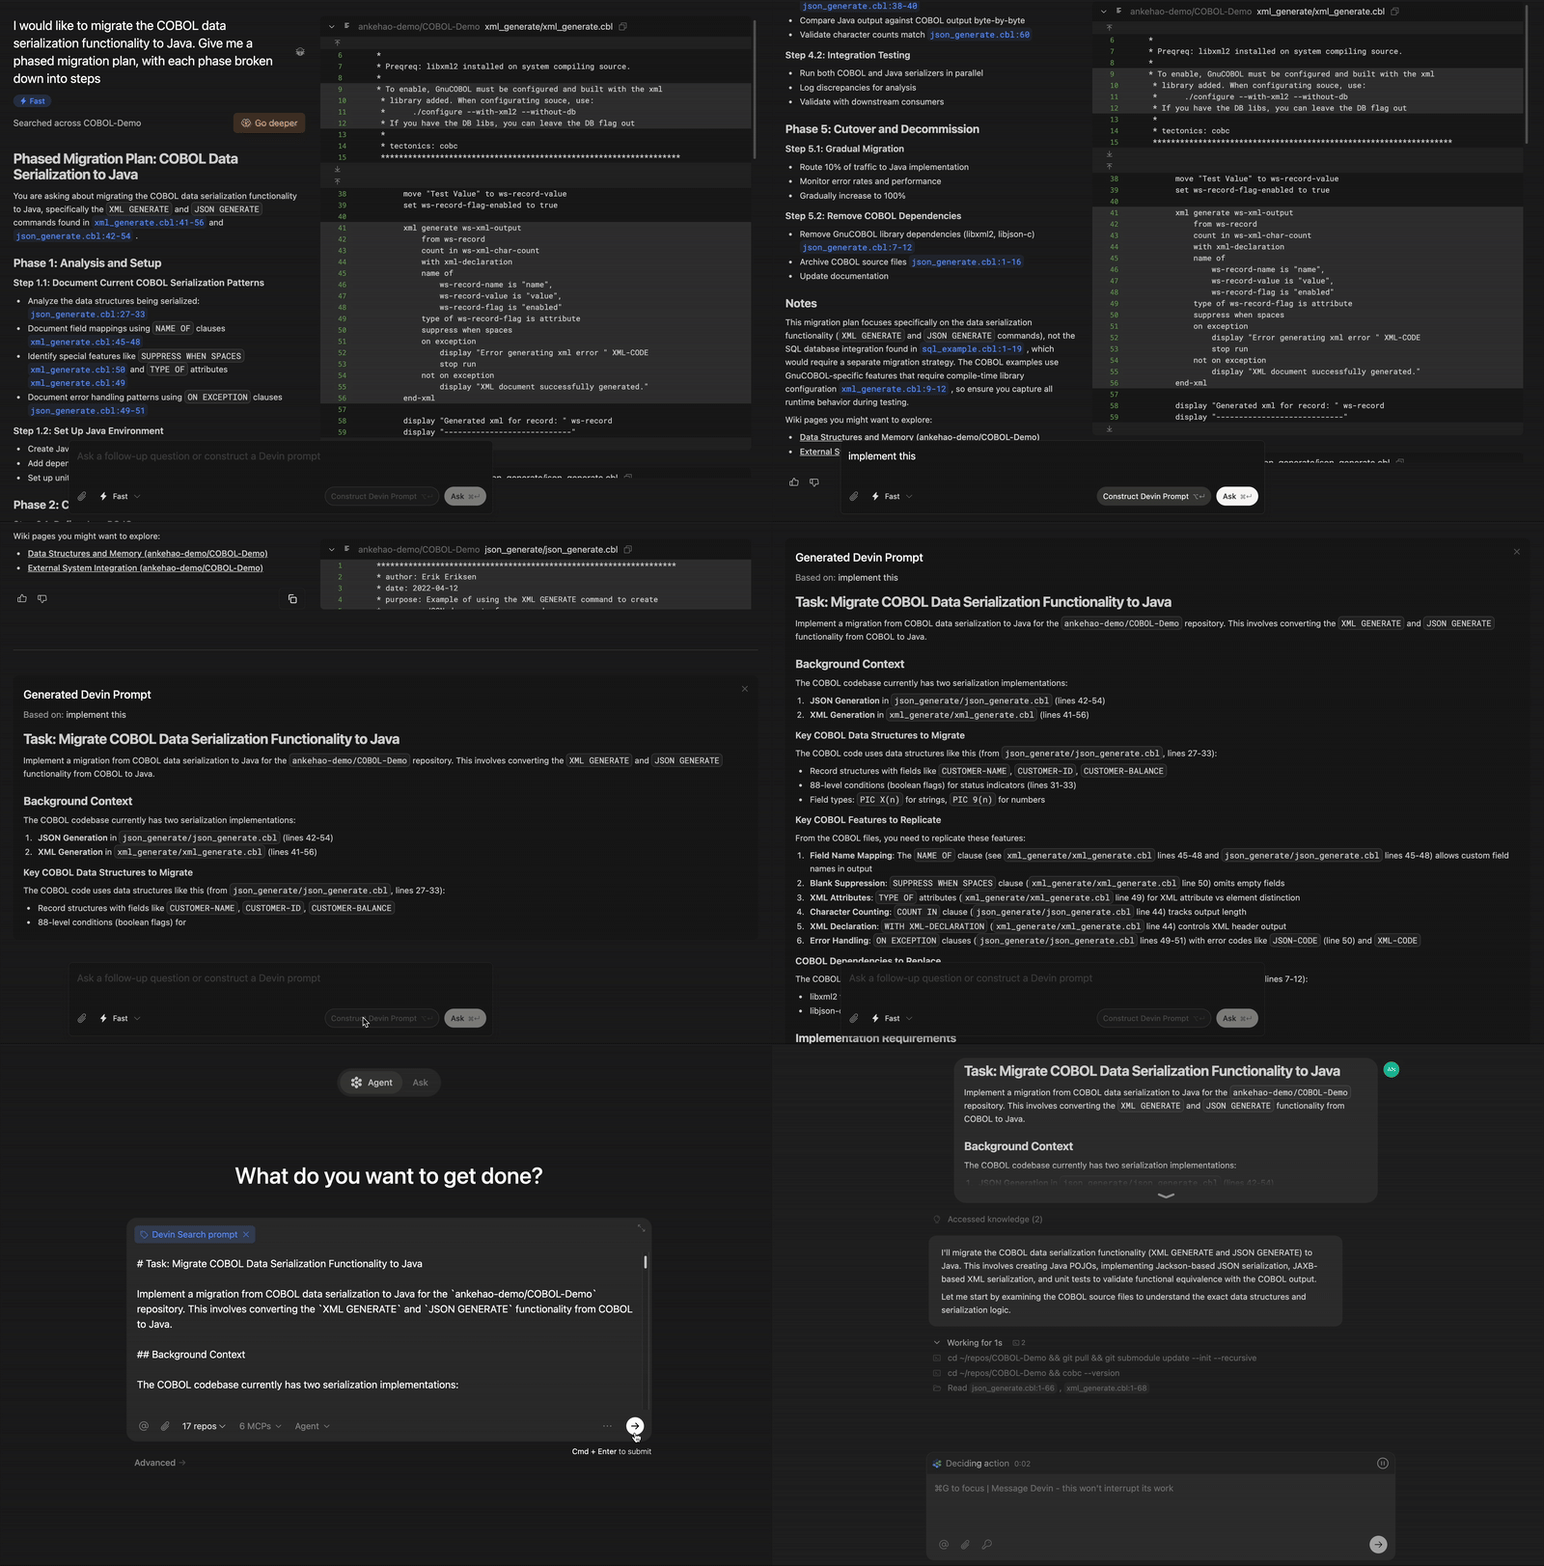 For Agent mode from the main page, toggle to Agent mode and select the repository/repositories you want to work with.
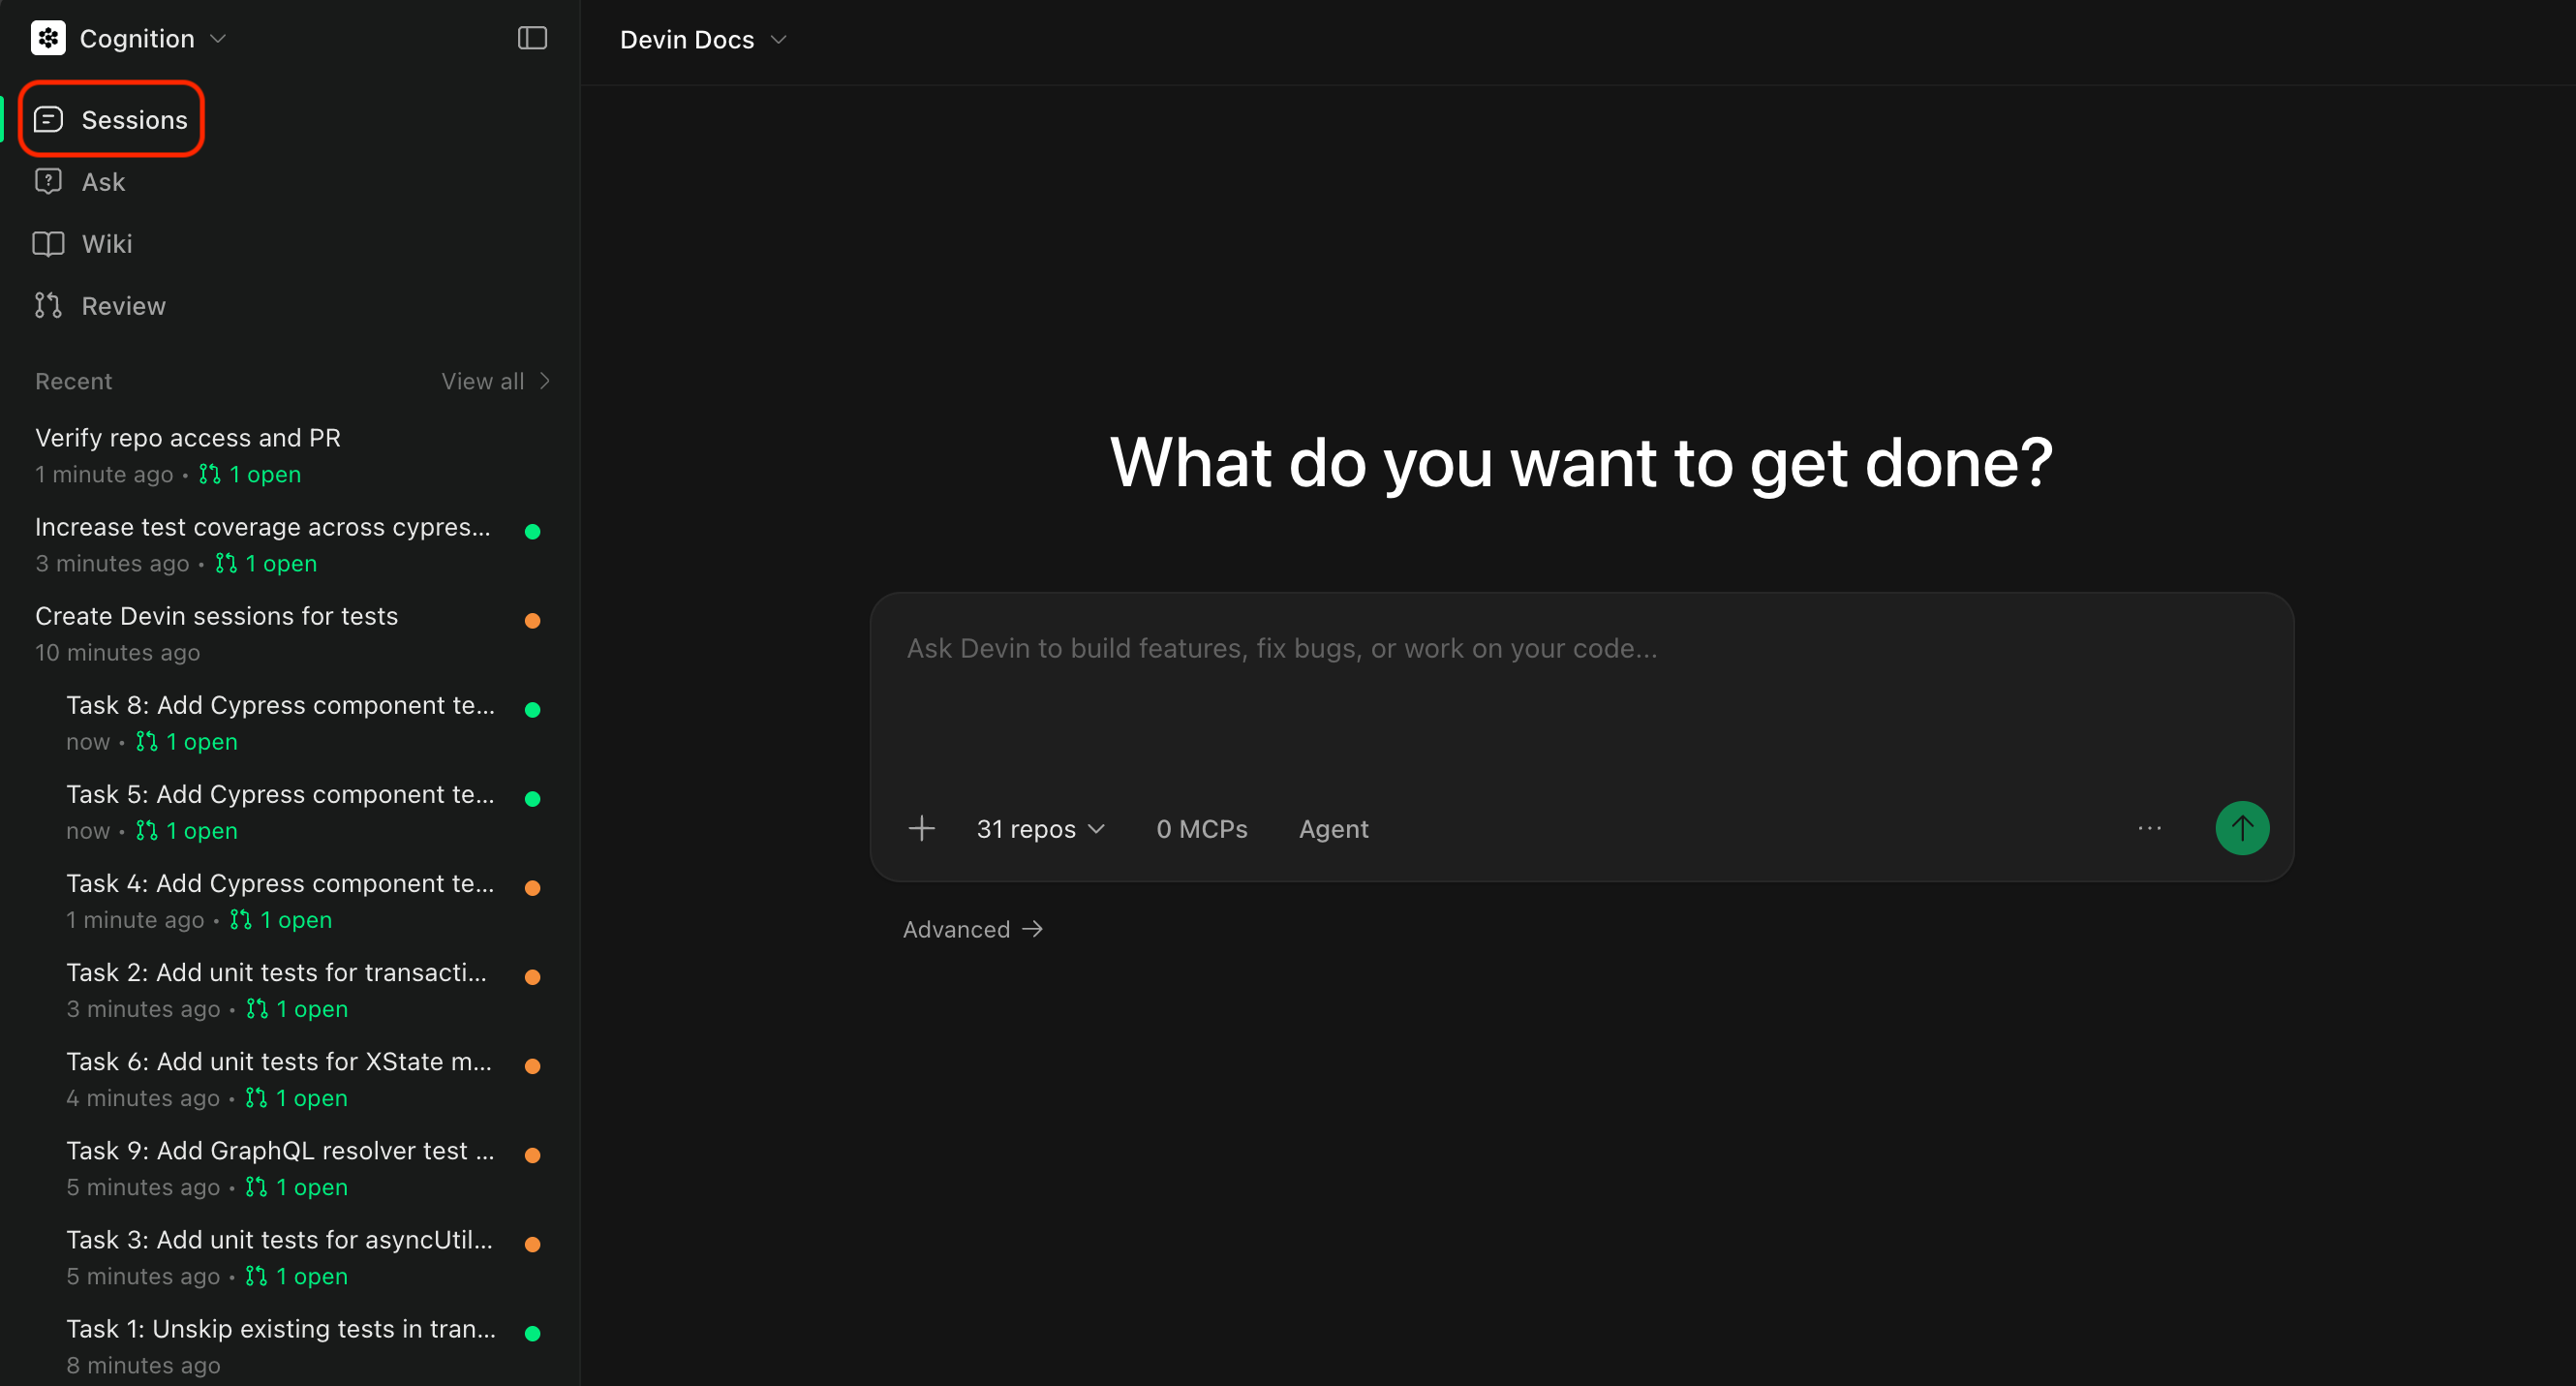 When starting an Agent session, you'll configure a few options: selecting a Repository and selecting an Agent.
#### Selecting a Repository
Select the repository you want Devin to work with. Click the repository selector to see all repositories that have been [added to Devin's machine](/onboard-devin/environment).
When starting an Agent session, you'll configure a few options: selecting a Repository and selecting an Agent.
#### Selecting a Repository
Select the repository you want Devin to work with. Click the repository selector to see all repositories that have been [added to Devin's machine](/onboard-devin/environment).
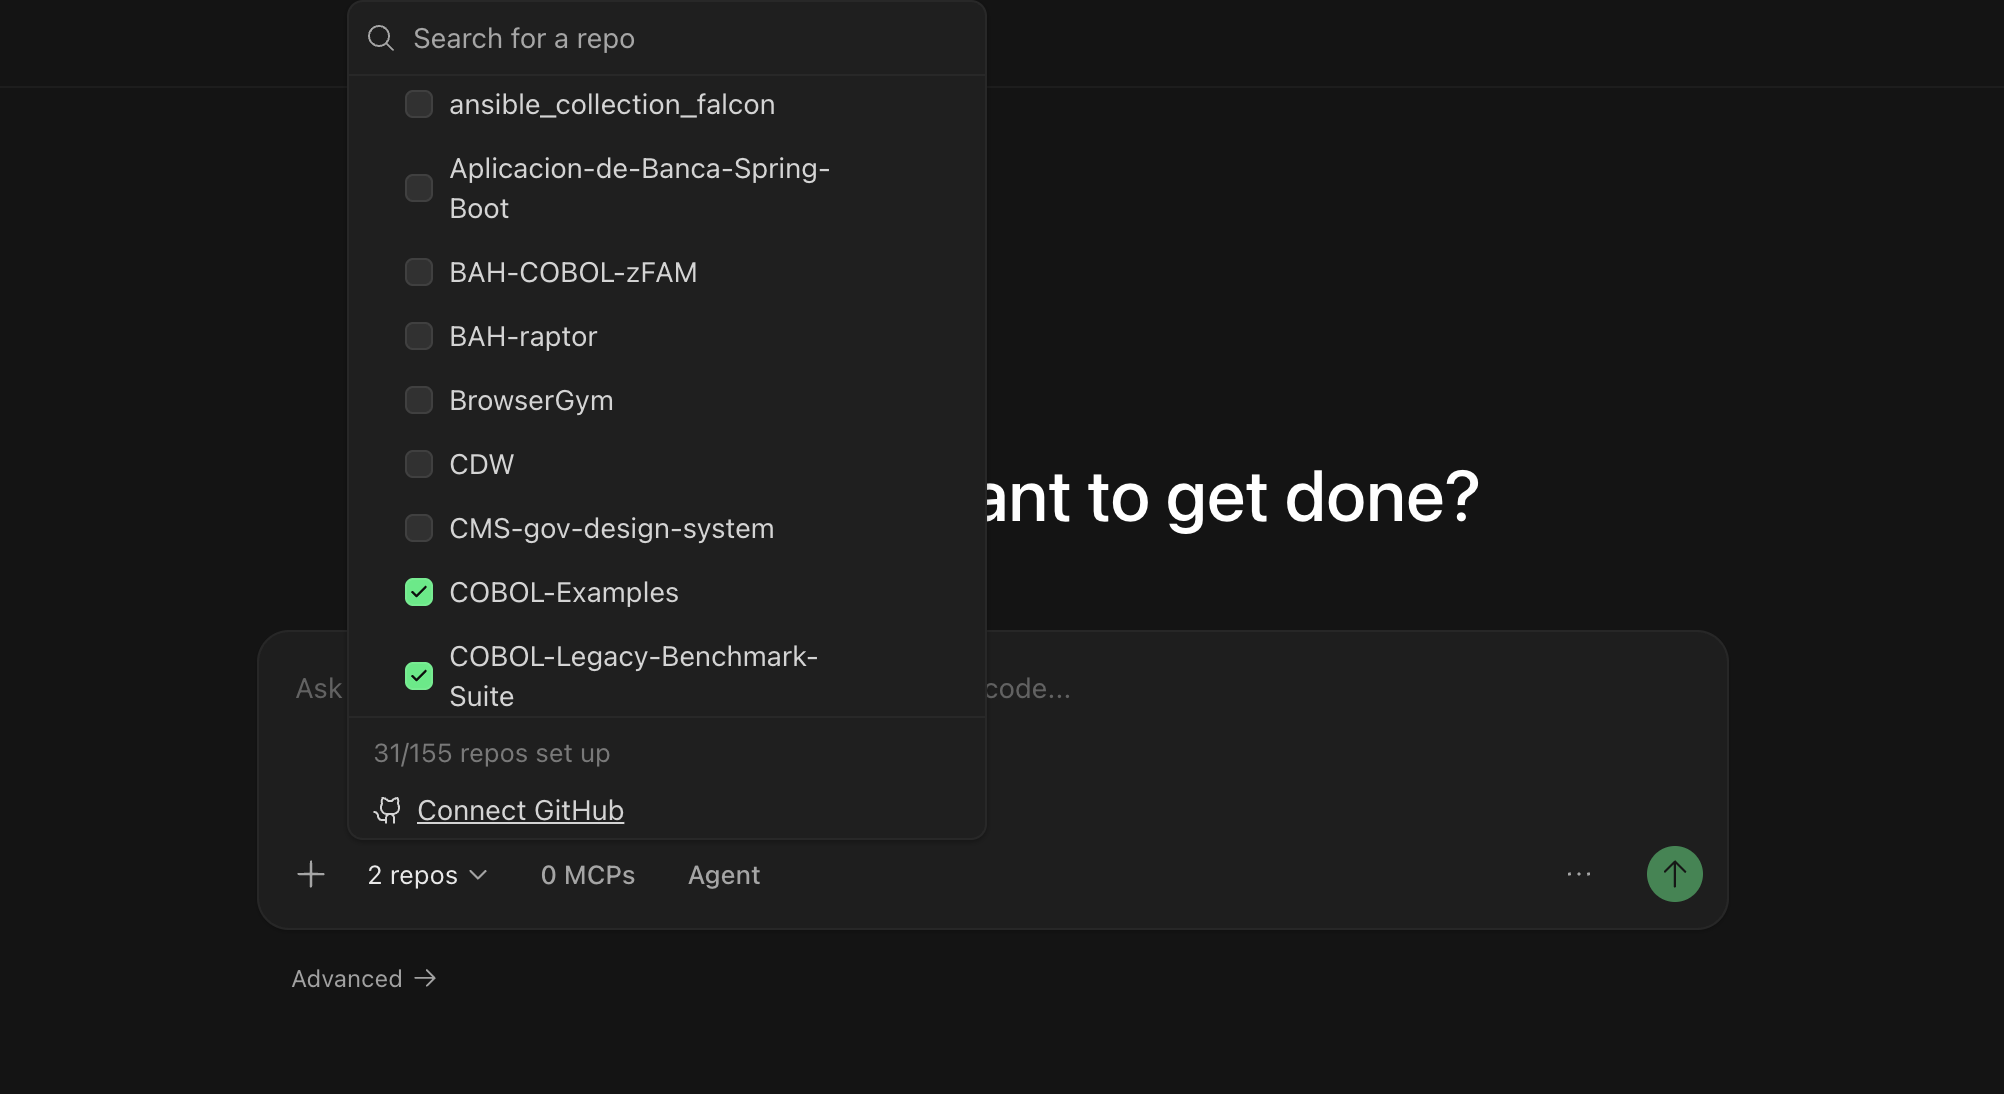 Selecting a repository ensures Devin:
* Has access to your codebase and can make changes
* Uses the correct branch as a starting point
* Can create pull requests to the right repository
#### Selecting an Agent
You can choose which agent configuration Devin uses for your session. Different agents may have different capabilities or be optimized for specific types of tasks.
Available agents include:
* **Devin** (default) — A general-purpose AI software engineer for building features, fixing bugs, refactoring code, and most development tasks.
* **Fast Mode** — An optimized mode for quick, well-scoped tasks.
* **[Dana](/work-with-devin/data-analyst)** — A data analyst agent optimized for querying databases, analyzing data, and creating visualizations.
Selecting a repository ensures Devin:
* Has access to your codebase and can make changes
* Uses the correct branch as a starting point
* Can create pull requests to the right repository
#### Selecting an Agent
You can choose which agent configuration Devin uses for your session. Different agents may have different capabilities or be optimized for specific types of tasks.
Available agents include:
* **Devin** (default) — A general-purpose AI software engineer for building features, fixing bugs, refactoring code, and most development tasks.
* **Fast Mode** — An optimized mode for quick, well-scoped tasks.
* **[Dana](/work-with-devin/data-analyst)** — A data analyst agent optimized for querying databases, analyzing data, and creating visualizations.
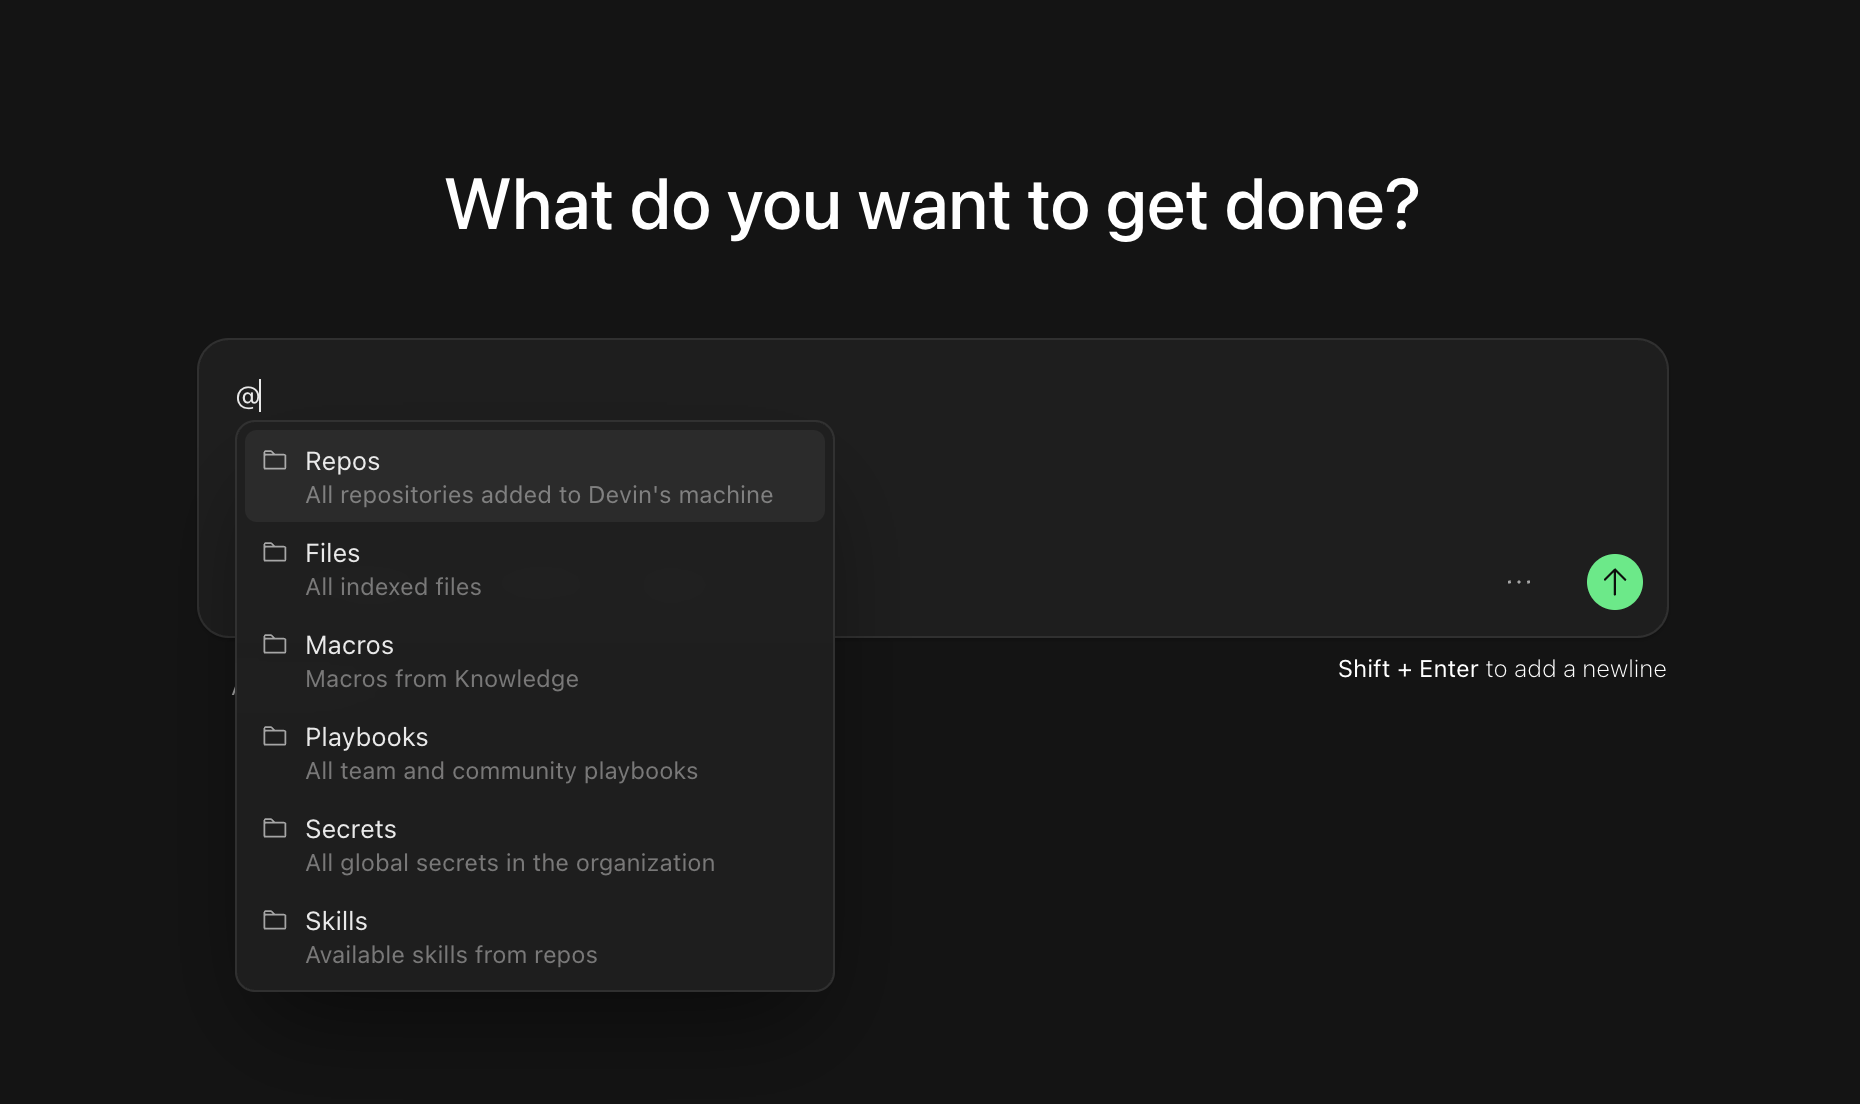 @ mentions help Devin understand exactly what you're working with and reduce ambiguity in your prompts.
## Scoping Your First Session
Start with tasks that have **clear success criteria** and **provide Devin with the context it needs** — just as you would when handing off work to a teammate. As you get comfortable, try progressively more complex tasks. We've seen users work with Devin on everything from fixing small bugs to targeted refactors to large-scale migrations and building entire features from scratch.
@ mentions help Devin understand exactly what you're working with and reduce ambiguity in your prompts.
## Scoping Your First Session
Start with tasks that have **clear success criteria** and **provide Devin with the context it needs** — just as you would when handing off work to a teammate. As you get comfortable, try progressively more complex tasks. We've seen users work with Devin on everything from fixing small bugs to targeted refactors to large-scale migrations and building entire features from scratch.