> ## Documentation Index
> Fetch the complete documentation index at: https://docs.devin.ai/llms.txt
> Use this file to discover all available pages before exploring further.
# SCIM Setup
> Automatically provision and deprovision users and groups from your identity provider using SCIM 2.0.
Devin Enterprise supports SCIM 2.0 for automatic user and group provisioning. With SCIM, your identity provider (Okta, Microsoft Entra ID, or any SCIM 2.0-compliant IdP) pushes changes to Devin in real time — users are created before their first login, deprovisioned users lose enterprise membership immediately, and group memberships stay in sync without waiting for the next login.
SCIM complements [SSO](/enterprise/security-access/sso/guide). SSO is not required to use SCIM, but it is highly recommended.
Before enabling SCIM, contact support to turn off login-based IdP group syncing. Otherwise groups re-sync on every login and conflict with the groups SCIM pushes. This only affects group syncing — users are still provisioned normally.
## What SCIM Manages
| Resource | Supported operations |
| :--------- | :--------------------------------------------- |
| **Users** | Create, read, list, update, deactivate, delete |
| **Groups** | Create, read, list, update, delete |
SCIM-provisioned groups appear as [IdP groups](/enterprise/security-access/idp-groups) in Devin, so you can map them to enterprise roles and org access the same way as groups synced from SSO logins. Unlike login-synced groups, renaming a SCIM group in your IdP preserves its role and org mappings in Devin.
## Step 1: Get Your SCIM Credentials
1. In Devin, go to **Settings → Enterprise → Members**
2. Scroll to the **SCIM provisioning** section at the bottom of the Membership page
3. Copy the **SCIM base URL**
4. Click **Generate token** and copy the bearer token
The bearer token is only shown once. Store it securely. You can rotate or revoke it from the same settings section at any time.
## Step 2: Configure Your Identity Provider
SCIM is set up as a separate application from your existing Devin SSO app.
**Create the application**
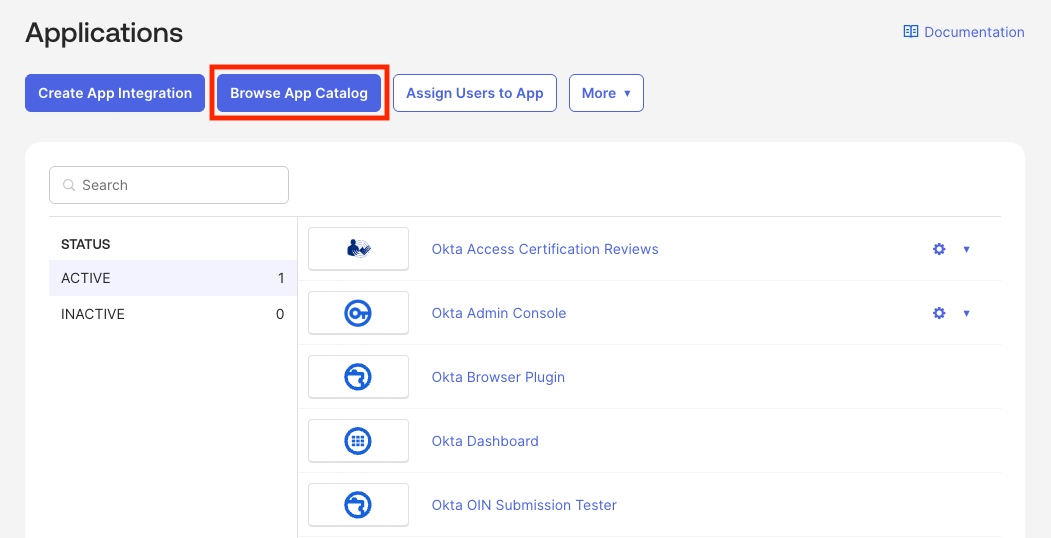
1. In the Okta Admin Console, go to **Applications → Applications** and click **Browse App Catalog**
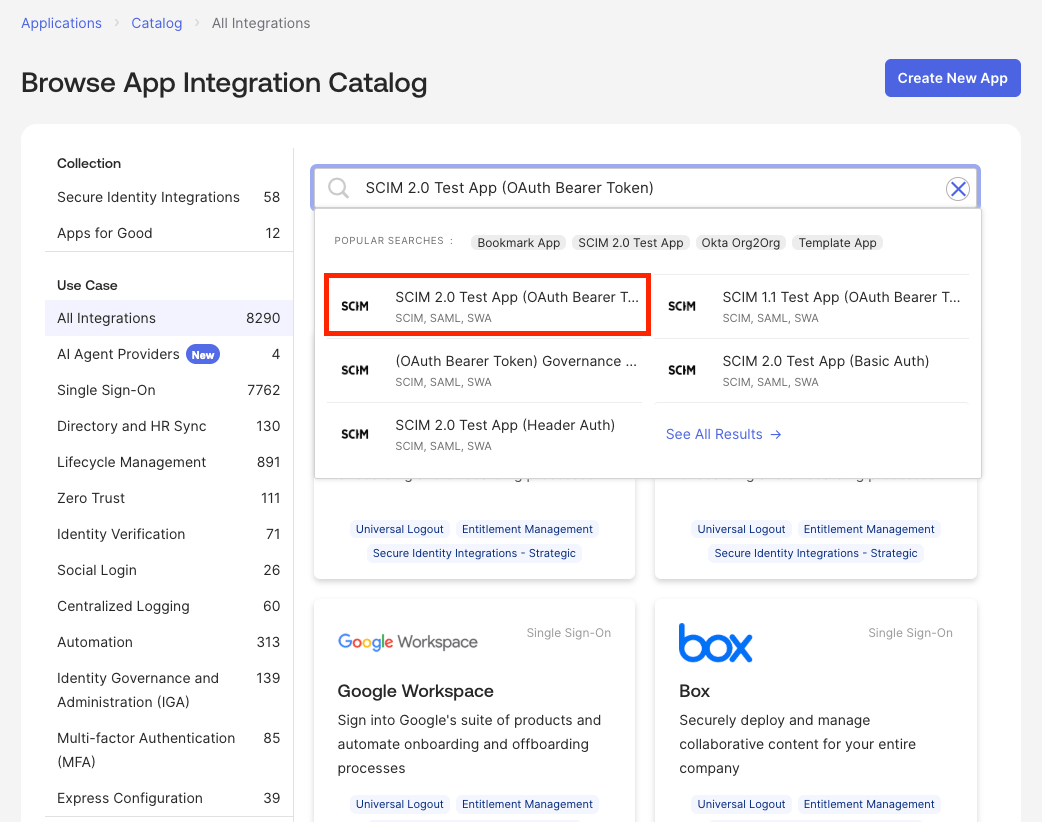
 2. Search for **SCIM 2.0 Test App (OAuth Bearer Token)**
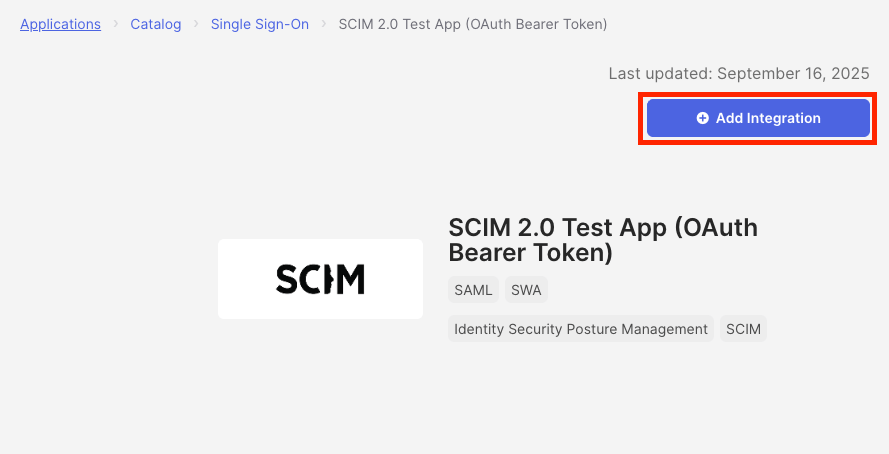
 3. Click **Add Integration** and name it for easy reference (e.g. `Devin (SCIM)`)
 **Configure the application**
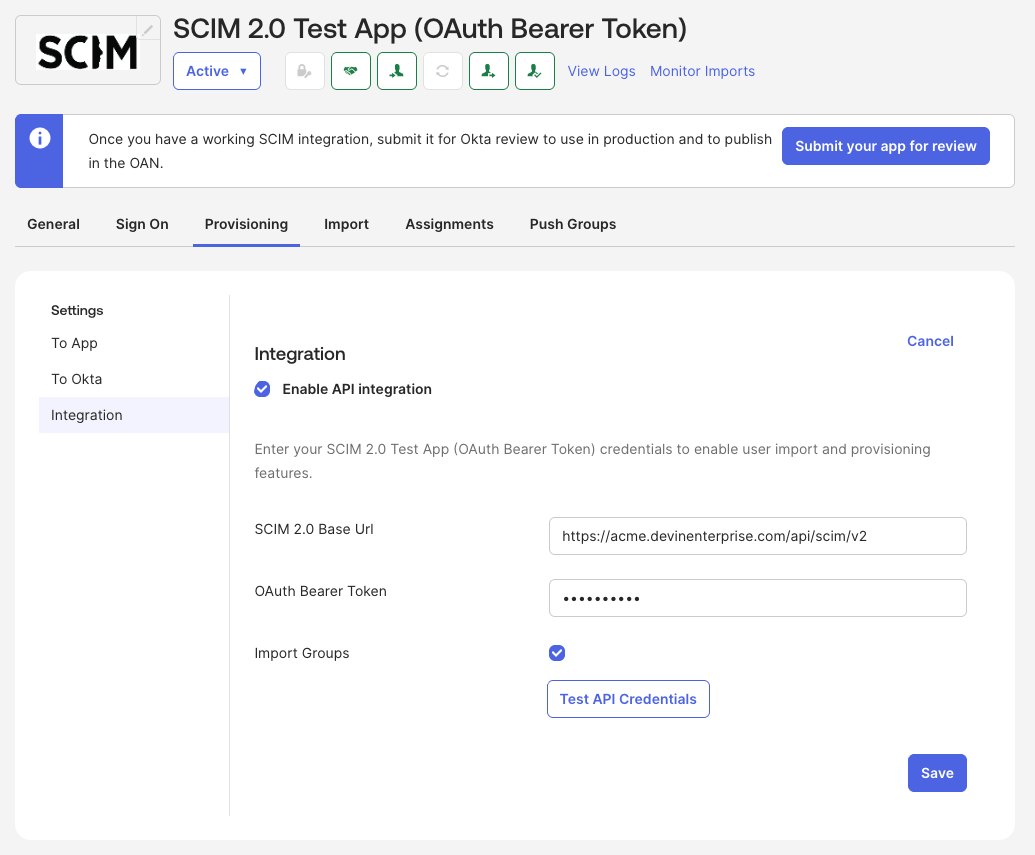
1. Open the app → **Provisioning → Integration**, click **Configure API Integration**, and check **Enable API integration**
* **SCIM 2.0 Base Url:** the SCIM base URL from Devin
* **OAuth Bearer Token:** the bearer token from Devin
* Click **Test API Credentials** — this should succeed — then **Save**
**Configure the application**
1. Open the app → **Provisioning → Integration**, click **Configure API Integration**, and check **Enable API integration**
* **SCIM 2.0 Base Url:** the SCIM base URL from Devin
* **OAuth Bearer Token:** the bearer token from Devin
* Click **Test API Credentials** — this should succeed — then **Save**
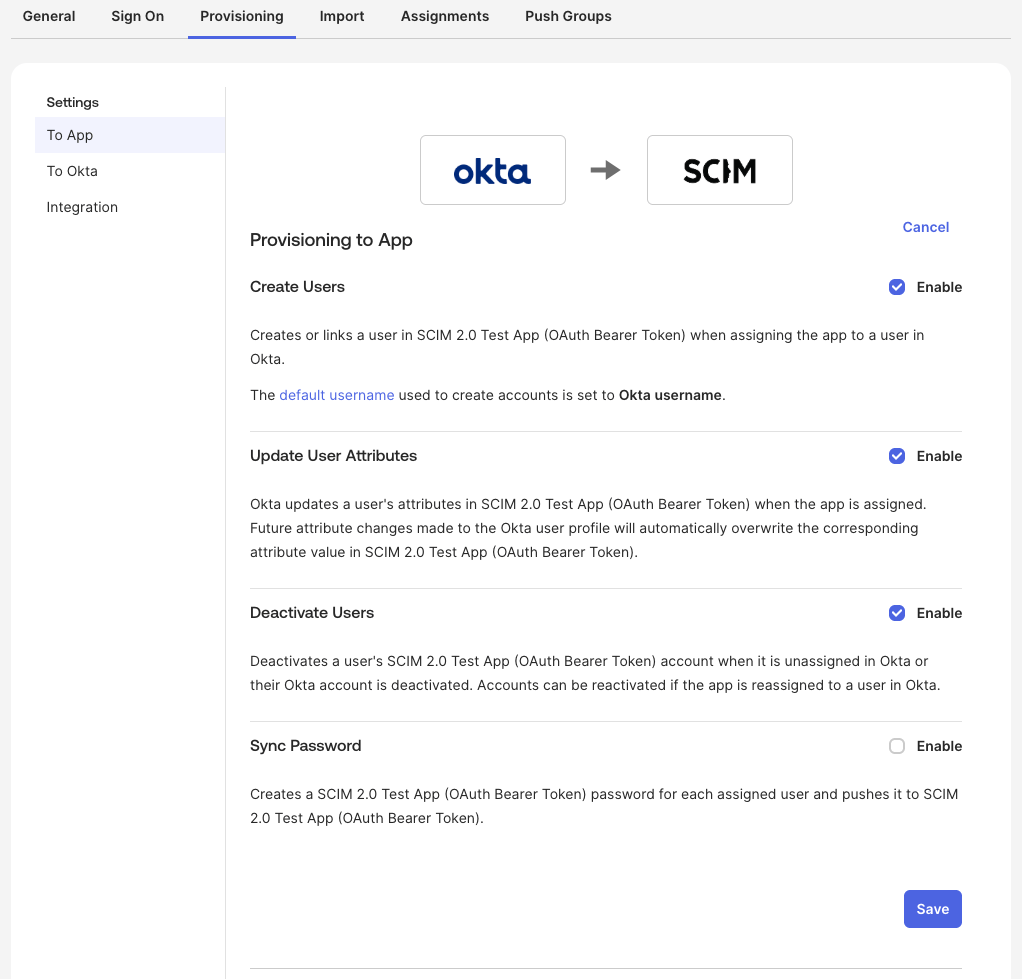
 2. Open the app → **Provisioning → To App**, click **Edit**, enable **Create Users**, **Update User Attributes**, and **Deactivate Users**, then click **Save**
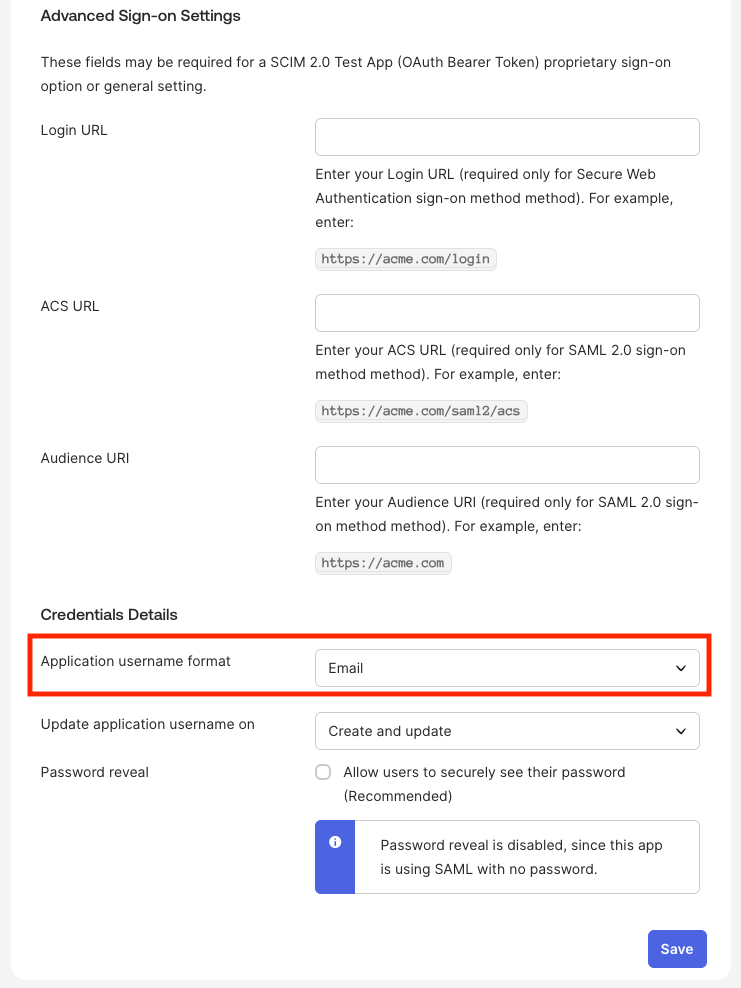
 3. Open the app → **Sign On**, click **Edit**, set **Application username format** to **Email**, and click **Save**
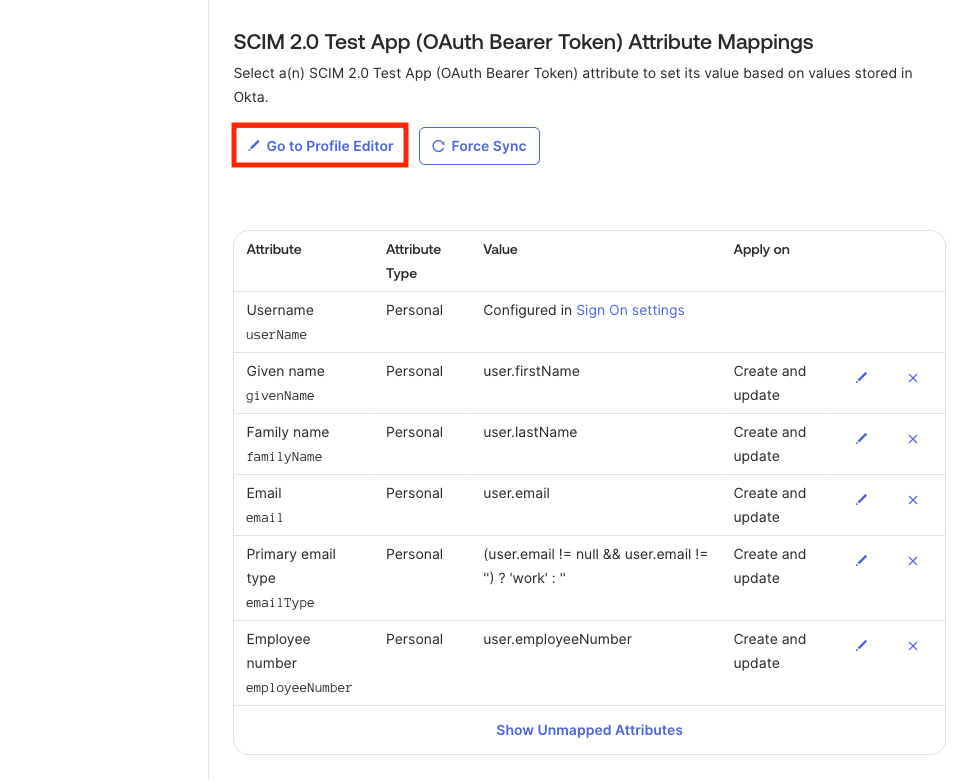
 4. Open the app → **Provisioning → To App**, scroll to the attribute mappings, and click **Go to Profile Editor**
 5. In the Profile Editor, click **Mappings**
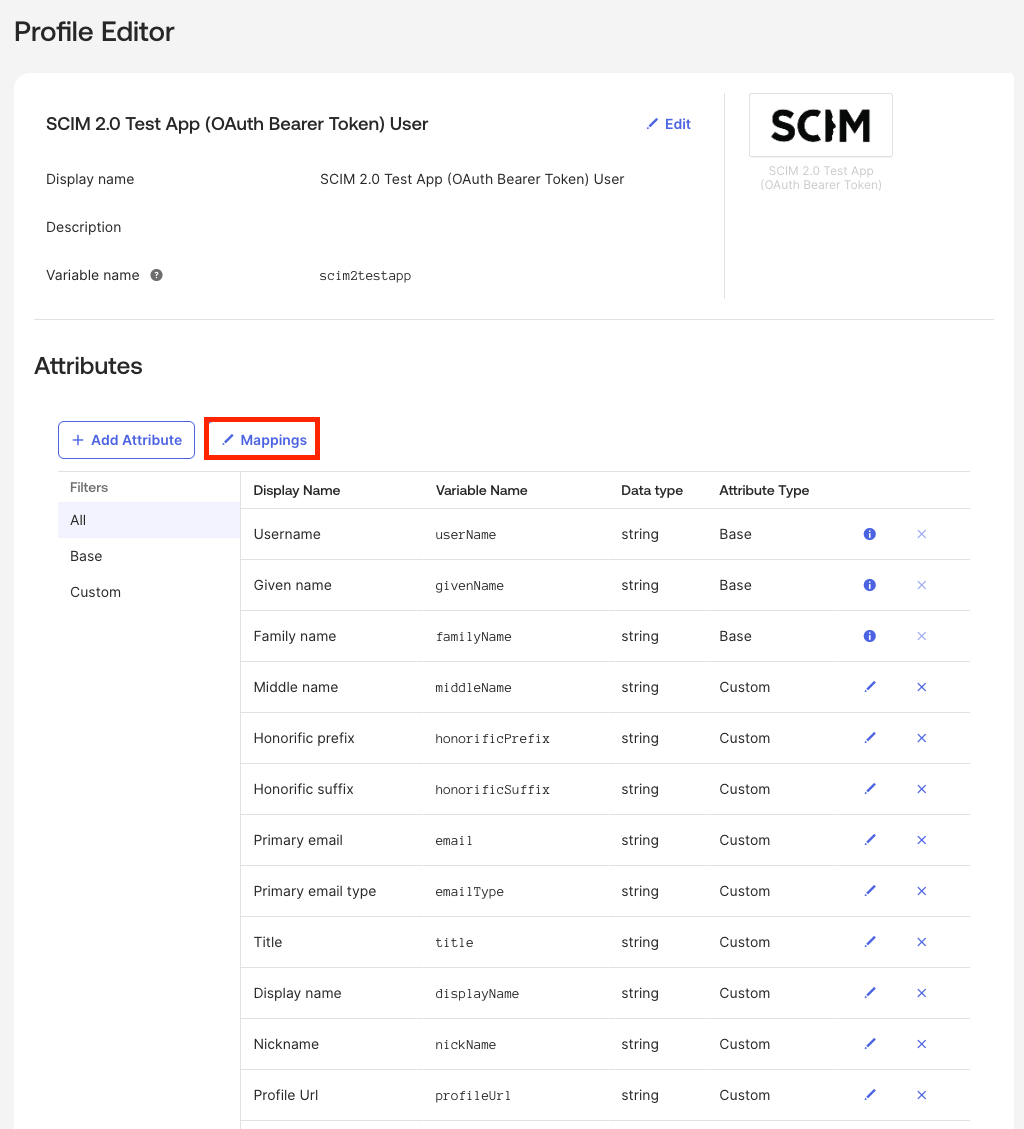 * On the first tab (Okta user to app), set all mappings to **Do not map** except `appuser.givenName → firstName`, `appuser.familyName → lastName`, and `appuser.email → email`, then click **Save Mappings**
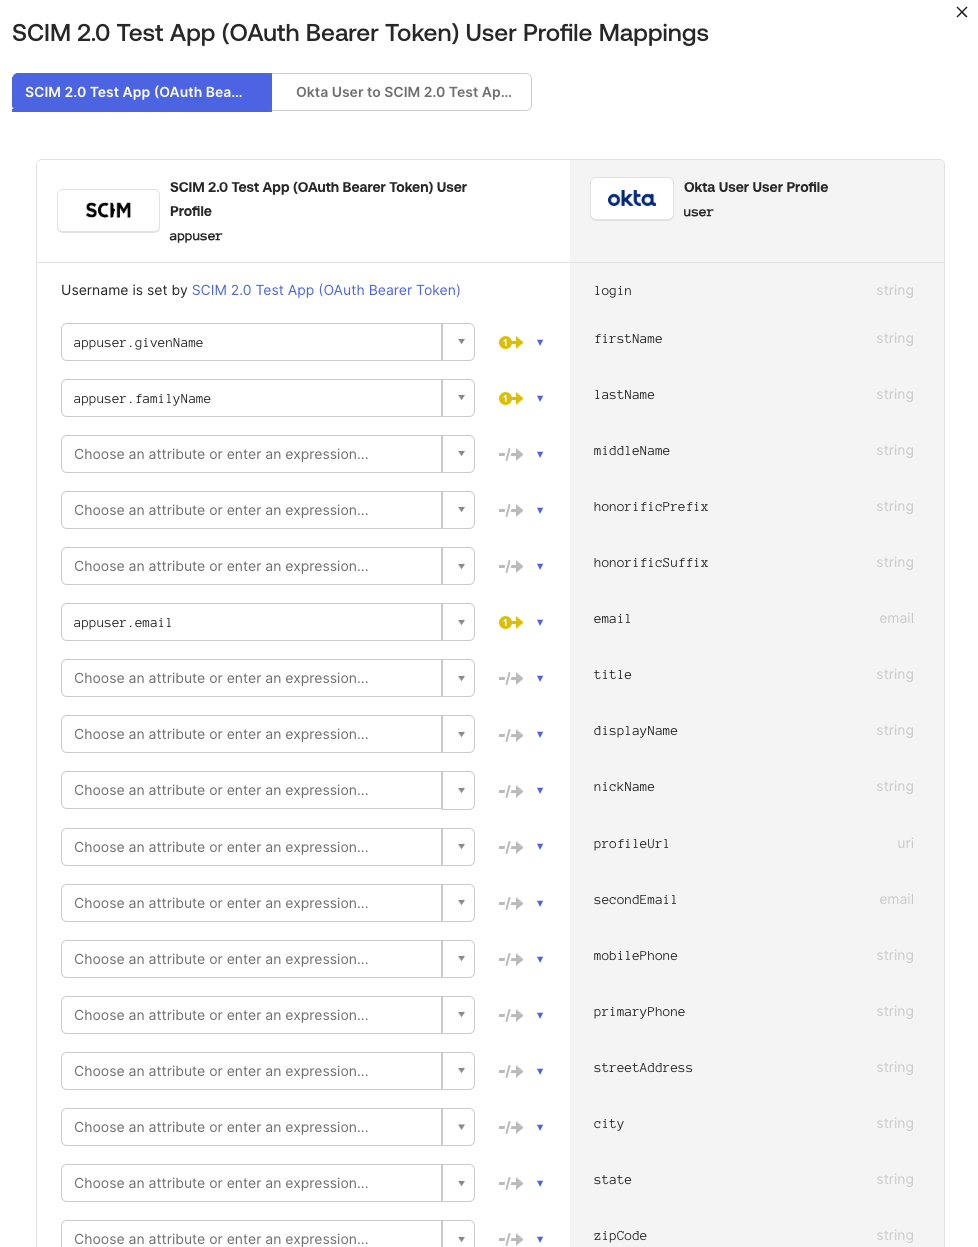 * On the second tab (app to Okta user), set all mappings to **Do not map** except `user.firstName`, `user.lastName`, and `user.email`, then click **Save Mappings**
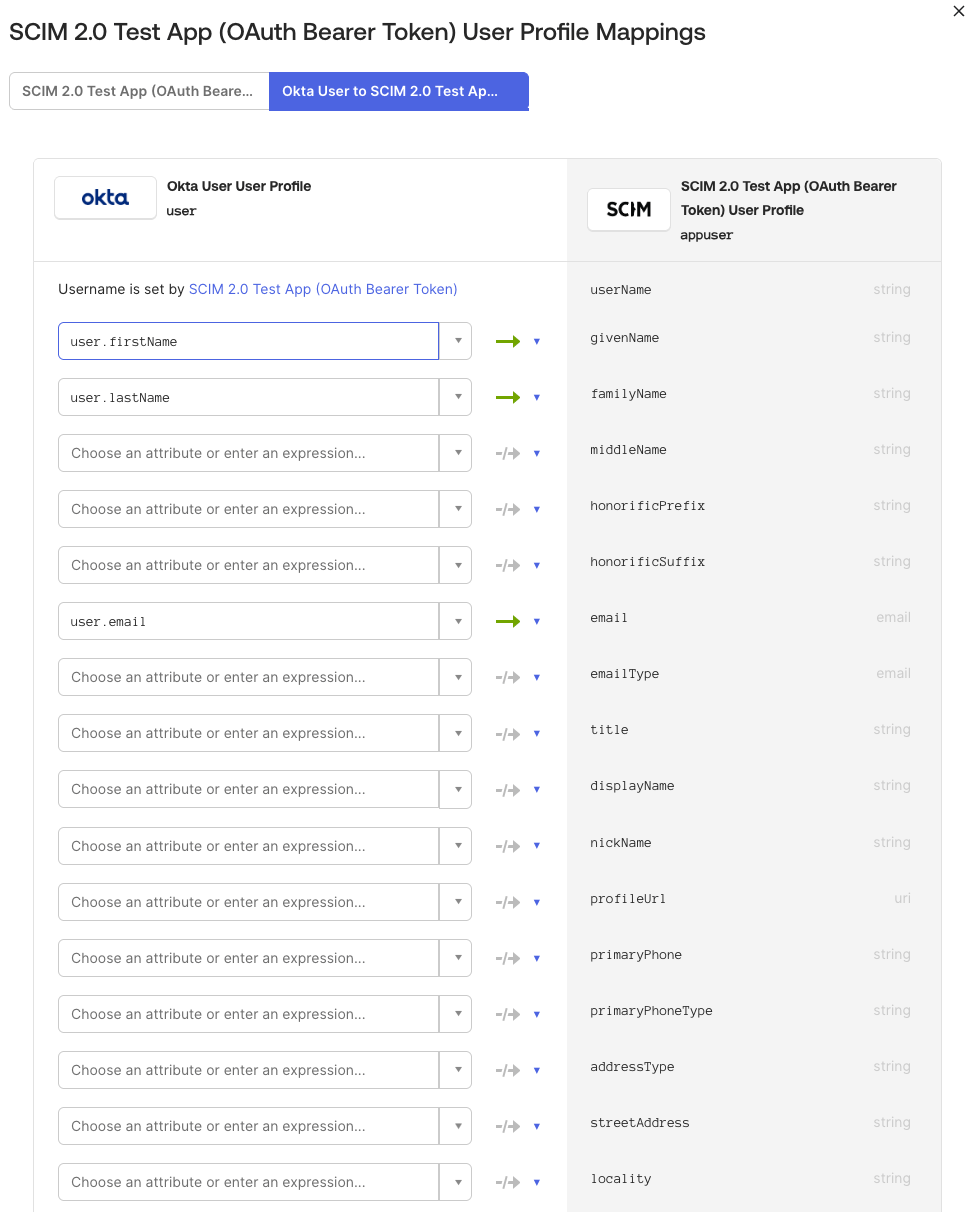 **Assign users and groups**
* Assign users (and groups) under the **Assignments** tab
* To sync groups to Devin, also push them under the **Push Groups** tab
SCIM is set up as a separate application from your existing Devin SSO app.
**Create the application**
1. In the Entra admin center, go to **Enterprise applications** and click **+ New application**
**Assign users and groups**
* Assign users (and groups) under the **Assignments** tab
* To sync groups to Devin, also push them under the **Push Groups** tab
SCIM is set up as a separate application from your existing Devin SSO app.
**Create the application**
1. In the Entra admin center, go to **Enterprise applications** and click **+ New application**
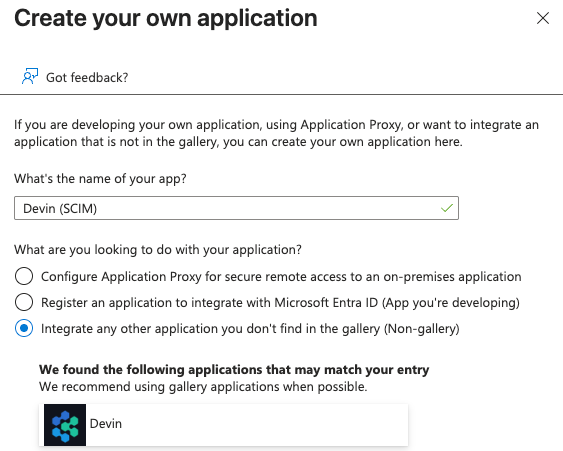
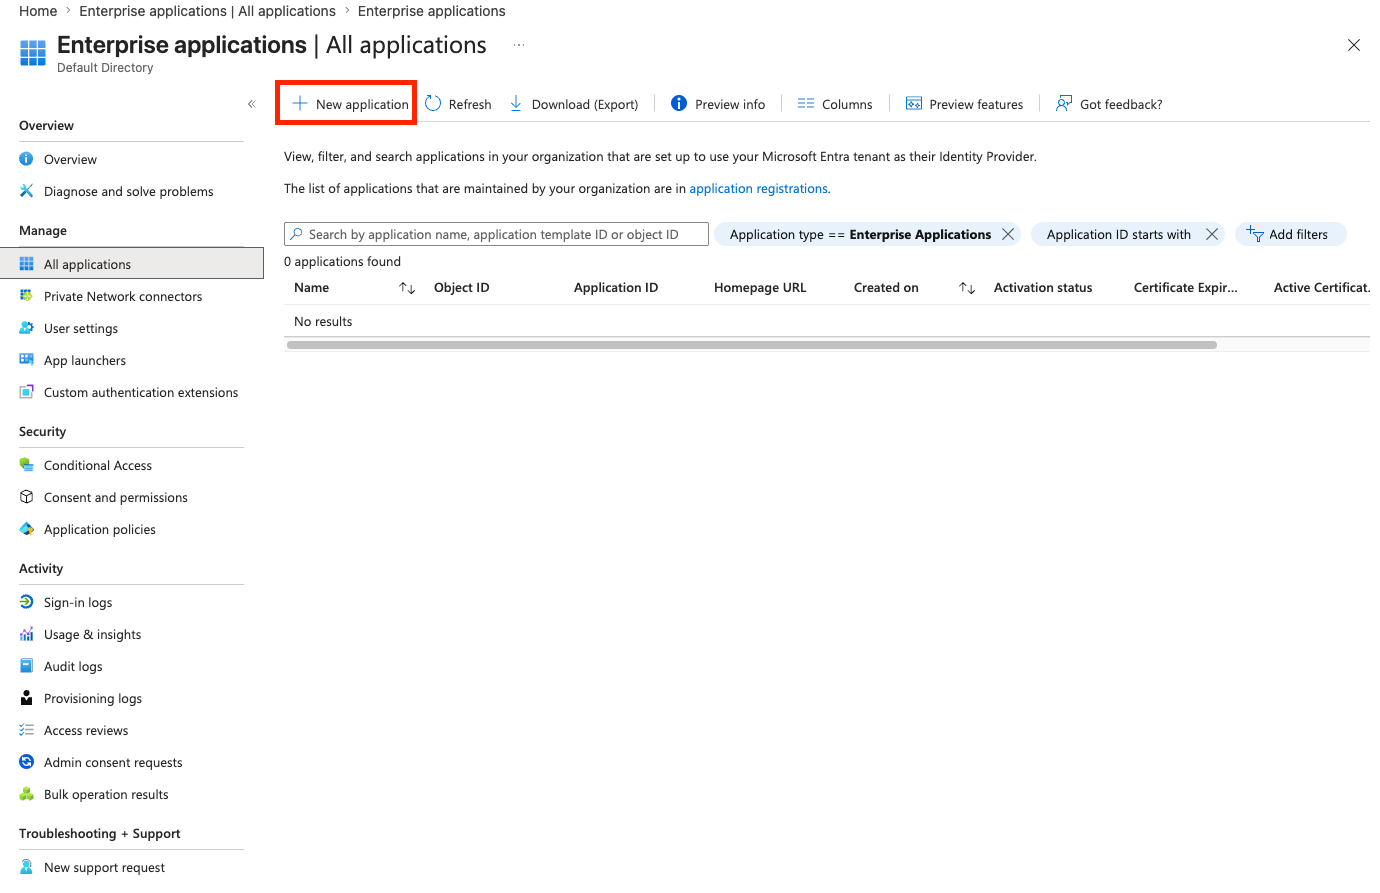 2. Click **+ Create your own application**
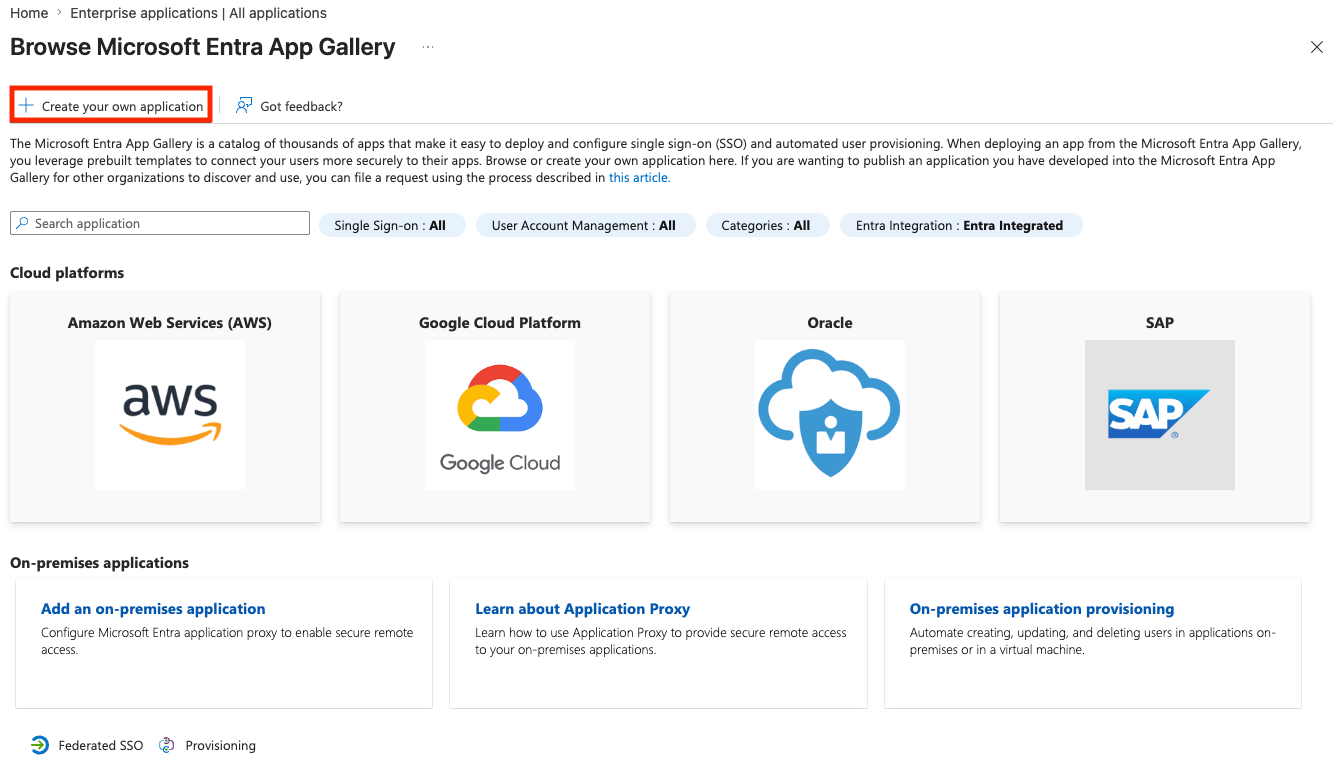 3. Name it for easy reference (e.g. `Devin (SCIM)`), keep the non-gallery option selected, and click **Create**
 **Configure the application**
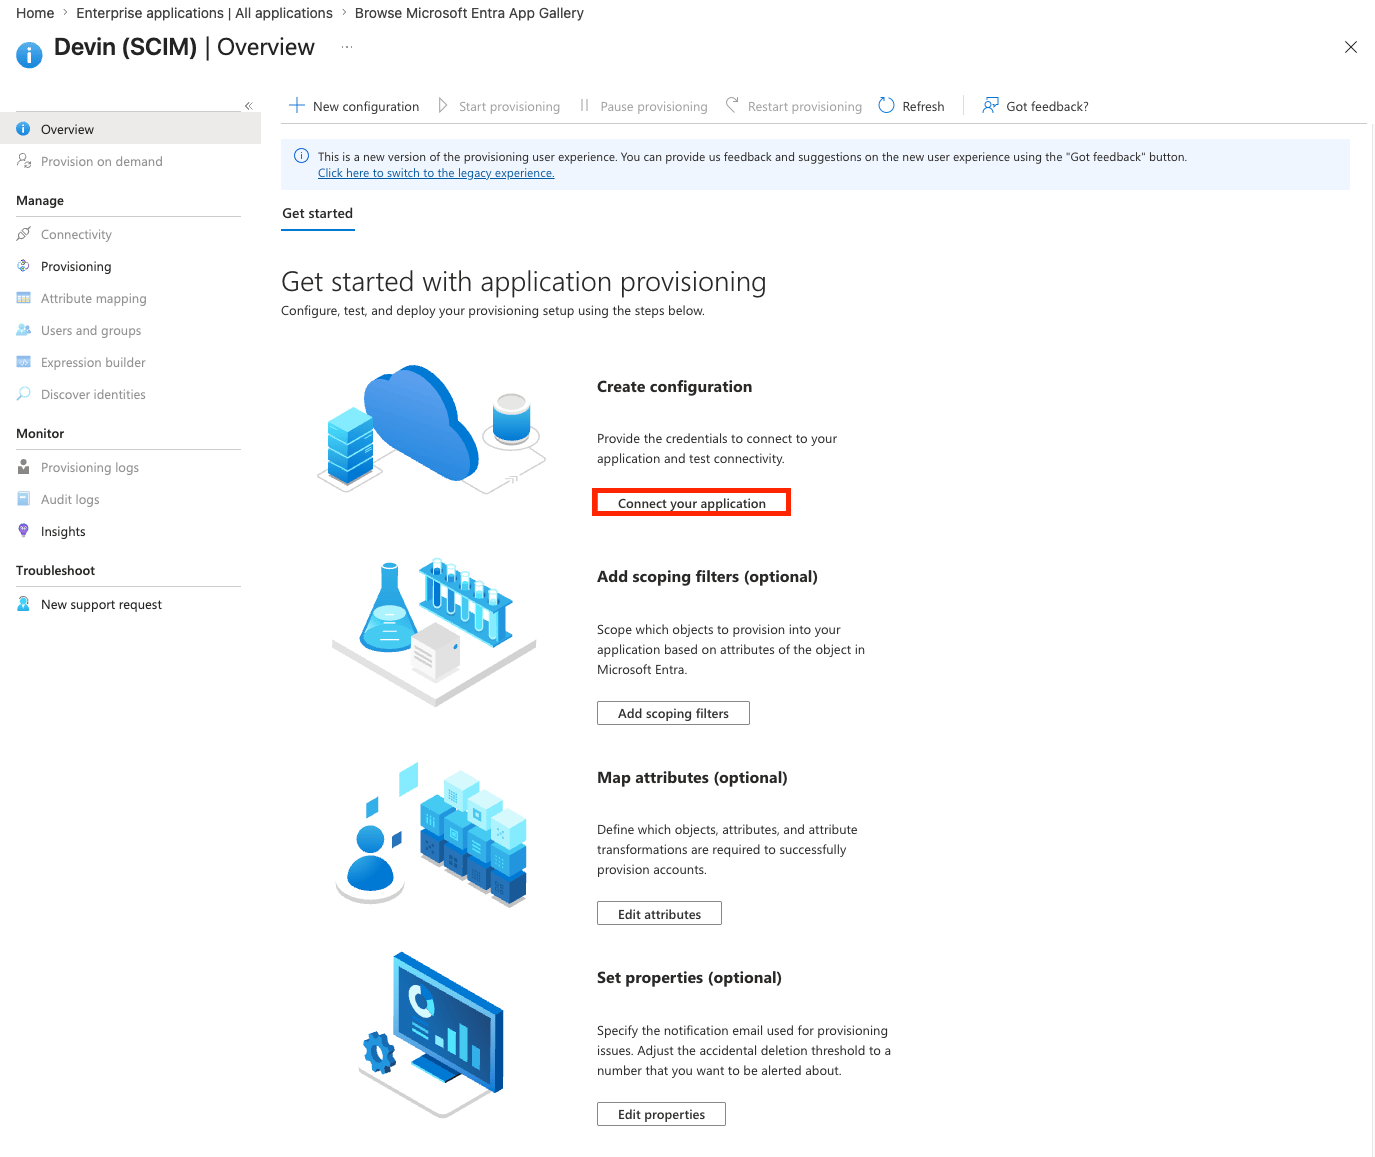
1. Open the app → **Provisioning** and click **Connect your application**
**Configure the application**
1. Open the app → **Provisioning** and click **Connect your application**
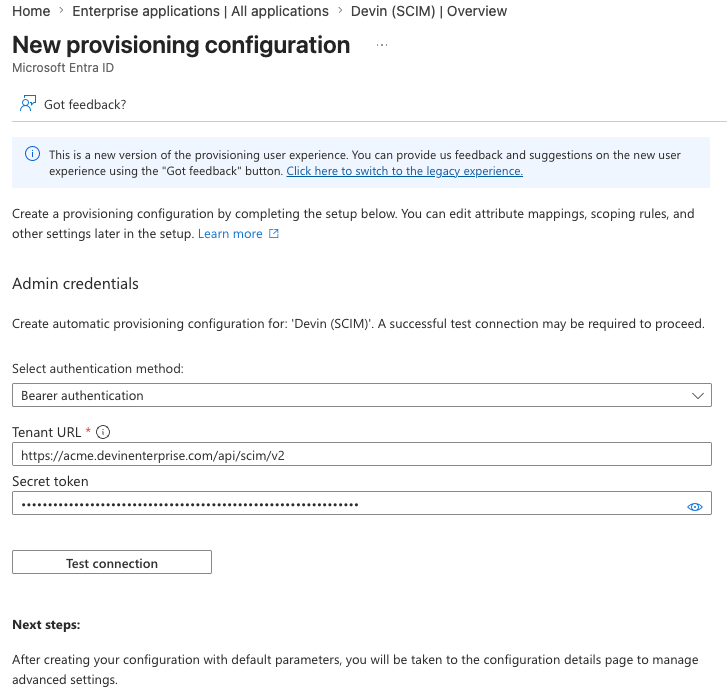
 * **Tenant URL:** the SCIM base URL from Devin
* **Secret Token:** the bearer token from Devin
* Click **Test Connection** — this should succeed — then **Save**
* **Tenant URL:** the SCIM base URL from Devin
* **Secret Token:** the bearer token from Devin
* Click **Test Connection** — this should succeed — then **Save**
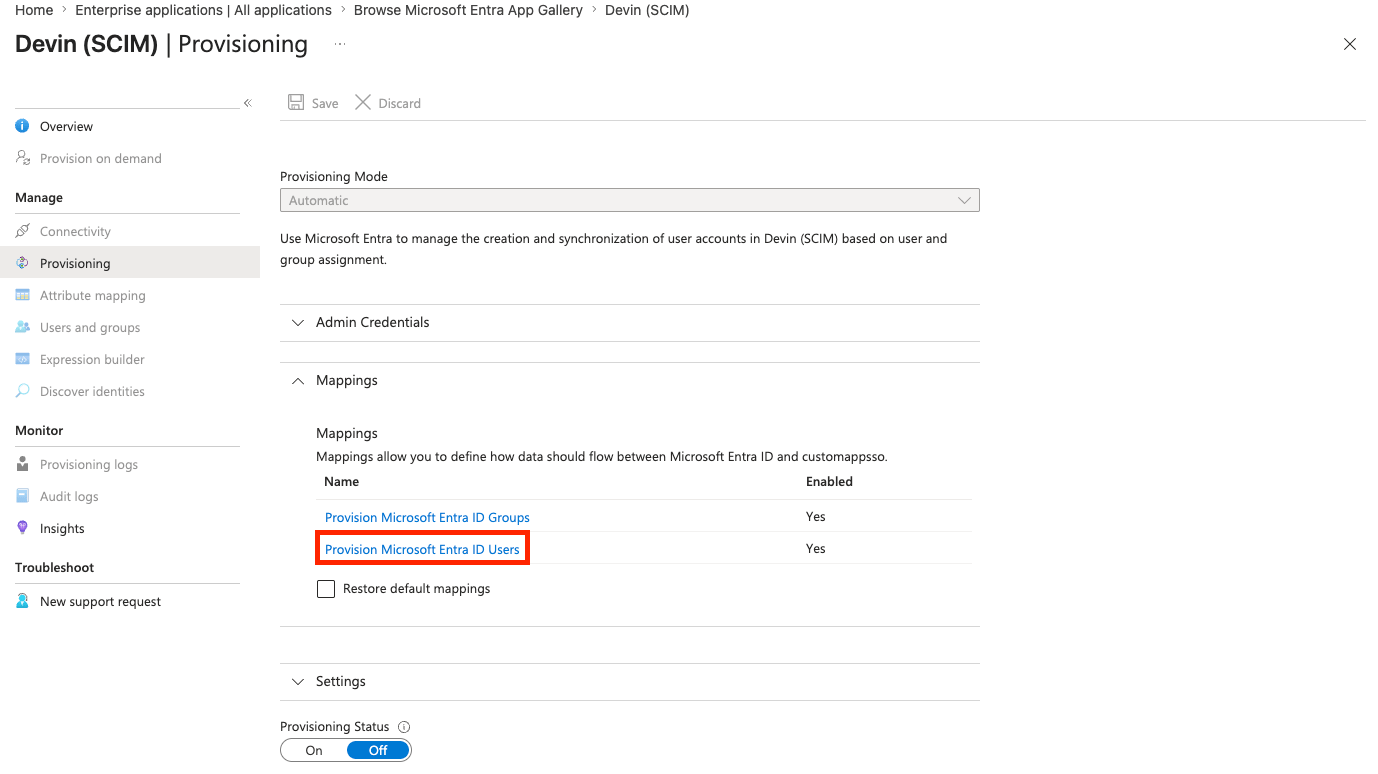
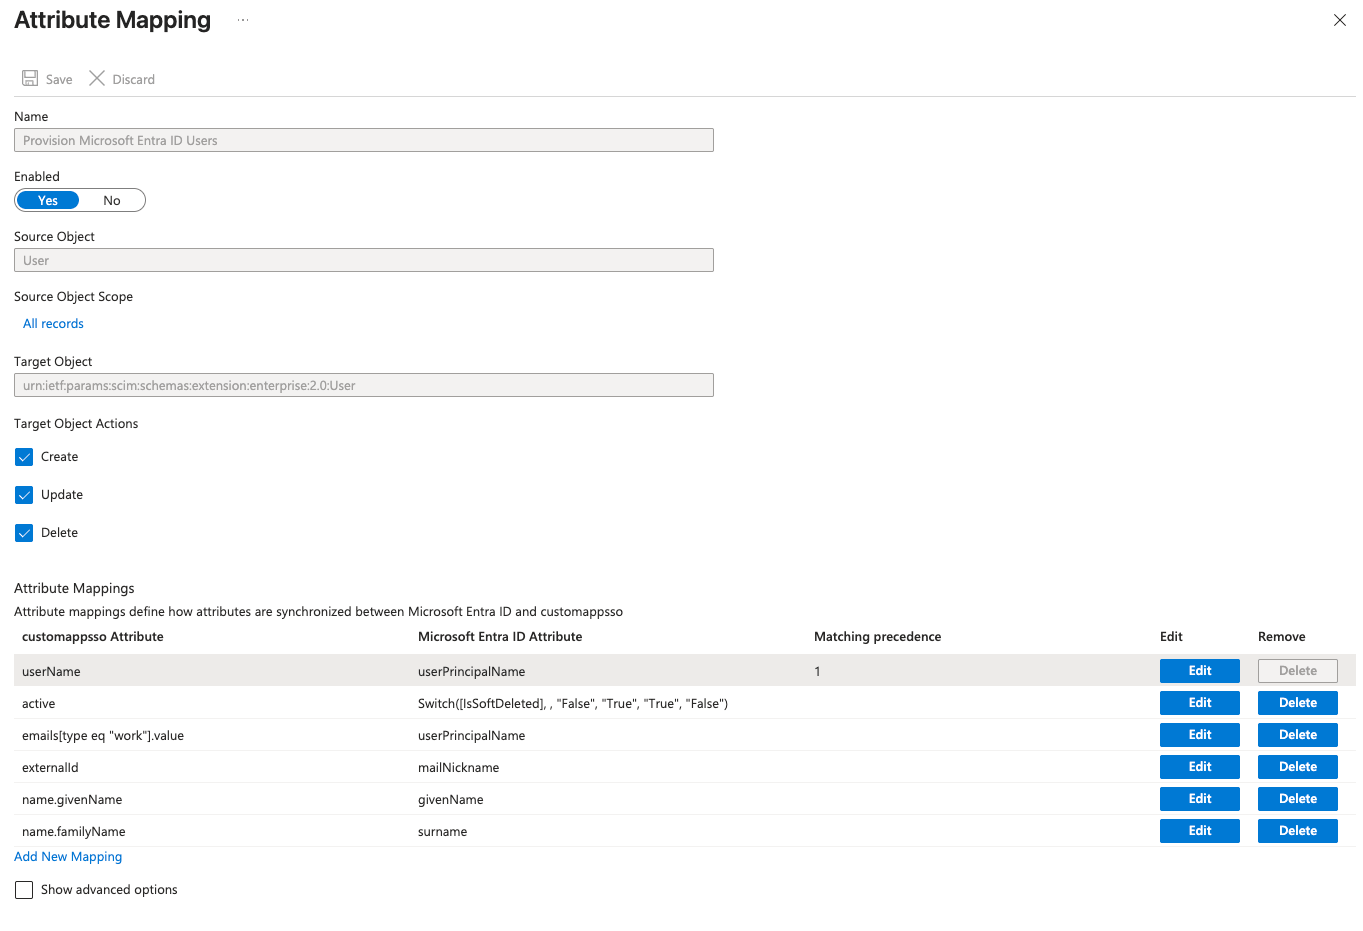
 2. Open the app → **Provisioning → Mappings → Provision Microsoft Entra ID Users** (ensure provisioning is enabled for users and groups)
 * Edit `userName` so it matches the `emails[type eq "work"].value` mapping (e.g. set both to the Entra attribute `userPrincipalName`), then click **Save**
![userName and emails[type eq work].value both mapped to userPrincipalName](https://mintcdn.com/cognitionai/SyQRU3qbsN5IUTkF/images/enterprise/scim/entra/entra-attribute-mapping.png?fit=max&auto=format&n=SyQRU3qbsN5IUTkF&q=85&s=2bd379e45fd0bdcb26822316c3dc4417) * Remove all attribute mappings except `userName`, `active`, `name.givenName`, `name.familyName`, `emails[type eq "work"].value`, and `externalId`
* Remove all attribute mappings except `userName`, `active`, `name.givenName`, `name.familyName`, `emails[type eq "work"].value`, and `externalId`
 **Assign users and groups**
1. Open the app → **Users and groups** and click **+ Add user/group**
2. Open the app → **Provisioning** and click **Start provisioning** (set **Provisioning Status** to **On** for automatic background syncing on Entra's standard cycle, approximately every 40 minutes)
3. (Optional) To sync specific users immediately, use **Provisioning → Provision on demand**
Any SCIM 2.0-compliant identity provider can provision users and groups to Devin:
* **Base URL:** the SCIM base URL from Devin (ends in `/scim/v2`)
* **Authentication:** HTTP `Authorization: Bearer ` header
* **Resources:** `/Users` and `/Groups`, with standard discovery endpoints (`/ServiceProviderConfig`, `/ResourceTypes`, `/Schemas`)
* **Limited attribute set:** other attributes are ignored. Only the following are supported:
* **Users:** `userName`, `active`, `emails`, `name.givenName`, `name.familyName`, `externalId`
* **Groups:** `displayName`, `members`, `externalId`
A user's `userName` must be their email address. This is why the Okta application username format is set to **Email** and the Entra `userName` mapping must match the work email mapping.
## Step 3: Map Groups to Roles
Assigned users are provisioned into your Devin enterprise with the default Enterprise Member role — before they ever log in. Map provisioned groups to roles and orgs under **Settings → Enterprise → Identity Provider Groups**.
## How Provisioning Interacts with SSO Login
* Users provisioned via SCIM can log in via SSO immediately; no invite is needed
* Deactivating a user in your IdP removes their enterprise membership right away; reassigning them restores it
* Group memberships pushed via SCIM take effect immediately, without waiting for the user's next login
* With login-based group syncing off, SCIM is the only source of IdP group memberships
* Users created earlier by just-in-time provisioning or manual invites keep working; assign them in your IdP so SCIM manages them
**Assign users and groups**
1. Open the app → **Users and groups** and click **+ Add user/group**
2. Open the app → **Provisioning** and click **Start provisioning** (set **Provisioning Status** to **On** for automatic background syncing on Entra's standard cycle, approximately every 40 minutes)
3. (Optional) To sync specific users immediately, use **Provisioning → Provision on demand**
Any SCIM 2.0-compliant identity provider can provision users and groups to Devin:
* **Base URL:** the SCIM base URL from Devin (ends in `/scim/v2`)
* **Authentication:** HTTP `Authorization: Bearer ` header
* **Resources:** `/Users` and `/Groups`, with standard discovery endpoints (`/ServiceProviderConfig`, `/ResourceTypes`, `/Schemas`)
* **Limited attribute set:** other attributes are ignored. Only the following are supported:
* **Users:** `userName`, `active`, `emails`, `name.givenName`, `name.familyName`, `externalId`
* **Groups:** `displayName`, `members`, `externalId`
A user's `userName` must be their email address. This is why the Okta application username format is set to **Email** and the Entra `userName` mapping must match the work email mapping.
## Step 3: Map Groups to Roles
Assigned users are provisioned into your Devin enterprise with the default Enterprise Member role — before they ever log in. Map provisioned groups to roles and orgs under **Settings → Enterprise → Identity Provider Groups**.
## How Provisioning Interacts with SSO Login
* Users provisioned via SCIM can log in via SSO immediately; no invite is needed
* Deactivating a user in your IdP removes their enterprise membership right away; reassigning them restores it
* Group memberships pushed via SCIM take effect immediately, without waiting for the user's next login
* With login-based group syncing off, SCIM is the only source of IdP group memberships
* Users created earlier by just-in-time provisioning or manual invites keep working; assign them in your IdP so SCIM manages them