> ## Documentation Index
> Fetch the complete documentation index at: https://docs.devin.ai/llms.txt
> Use this file to discover all available pages before exploring further.
# GitLab Self-Managed Integration
> Connect Devin with your self-managed GitLab instance
## Overview
This guide walks through the full setup for integrating a **GitLab instance** with Devin, including both the **admin setup** and the **end-user setup**.
There are two parts to the integration:
1. **Admin setup**
* Connect the organization's self-hosted GitLab instance to Devin
* Set up a service account
* Configure repository access
* Register OAuth so users can link their personal GitLab identities
2. **User setup**
* Link an individual user's GitLab account to their Devin account
The admin setup must be completed before any user can link their GitLab account. Only Enterprise Admins can perform the admin setup steps.
***
## Part 1: Admin Setup
### Step 1: Create a Service Account in GitLab
In GitLab:
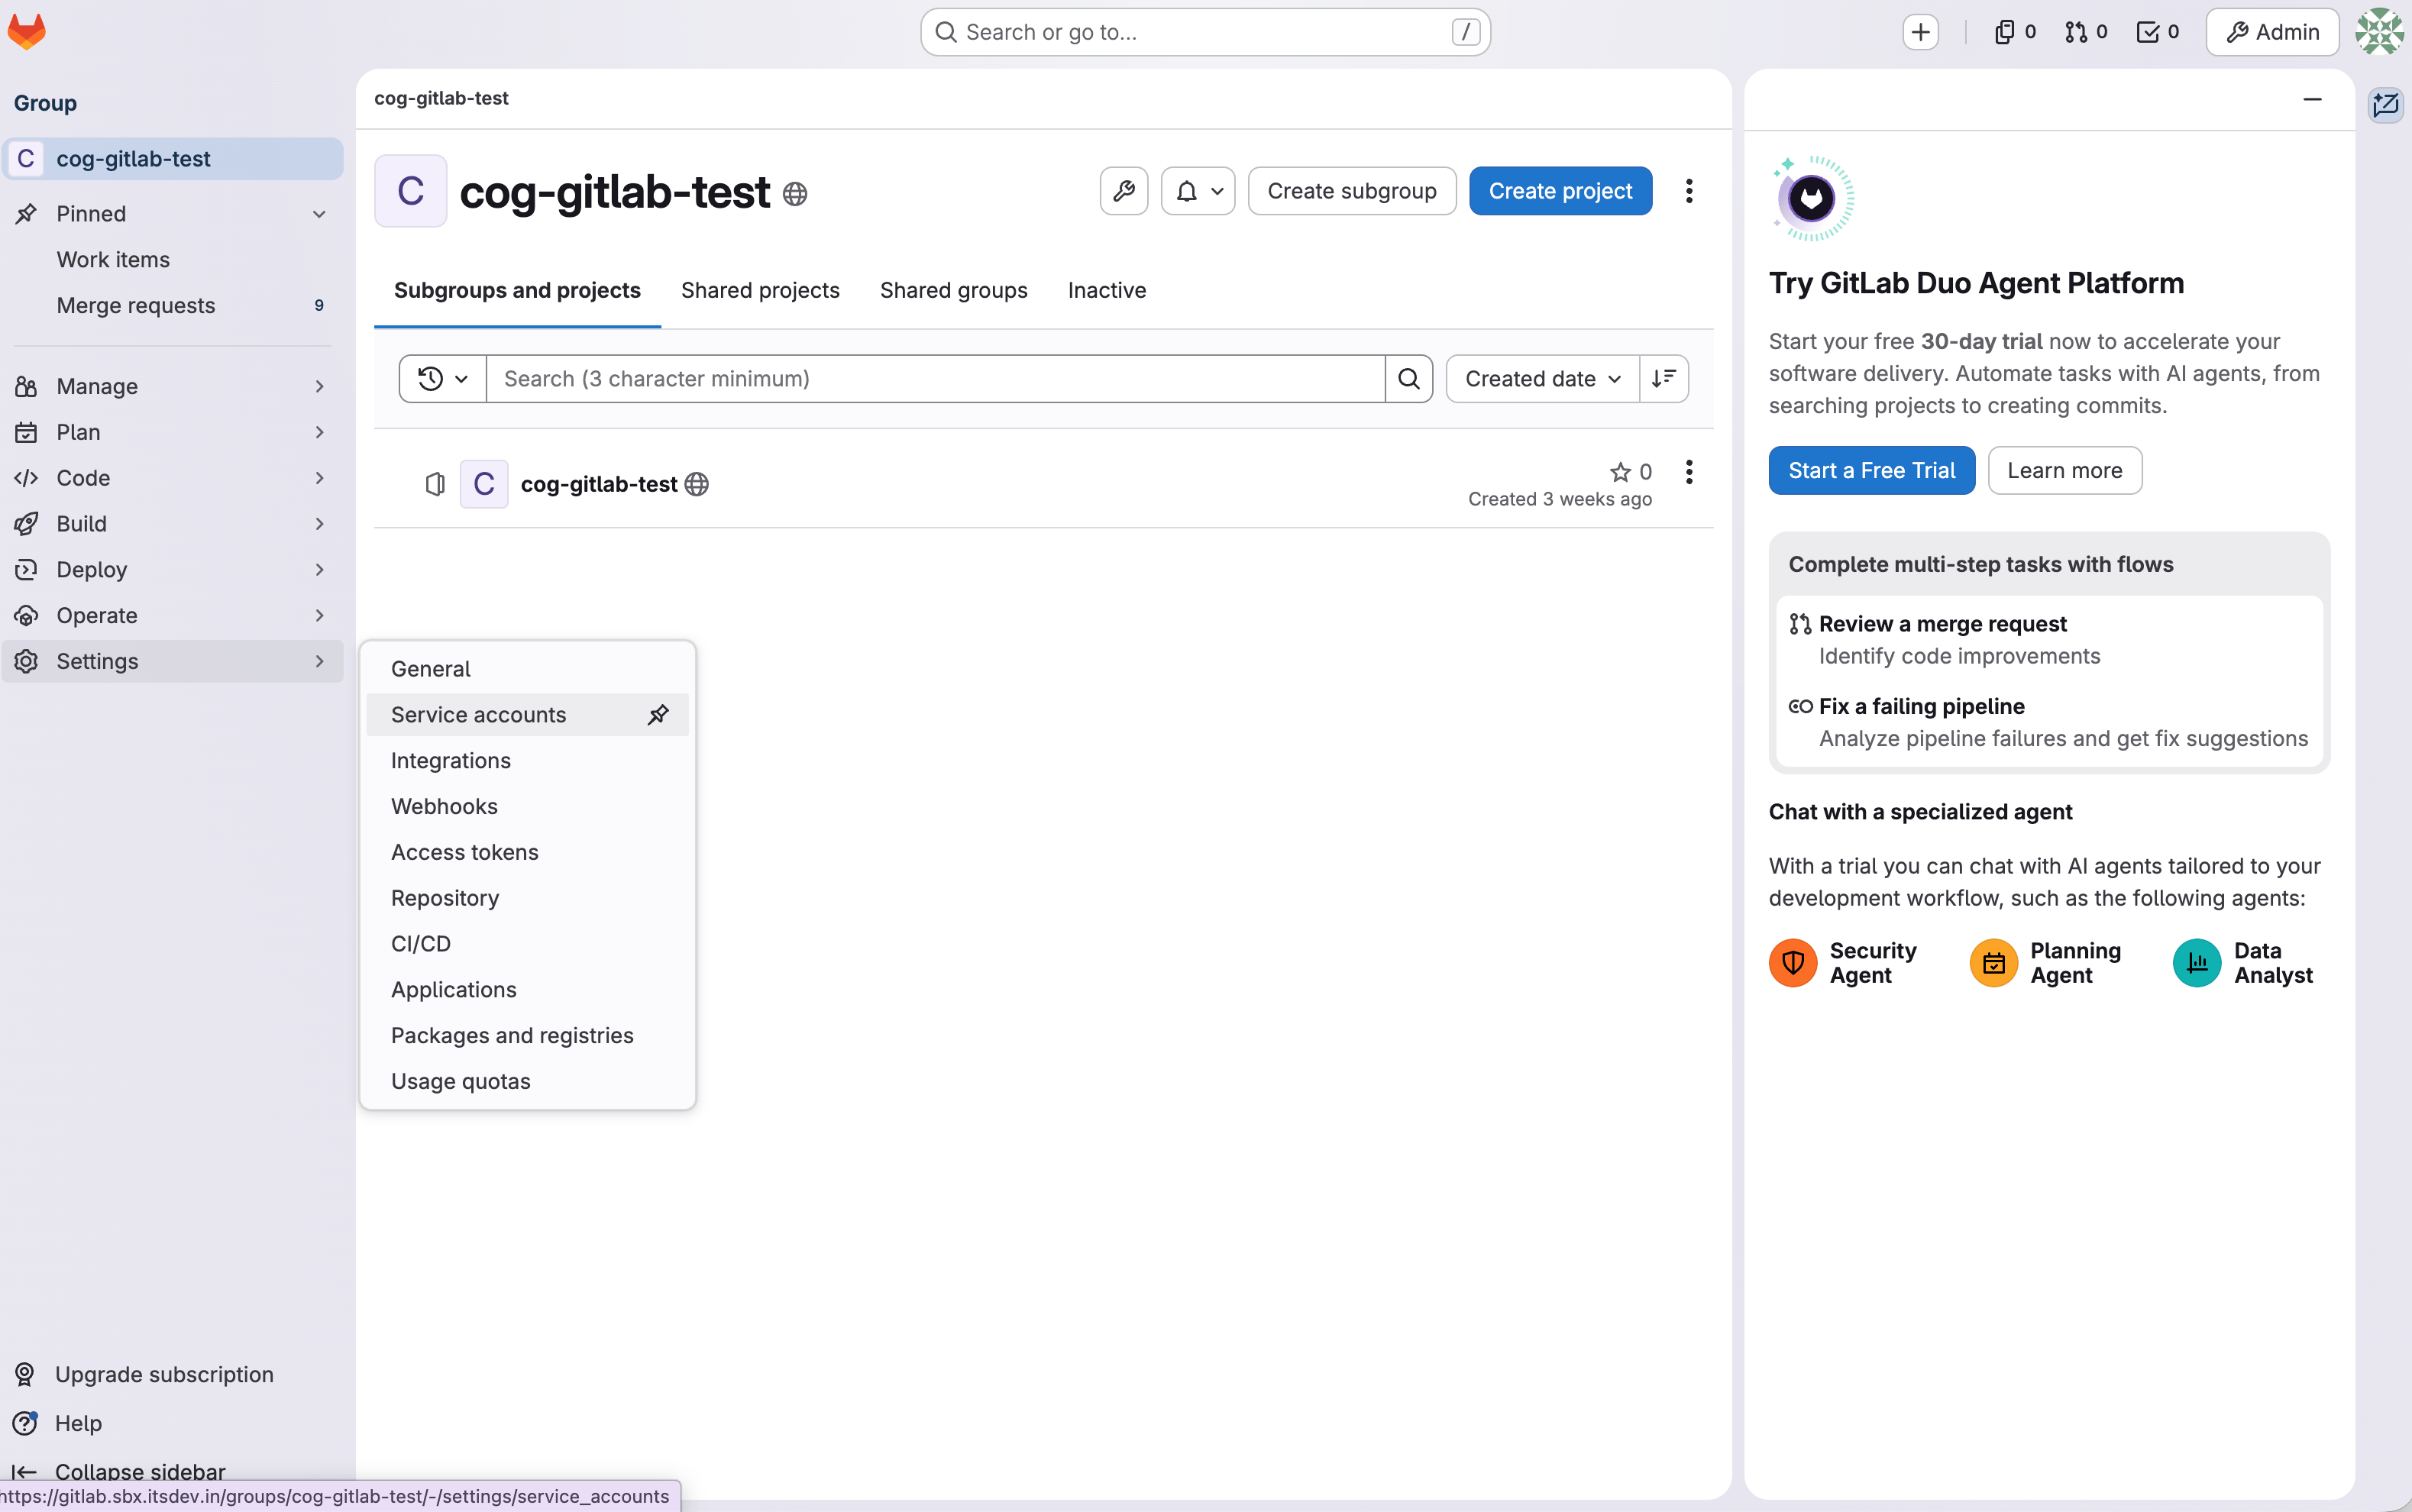
1. Go to the correct **GitLab group**
2. Navigate to **Settings**
3. Open **Service Accounts**
4. Create a new service account
This service account is what Devin will use to access repositories in GitLab.
 ***
### Step 2: Add the Service Account as a Group Member
Still in GitLab:
1. Go to the group's **Members** page
***
### Step 2: Add the Service Account as a Group Member
Still in GitLab:
1. Go to the group's **Members** page
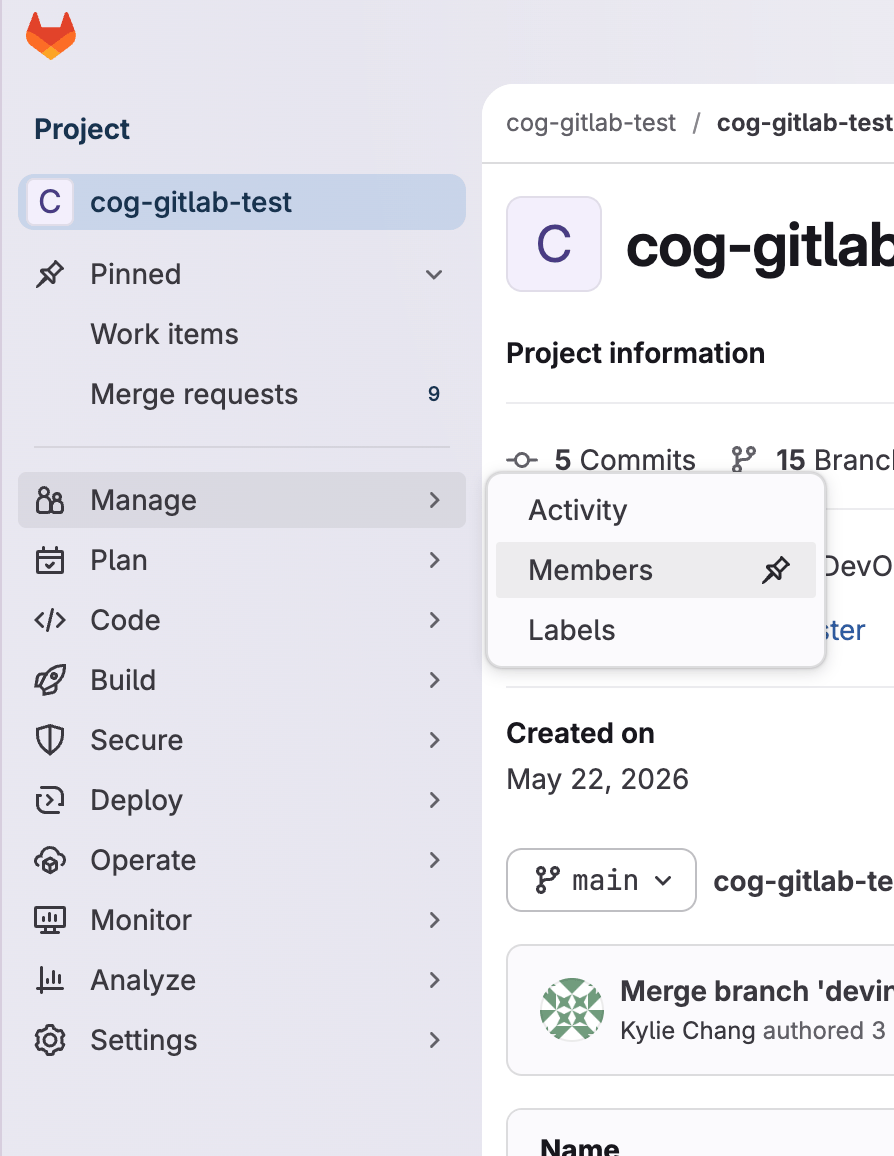 2. Add the service account as a member of the group
3. Grant it the **Developer** role
This is necessary so the service account can access repositories appropriately.
***
### Step 3: Generate a Personal Access Token for the Service Account
After creating the service account:
1. Locate the newly created service account
2. Click on the three dots > **Manage access tokens** > **Generate a new personal access token** > Select **api** under access scopes
3. Copy and store that token securely
Ensure you are selecting the service account's token, and not your personal access token found in your user's preferences. You want Devin to act as the service account, not as you. You will use this token when adding the GitLab connection in Devin.
***
### Step 4: Add the GitLab Connection in Devin
In Devin:
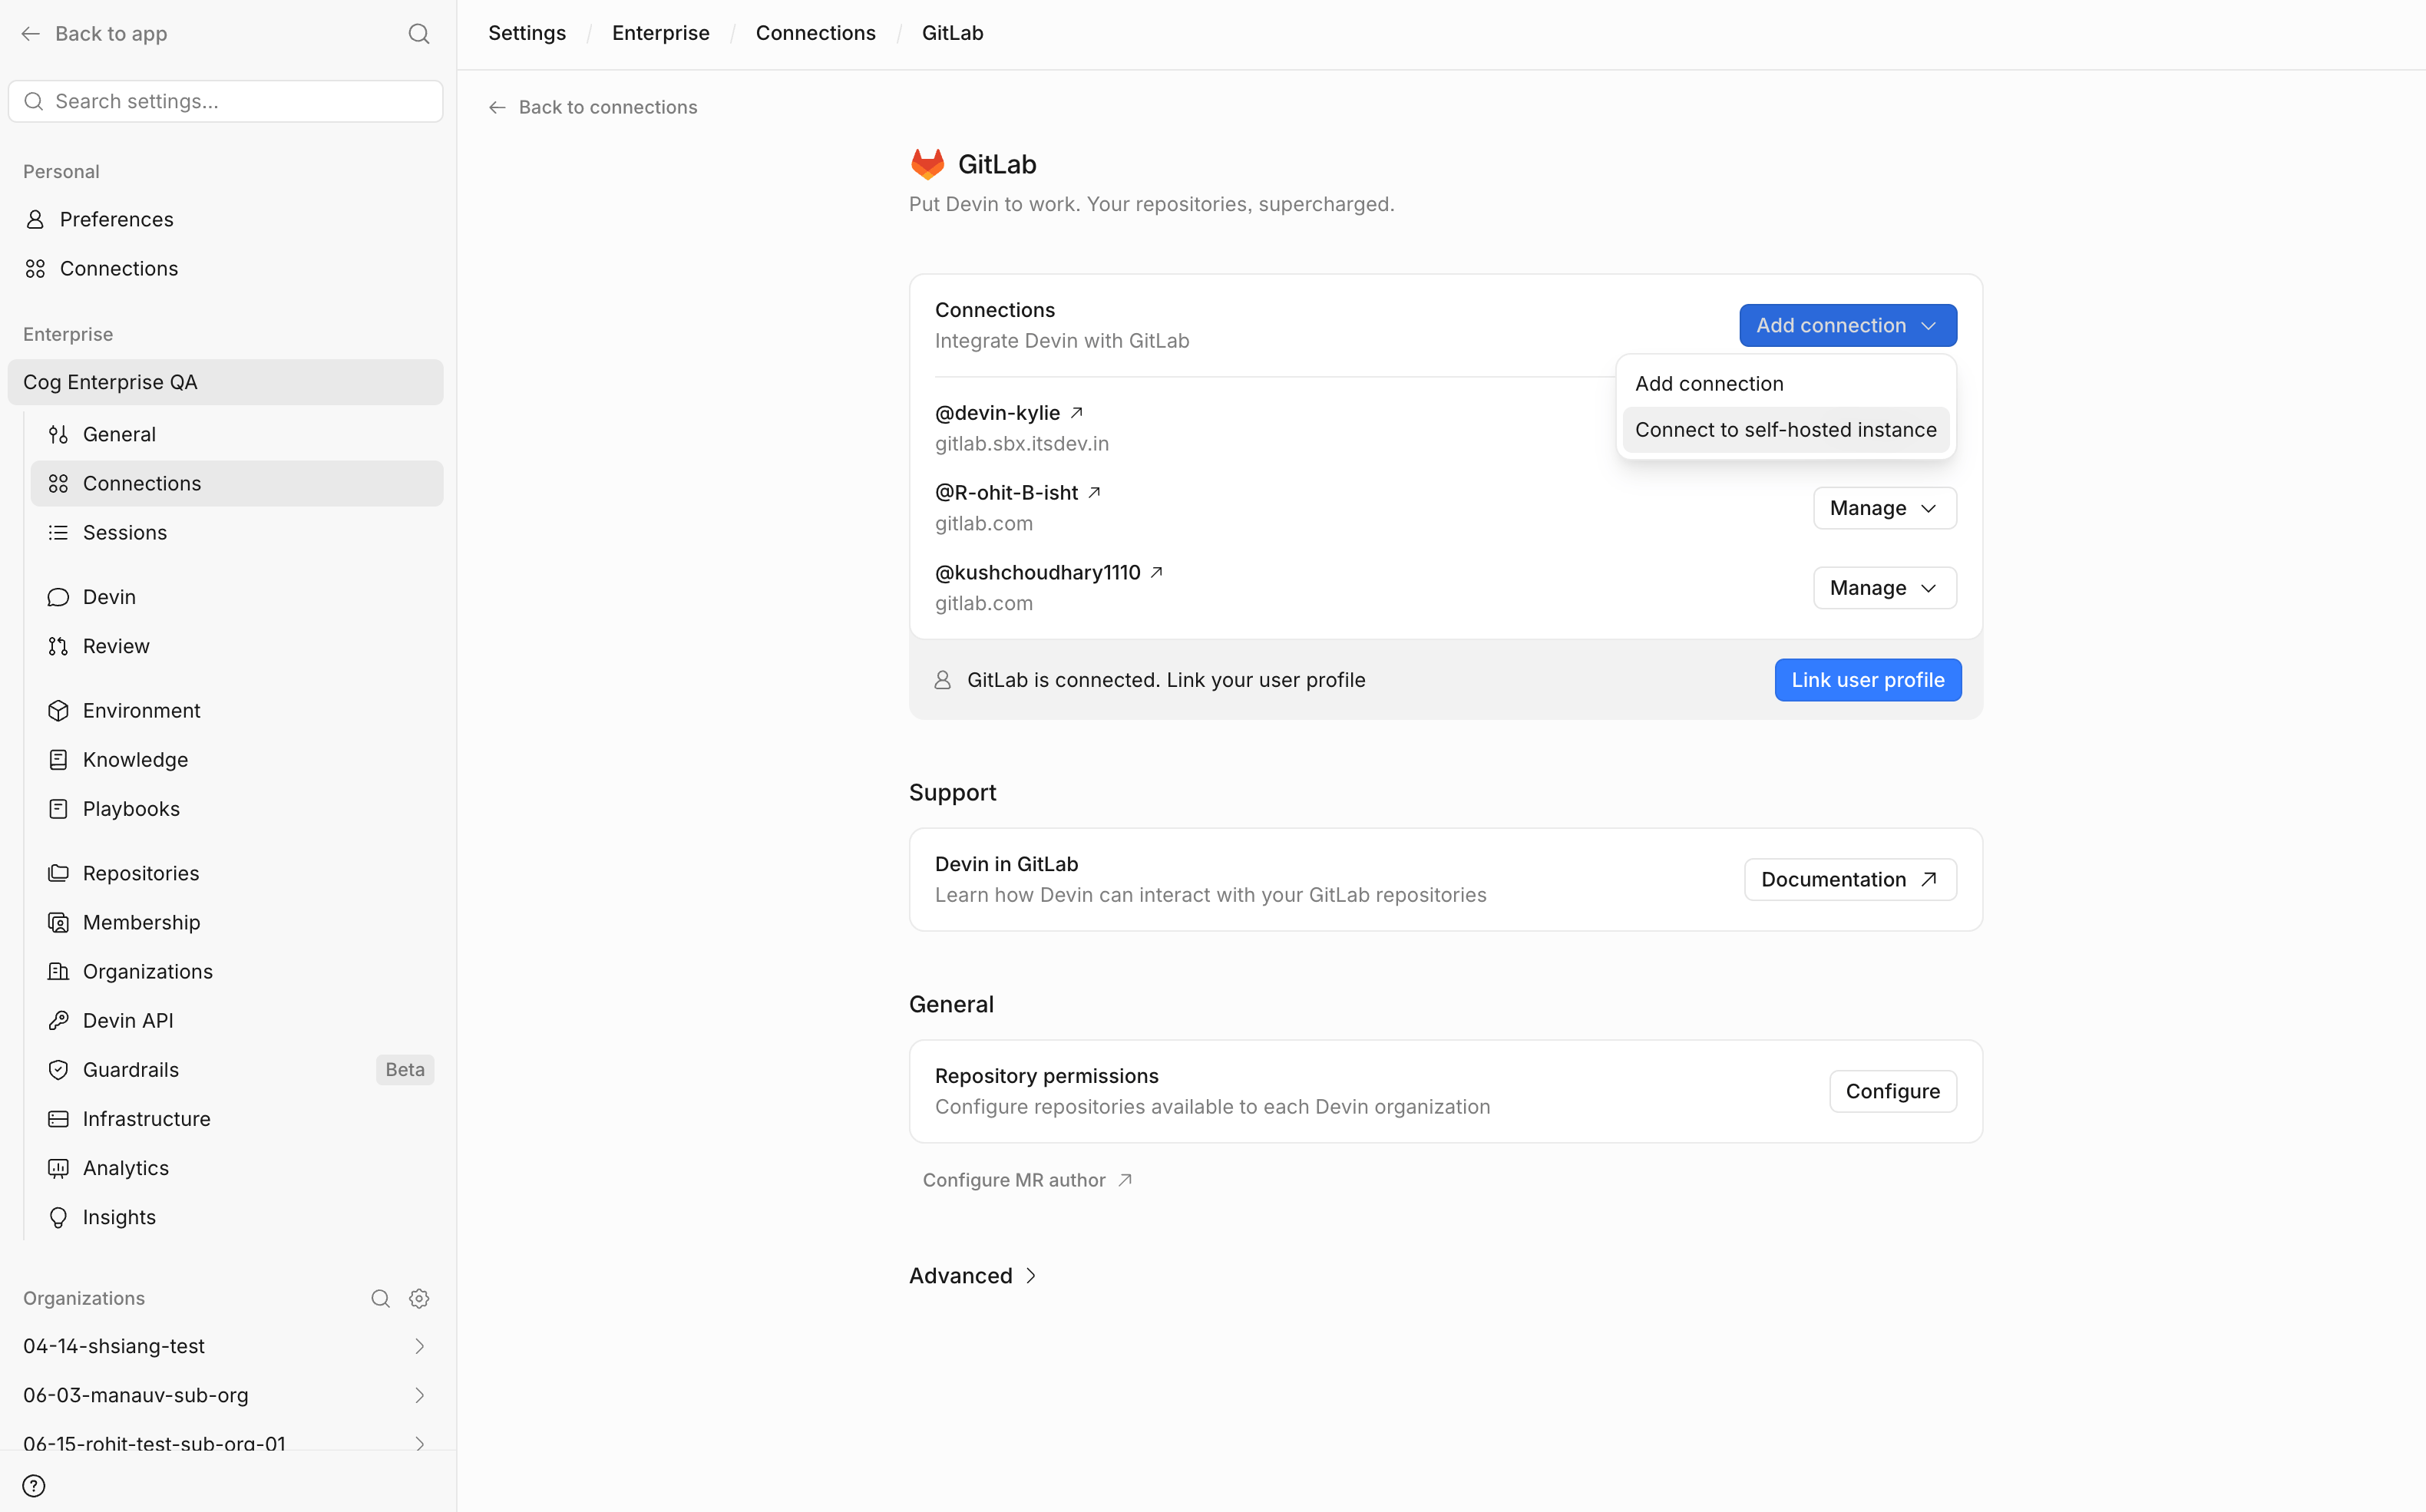
1. Go to **Enterprise Settings**
2. Open **Connections**
3. Add a new connection
4. Enter:
* Your **self-hosted GitLab URL** (if applicable)
2. Add the service account as a member of the group
3. Grant it the **Developer** role
This is necessary so the service account can access repositories appropriately.
***
### Step 3: Generate a Personal Access Token for the Service Account
After creating the service account:
1. Locate the newly created service account
2. Click on the three dots > **Manage access tokens** > **Generate a new personal access token** > Select **api** under access scopes
3. Copy and store that token securely
Ensure you are selecting the service account's token, and not your personal access token found in your user's preferences. You want Devin to act as the service account, not as you. You will use this token when adding the GitLab connection in Devin.
***
### Step 4: Add the GitLab Connection in Devin
In Devin:
1. Go to **Enterprise Settings**
2. Open **Connections**
3. Add a new connection
4. Enter:
* Your **self-hosted GitLab URL** (if applicable)
 * The **personal access token** created for the service account
This creates the enterprise-level GitLab connection.
***
### Step 5: Configure Webhook
Configuring a webhook allows Devin to automatically receive real-time notifications when specific events occur in GitLab (such as opening or updating merge requests and commenting on merge requests).
To configure the webhook:
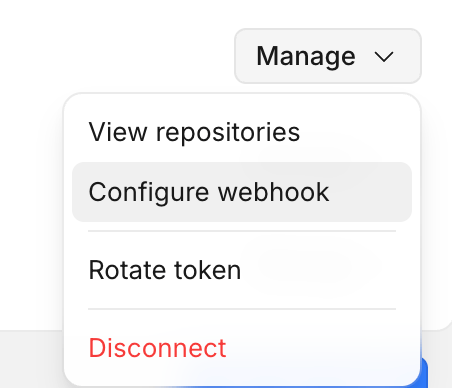
1. In **Enterprise Settings** > **Connections**, locate the GitLab instance you just added
2. Click the **Manage** dropdown
3. Select **Configure Webhook**
4. Follow the provided commands to complete the setup
* The **personal access token** created for the service account
This creates the enterprise-level GitLab connection.
***
### Step 5: Configure Webhook
Configuring a webhook allows Devin to automatically receive real-time notifications when specific events occur in GitLab (such as opening or updating merge requests and commenting on merge requests).
To configure the webhook:
1. In **Enterprise Settings** > **Connections**, locate the GitLab instance you just added
2. Click the **Manage** dropdown
3. Select **Configure Webhook**
4. Follow the provided commands to complete the setup
 Once configured, Devin will be able to respond to GitLab events in real time rather than relying on periodic polling.
***
### Step 6: Verify Repository Access
After adding the connection:
1. Confirm that the service account has access to the repositories you want to use
2. In Devin, if repositories do not appear immediately, manually refresh the repository list
3. Go to **Enterprise Repositories**
4. Select the correct organization
Once configured, Devin will be able to respond to GitLab events in real time rather than relying on periodic polling.
***
### Step 6: Verify Repository Access
After adding the connection:
1. Confirm that the service account has access to the repositories you want to use
2. In Devin, if repositories do not appear immediately, manually refresh the repository list
3. Go to **Enterprise Repositories**
4. Select the correct organization
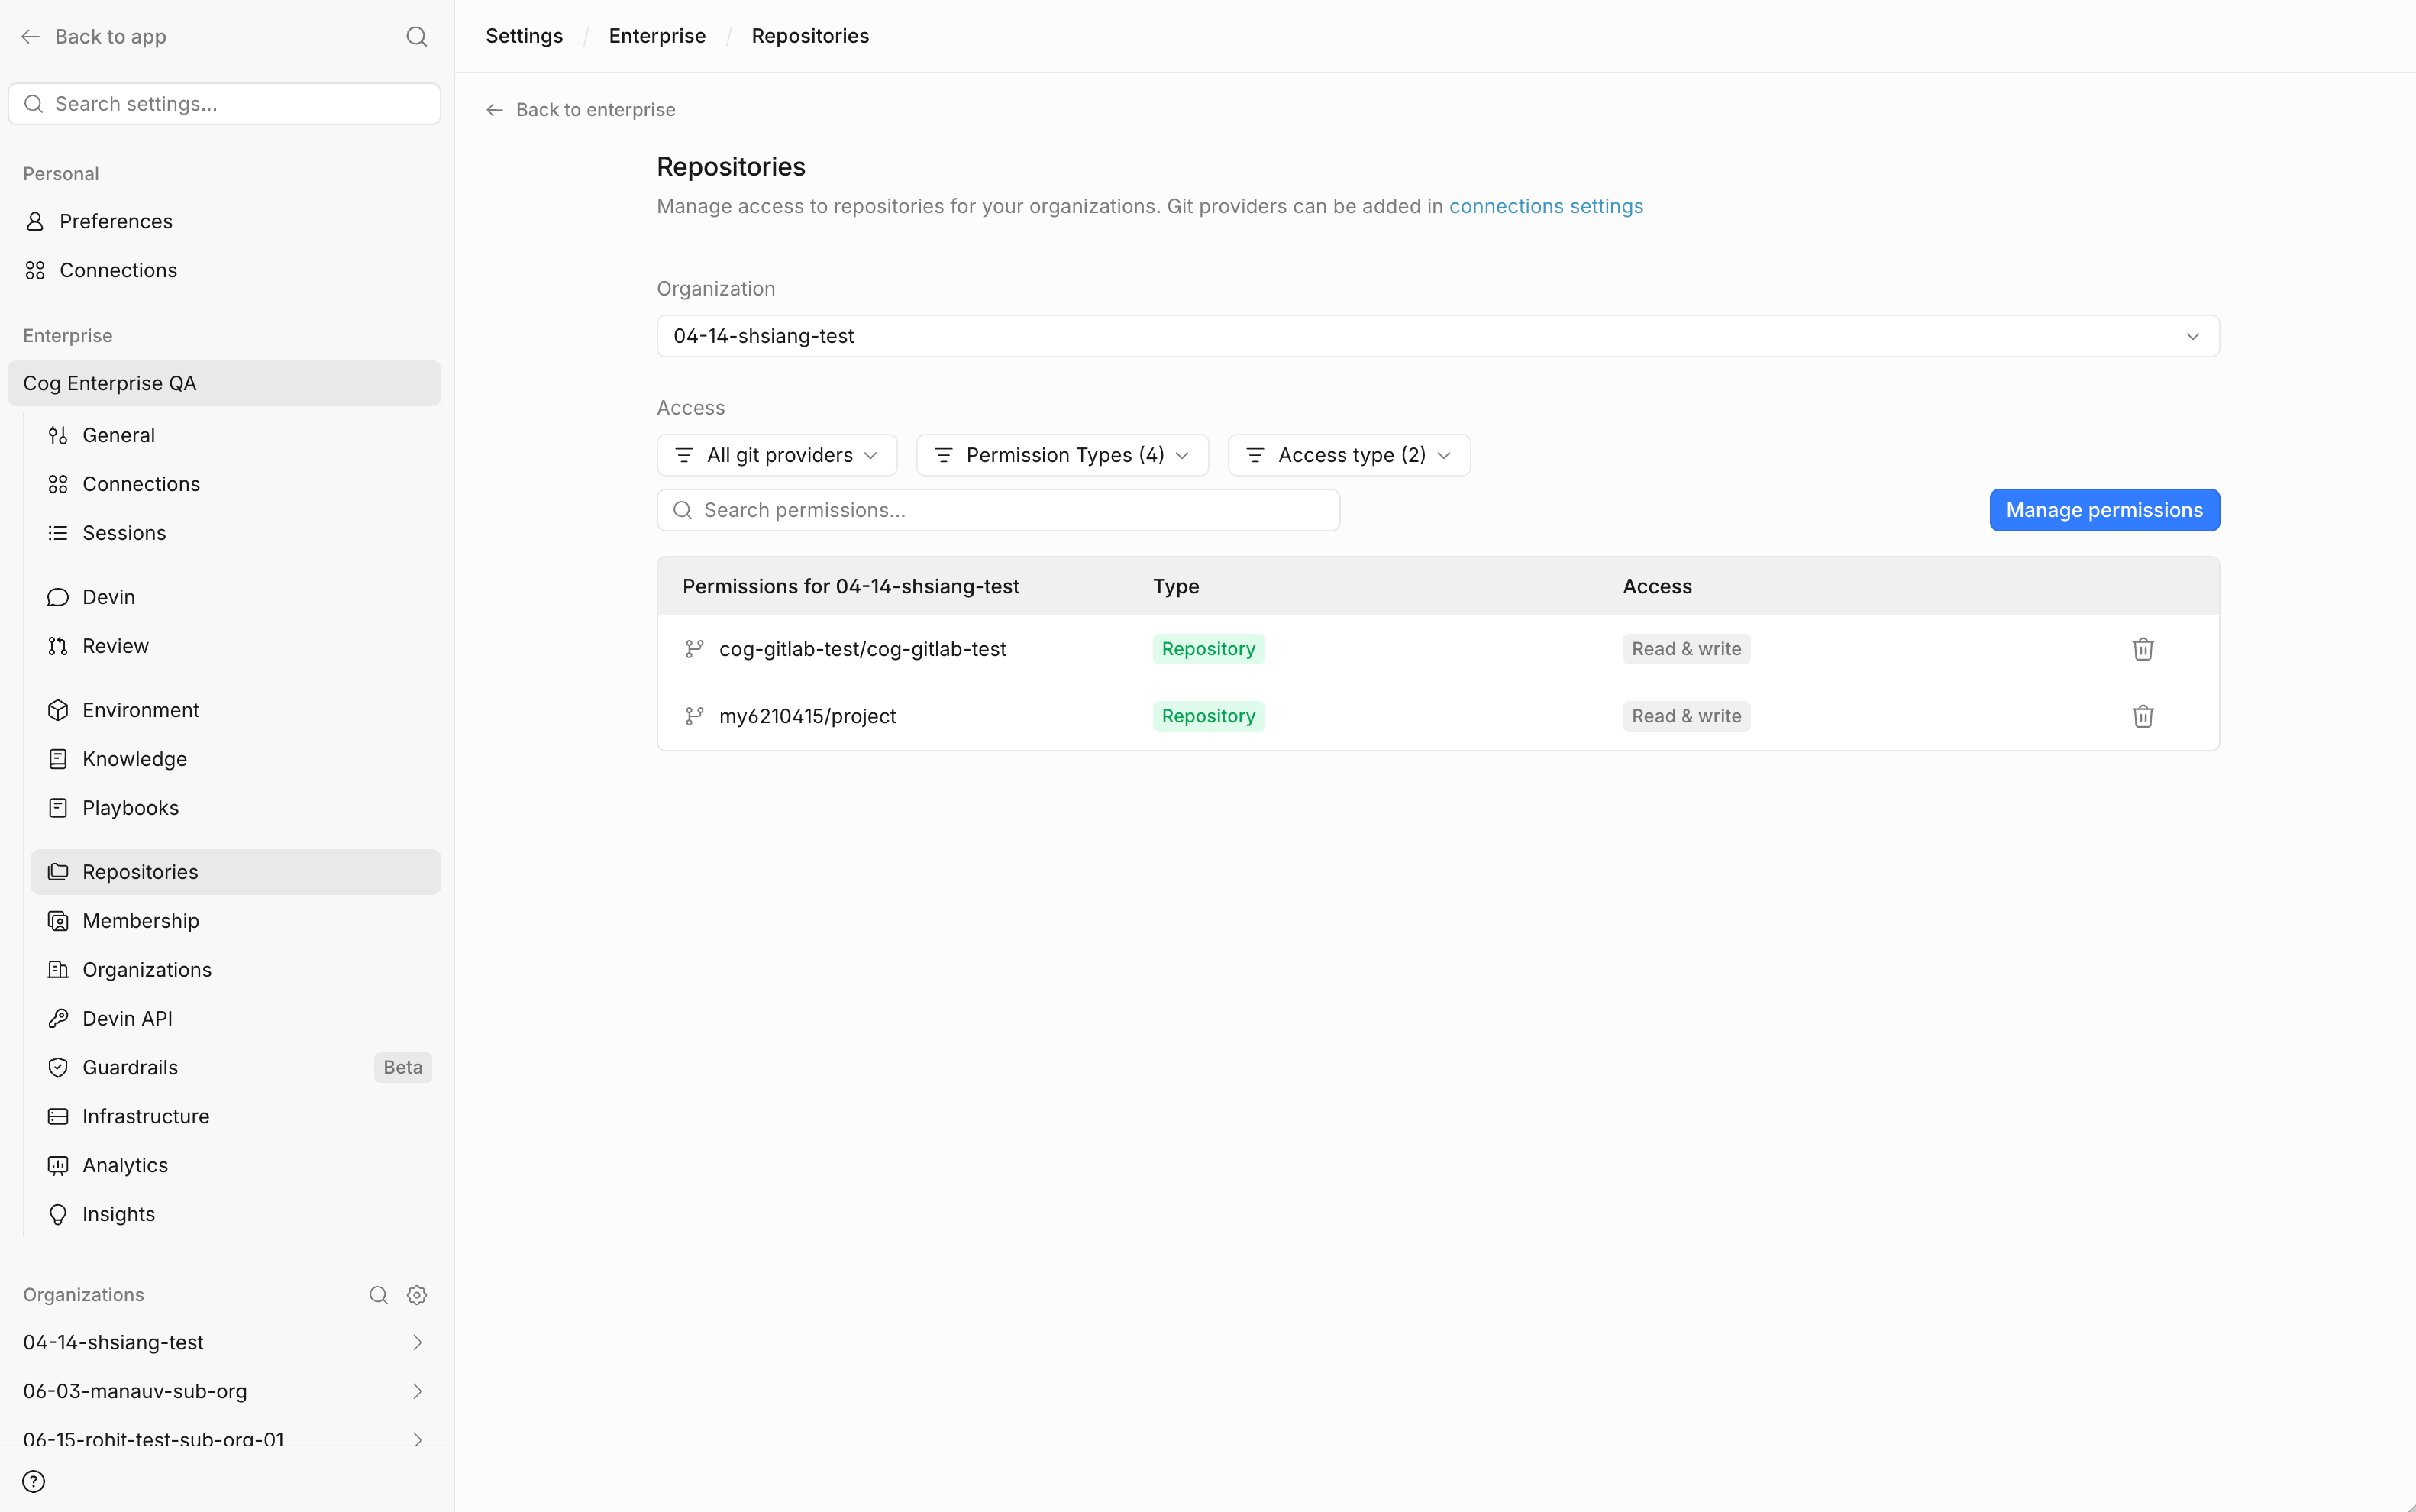 5. Open **Manage Permissions**
6. Add the relevant repositories with the appropriate **read/write** permissions
5. Open **Manage Permissions**
6. Add the relevant repositories with the appropriate **read/write** permissions
 If repos are missing, it may be because Devin refreshes the repository list periodically rather than instantly.
***
## Part 2: Enable User Linking for Self-Hosted GitLab
### Step 7: Register an OAuth Application on the Self-Hosted GitLab Instance
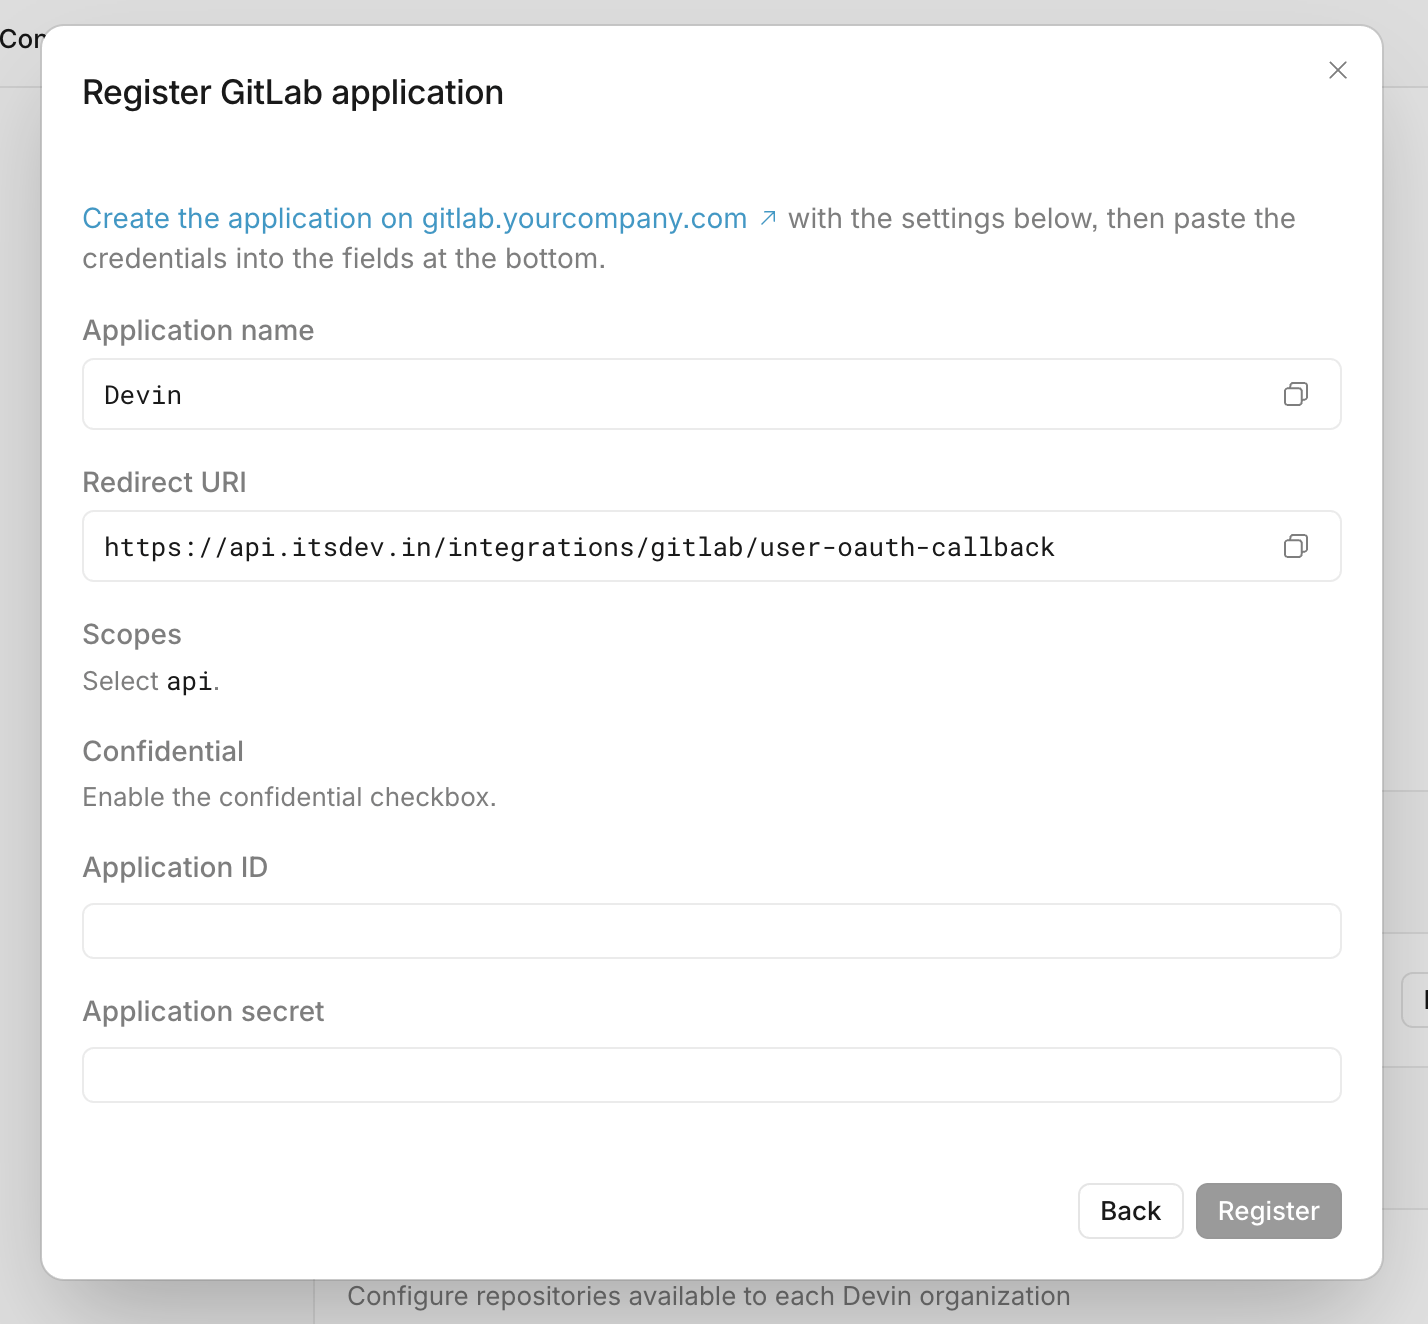
To allow individual users to link their GitLab identity to Devin, the admin must register an OAuth app for the self-hosted GitLab instance.
In Devin:
1. Go to the enterprise GitLab connection area
2. Open **Advanced**
3. Go to the self-hosted GitLab section
4. Start the flow to **register an OAuth application**
If repos are missing, it may be because Devin refreshes the repository list periodically rather than instantly.
***
## Part 2: Enable User Linking for Self-Hosted GitLab
### Step 7: Register an OAuth Application on the Self-Hosted GitLab Instance
To allow individual users to link their GitLab identity to Devin, the admin must register an OAuth app for the self-hosted GitLab instance.
In Devin:
1. Go to the enterprise GitLab connection area
2. Open **Advanced**
3. Go to the self-hosted GitLab section
4. Start the flow to **register an OAuth application**
 ***
### Step 8: Complete OAuth App Registration in GitLab
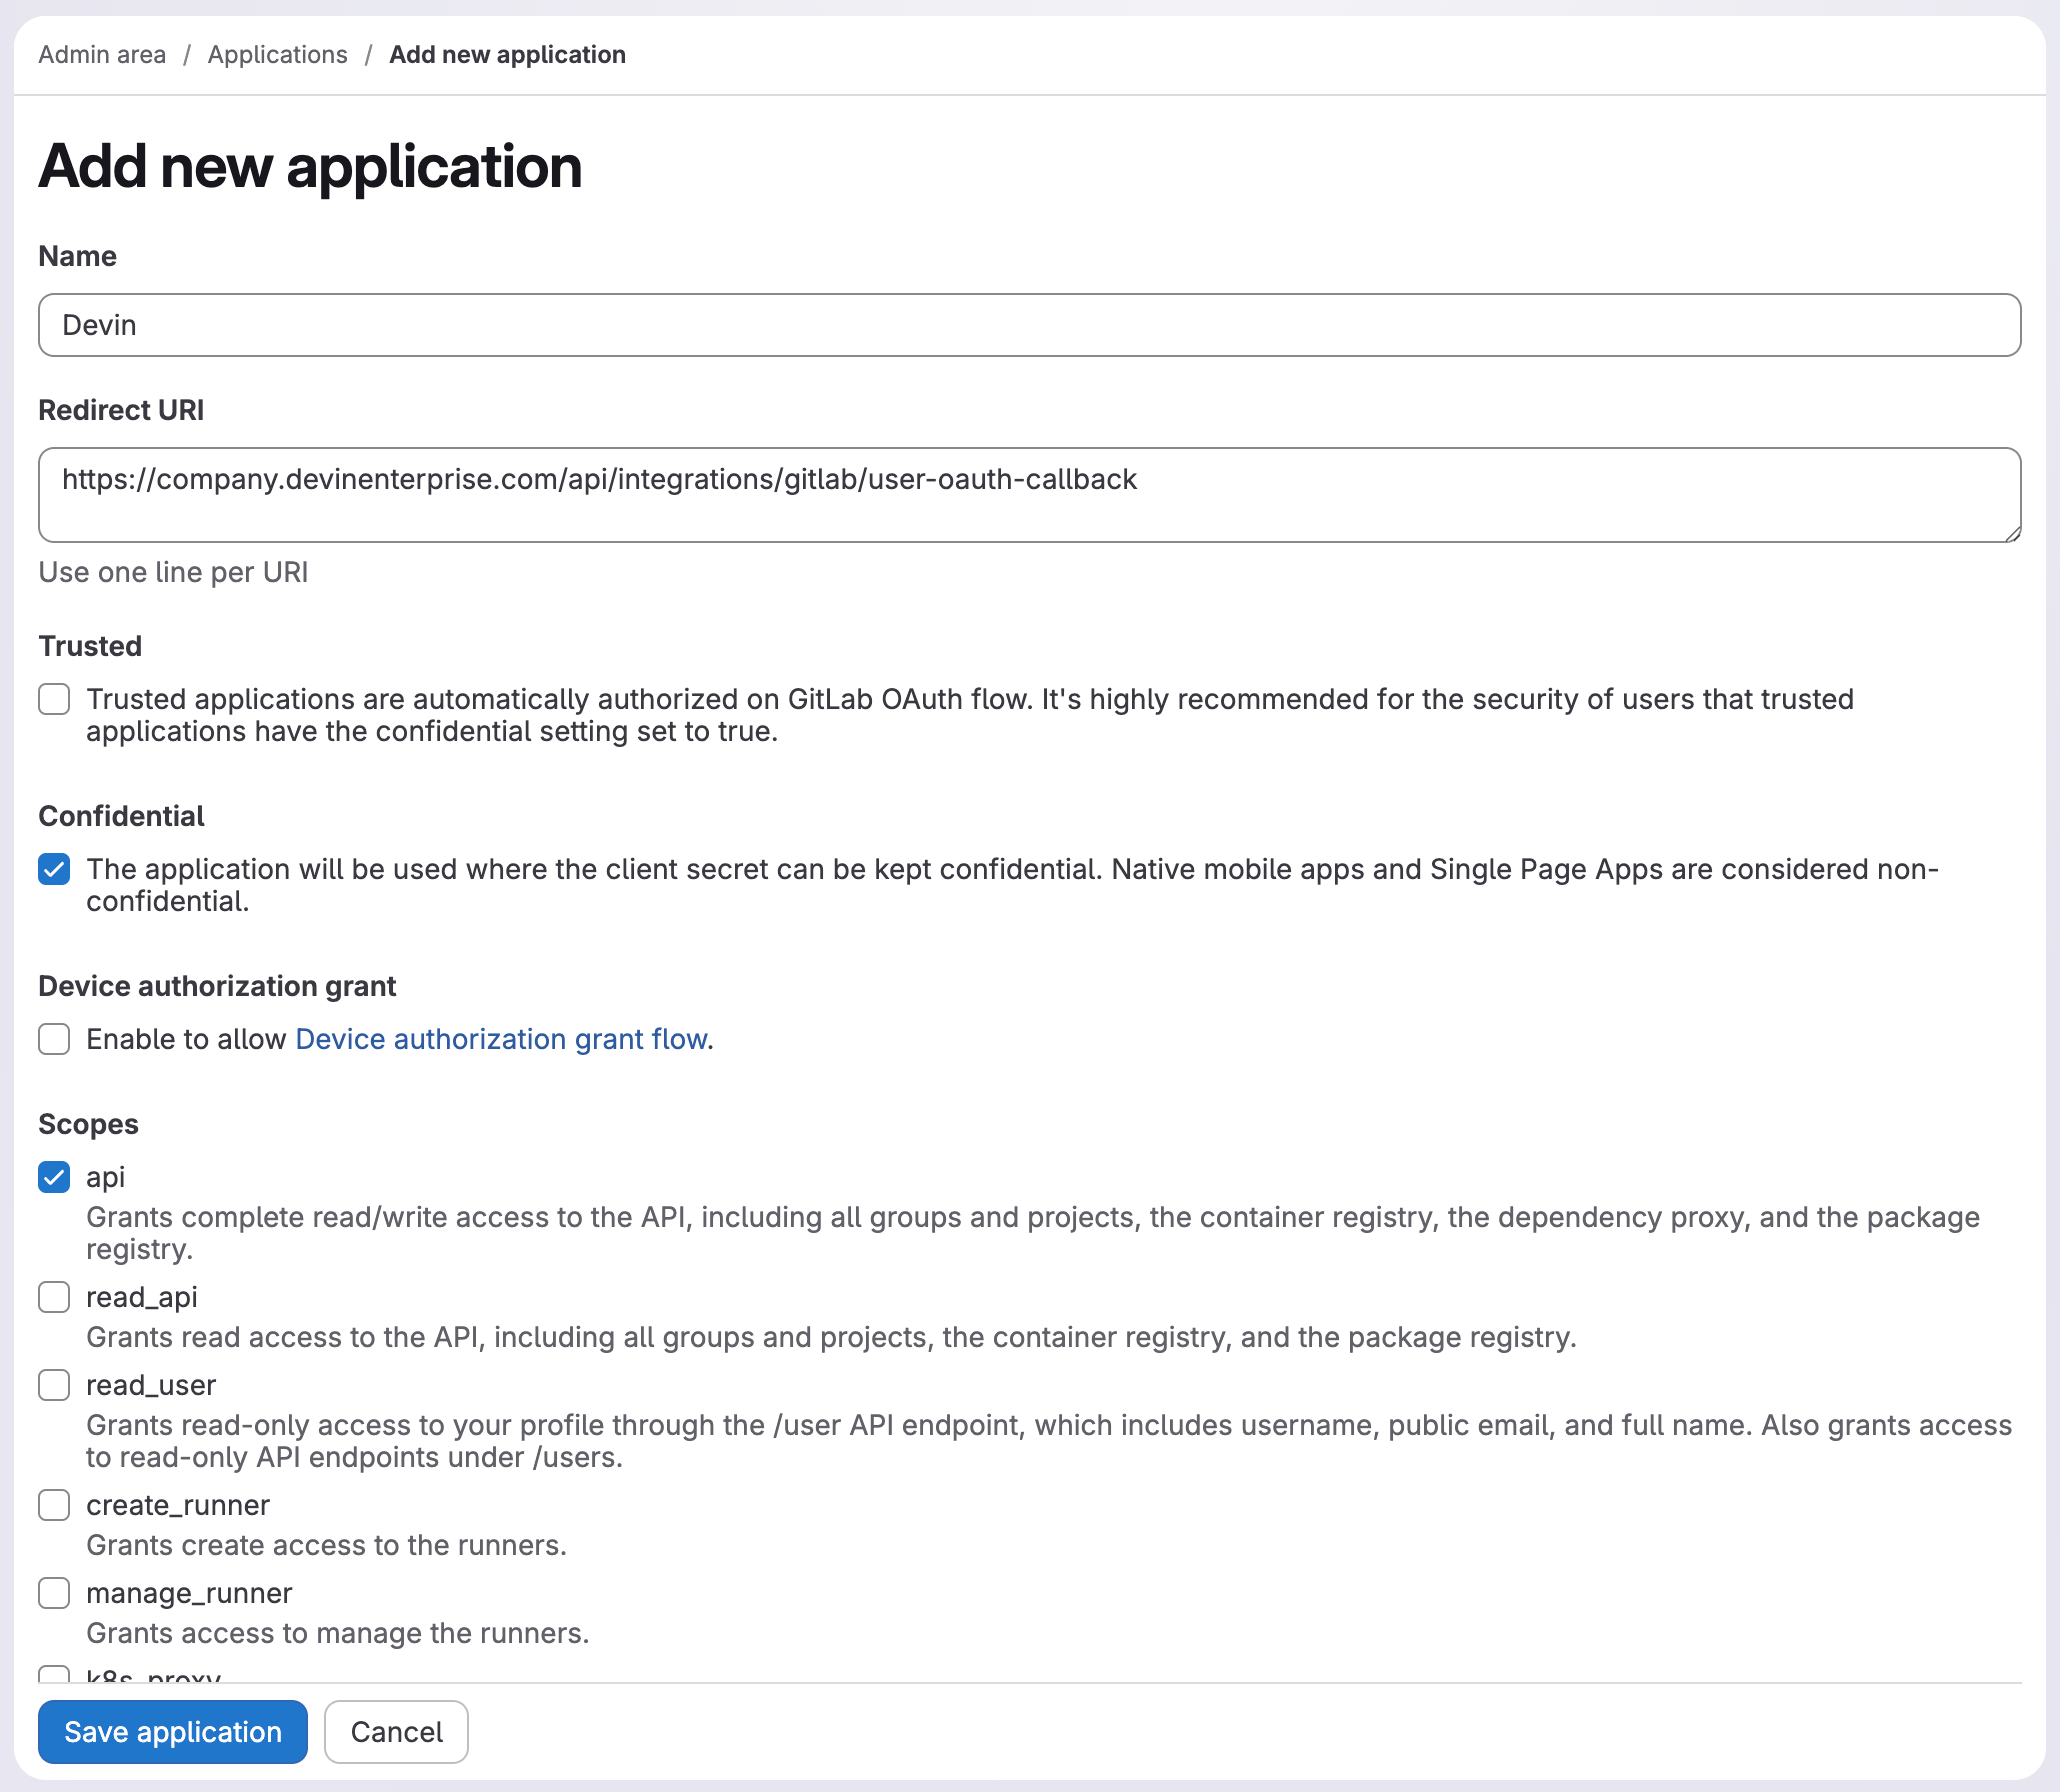
Follow the link in the registration modal to open the GitLab application form. Fill in the fields as shown:
1. Set the **Name** and **Redirect URI** exactly as shown in the Devin modal
2. Enable the **Confidential** checkbox
3. Select the **api** scope
4. Click **Save application**
***
### Step 8: Complete OAuth App Registration in GitLab
Follow the link in the registration modal to open the GitLab application form. Fill in the fields as shown:
1. Set the **Name** and **Redirect URI** exactly as shown in the Devin modal
2. Enable the **Confidential** checkbox
3. Select the **api** scope
4. Click **Save application**
 5. Copy the **Application ID** and **Application Secret** from GitLab
6. Return to Devin and paste those values into the registration modal
7. Click **Register**
This completes the admin-side setup needed for user identity linking.
***
## Part 3: Organization Membership Requirement
### Step 9: Make Sure the User Belongs to the Correct Devin Organization
Before a user can link their GitLab account, they must be a member of a Devin organization with GitLab repository permissions.
In Devin:
1. Go to the organization membership area
2. Confirm the user is part of a Devin organization with GitLab repository permissions
3. If they are not, add them first
**Personal Connections only shows integrations for organizations the user belongs to.** If a user is not in a Devin organization with GitLab repository permissions, the GitLab integration may not appear at all.
***
## Part 4: End-User Setup
### Step 10: Open Personal Connections
As the end user in Devin:
1. Go to **Personal Connections**
2. Look for the self-hosted GitLab integration
If it does not appear, check organization membership first.
***
### Step 11: Link the User's GitLab Account
Once the integration appears:
1. Select the self-hosted GitLab connection
2. Complete the linking flow
3. Link the user's **GitLab account** to their **Devin account**
After this, Devin should be able to act as that user for GitLab operations.
5. Copy the **Application ID** and **Application Secret** from GitLab
6. Return to Devin and paste those values into the registration modal
7. Click **Register**
This completes the admin-side setup needed for user identity linking.
***
## Part 3: Organization Membership Requirement
### Step 9: Make Sure the User Belongs to the Correct Devin Organization
Before a user can link their GitLab account, they must be a member of a Devin organization with GitLab repository permissions.
In Devin:
1. Go to the organization membership area
2. Confirm the user is part of a Devin organization with GitLab repository permissions
3. If they are not, add them first
**Personal Connections only shows integrations for organizations the user belongs to.** If a user is not in a Devin organization with GitLab repository permissions, the GitLab integration may not appear at all.
***
## Part 4: End-User Setup
### Step 10: Open Personal Connections
As the end user in Devin:
1. Go to **Personal Connections**
2. Look for the self-hosted GitLab integration
If it does not appear, check organization membership first.
***
### Step 11: Link the User's GitLab Account
Once the integration appears:
1. Select the self-hosted GitLab connection
2. Complete the linking flow
3. Link the user's **GitLab account** to their **Devin account**
After this, Devin should be able to act as that user for GitLab operations.