> ## Documentation Index
> Fetch the complete documentation index at: https://docs.devin.ai/llms.txt
> Use this file to discover all available pages before exploring further.
# Artifacts
> Accessing Your Artifacts
To use artifacts during snapshot setup, you will need to authenticate with them during repository configuration.
If you need to store secrets for artifact authentication, you can either save them directly to the machine file system (e.g., in a file or by exporting environment variables) or use [Devin's Secret Manager](/product-guides/secrets). Below are sections for AWS, Azure, and Jfrog
If your artifacts are on a private network, please see [Deployment Options](/enterprise/deployment/overview)
## Devin Machine Setup
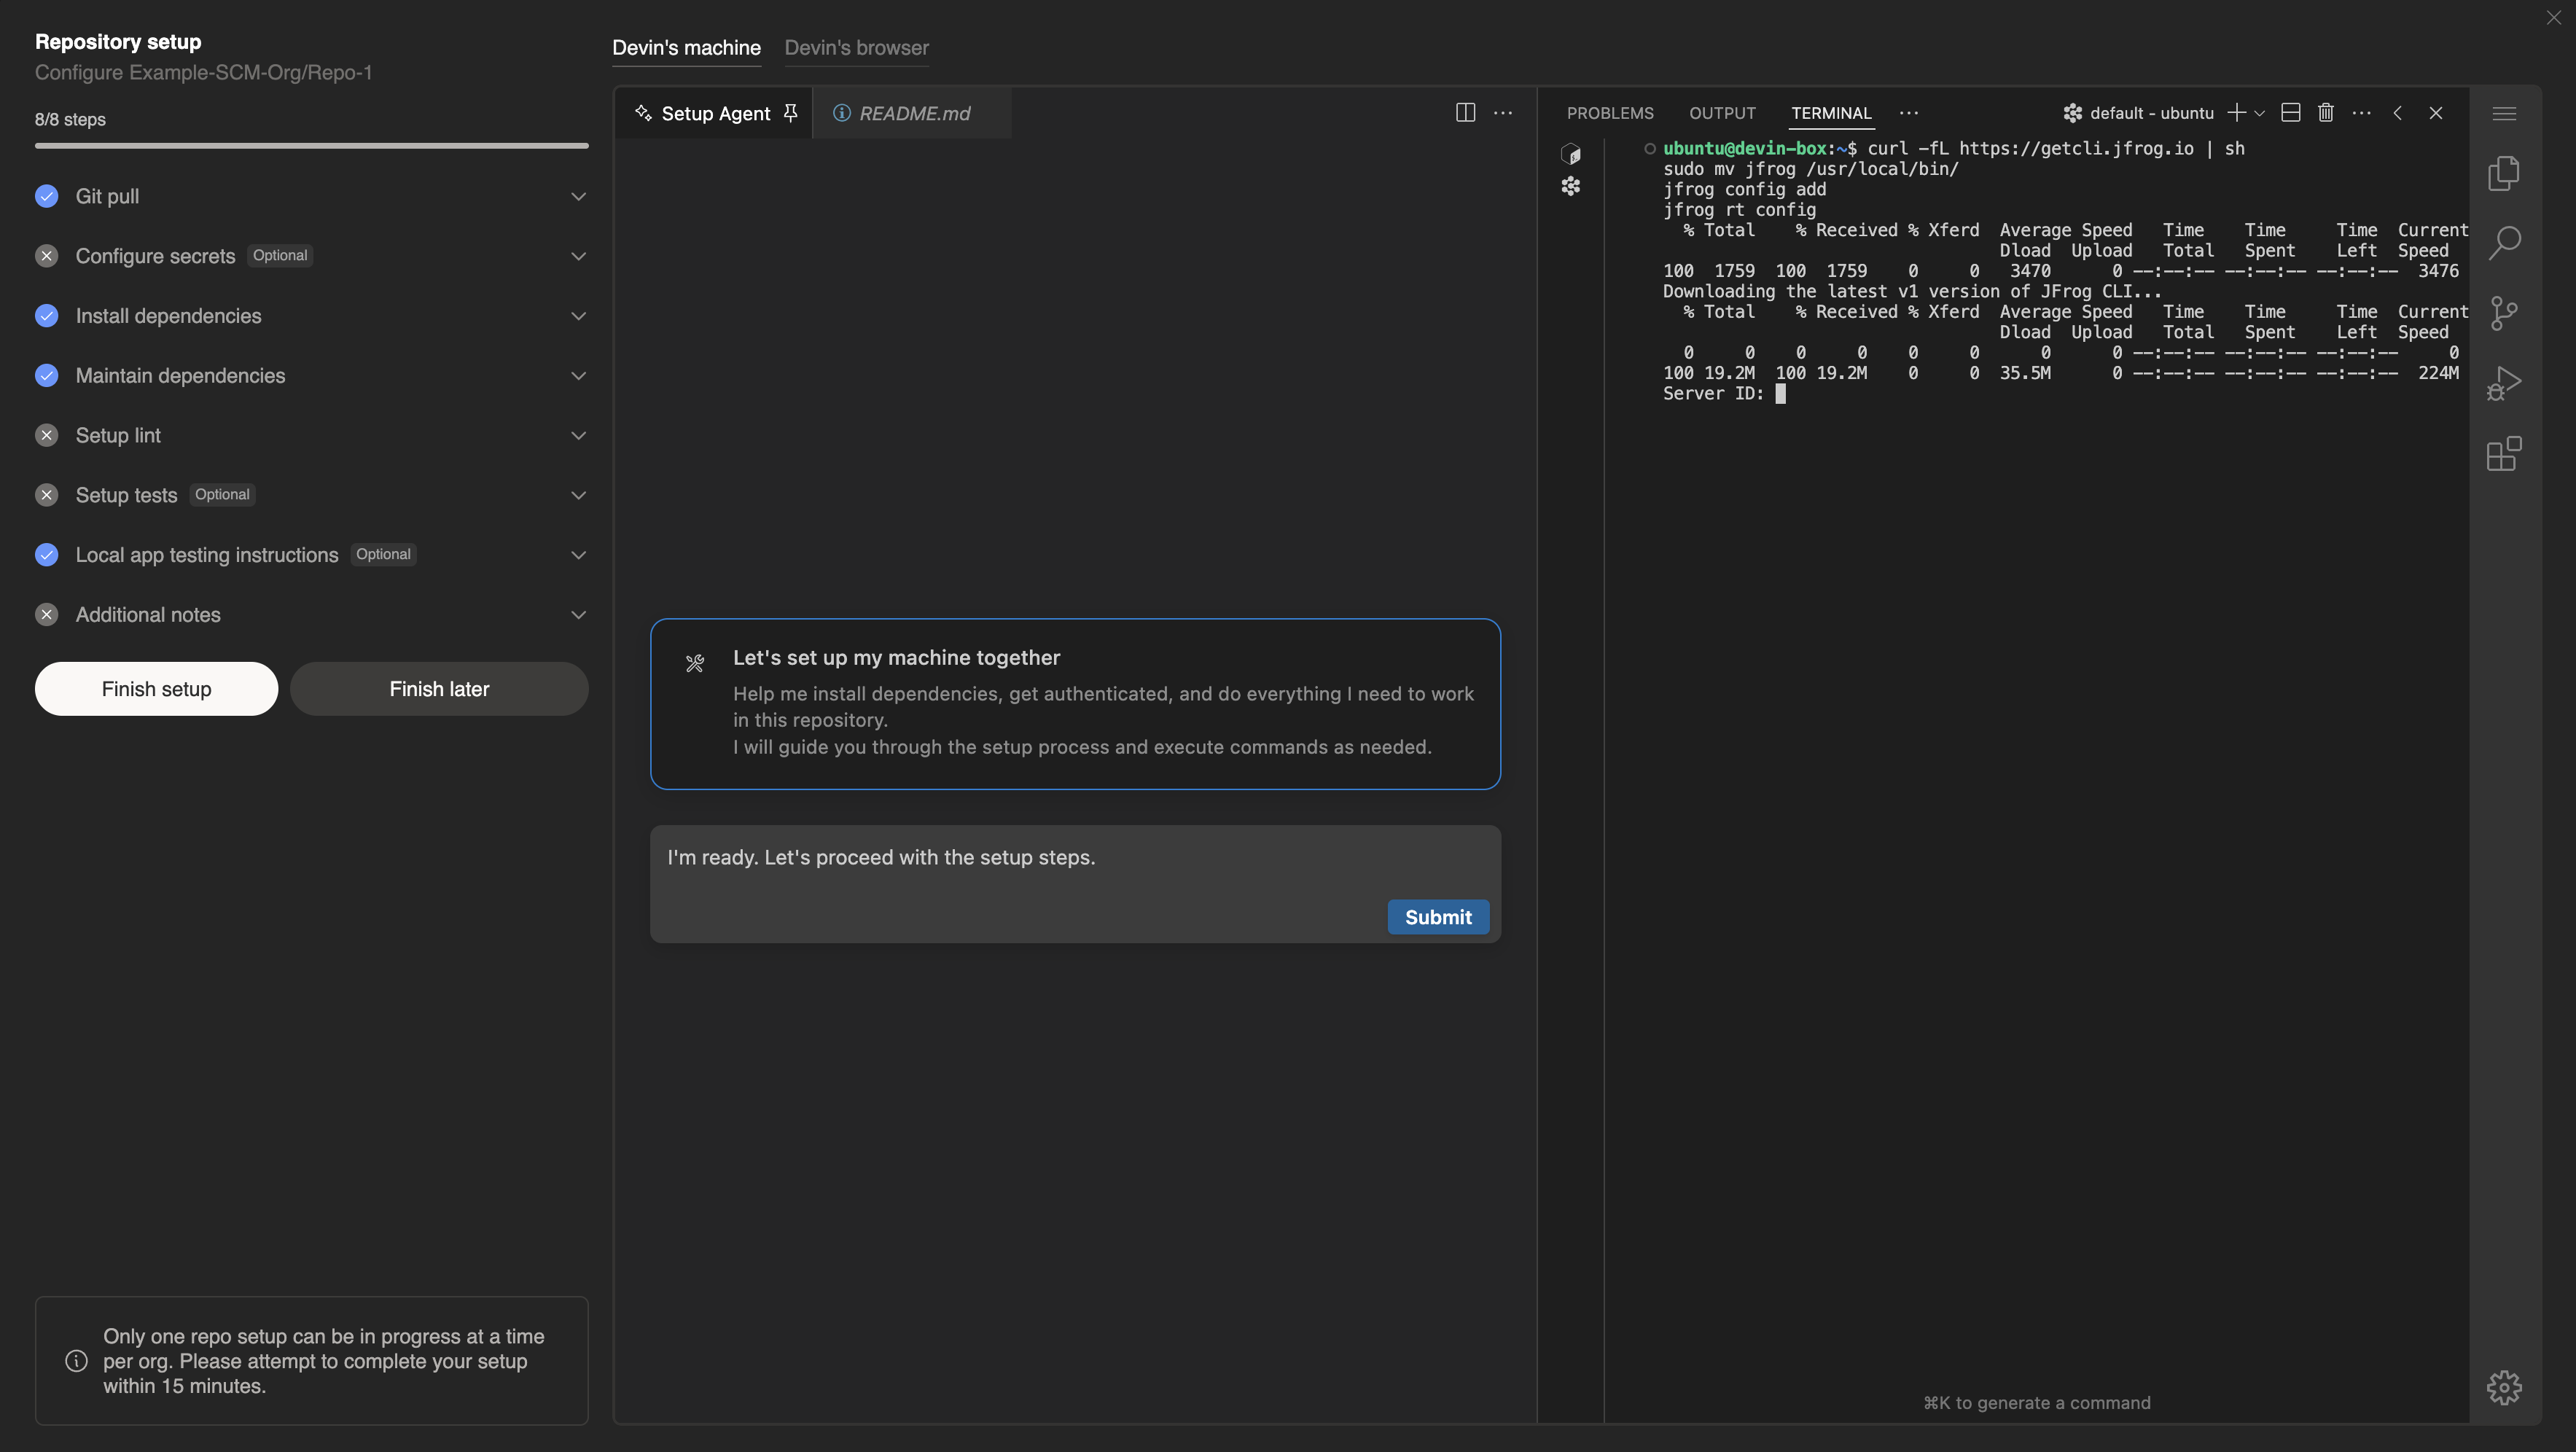
To integrate with your artifact repositories, you'll need to configure your Devin machine with the appropriate credentials and tools. There are two main ways to accomplish this:
1. Use the integrated Terminal within Devin to install and configure artifact repository tools directly on the machine.
2. Use the **Setup Agent** tab (located in the center column of Devin's Machine during repo setup) and prompt Devin to assist with the setup.
 ## Jfrog Artifactory
### Step 1: Downloading CLI
```bash theme={null}
curl -fL https://getcli.jfrog.io | sh
sudo mv jfrog /usr/local/bin/
jfrog config add
jfrog rt config
```
### Step 2: Download Artifact
```bash theme={null}
#!/bin/bash
# Set variables for your Artifactory instance and artifact details
ARTIFACTORY_URL="https://your-artifactory-instance.jfrog.io/artifactory" # Change this to your Artifactory URL
REPO="my-repository" # Replace with your repository name
ARTIFACT_PATH="my-artifact/my-package/1.0.0/my-package-1.0.0.jar" # Path to your artifact in Artifactory
OUTPUT_DIR="./downloads" # Directory to save downloaded artifact
## Step 1: Download the artifact
echo "Downloading artifact $ARTIFACT_PATH from $ARTIFACTORY_URL"
jfrog rt dl "$REPO/$ARTIFACT_PATH" "$OUTPUT_DIR/"
## Step 2: Check if download was successful
if [ $? -eq 0 ]; then
echo "Artifact downloaded successfully to $OUTPUT_DIR/"
else
echo "Failed to download the artifact."
exit 1
fi
```
## AWS Code Artifact
### Step 1: Downloading CLI
```bash theme={null}
#!/bin/bash
# Variables
ROLE_NAME="robot-artifact-iam-role"
POLICY_ARN="arn:aws:iam::aws:policy/AWSArtifactReadOnlyAccess"
KEY_PAIR_NAME="robot-artifact-key-pair"
# Step 1: Create IAM Role for AWS Artifact
echo "Creating IAM Role: $ROLE_NAME"
aws iam create-role \
--role-name "$ROLE_NAME" \
--assume-role-policy-document '{
"Version": "2012-10-17",
"Statement": [
{
"Effect": "Allow",
"Action": "sts:AssumeRole",
"Principal": {
"Service": "artifact.amazonaws.com"
}
}
]
}' > create_role_output.json
# Check if IAM Role was created successfully
if [ $? -eq 0 ]; then
echo "IAM Role $ROLE_NAME created successfully."
else
echo "Failed to create IAM Role $ROLE_NAME."
exit 1
fi
# Step 2: Attach Policy to Role for Artifact Access
echo "Attaching AWSArtifactReadOnlyAccess policy to IAM Role $ROLE_NAME"
aws iam attach-role-policy \
--role-name "$ROLE_NAME" \
--policy-arn "$POLICY_ARN"
if [ $? -eq 0 ]; then
echo "Policy attached successfully."
else
echo "Failed to attach policy."
exit 1
fi
# Step 3: Create IAM Access Keys (for programmatic access)
echo "Creating Access Keys for IAM Role: $ROLE_NAME"
aws iam create-access-key \
--user-name "$ROLE_NAME" \
> access_keys_output.json
# Check if keys were created
if [ $? -eq 0 ]; then
echo "Access keys created successfully."
ACCESS_KEY_ID=$(jq -r '.AccessKey.AccessKeyId' access_keys_output.json)
SECRET_ACCESS_KEY=$(jq -r '.AccessKey.SecretAccessKey' access_keys_output.json)
echo "Access Key ID: $ACCESS_KEY_ID"
echo "Secret Access Key: $SECRET_ACCESS_KEY"
else
echo "Failed to create access keys."
exit 1
fi
# Step 4: Display the IAM Role and Access Key Information
echo "IAM Role $ROLE_NAME has been created with the policy: $POLICY_ARN"
echo "Access Key ID: $ACCESS_KEY_ID"
echo "Secret Access Key: $SECRET_ACCESS_KEY"
```
### Step 2: Downloading Artifact
```bash theme={null}
#!/bin/bash
# Variables
ARTIFACT_ID="example-artifact-id" # Replace with the actual Artifact ID
# Step 1: Get Artifact URL for downloading the report
echo "Fetching artifact download URL for Artifact ID: $ARTIFACT_ID"
DOWNLOAD_URL=$(aws artifact describe-artifact \
--artifact-id "$ARTIFACT_ID" \
--query "artifactDetails[0].downloadUrl" \
--output text)
```
## Azure Artifacts
### Step 1: Downloading CLI
```bash theme={null}
# Install Microsoft package repository
wget https://packages.microsoft.com/config/ubuntu/$(lsb_release -rs)/packages-microsoft-prod.deb -O packages-microsoft-prod.deb
sudo dpkg -i packages-microsoft-prod.deb
rm packages-microsoft-prod.deb
# Update package lists and install .NET SDK
sudo apt update
sudo apt install -y dotnet-sdk-8.0
dotnet tool install -g AzureArtifactsCredentialProvider
```
### Step 2: Generating a PAT
Next, you’ll need to generate a personal access token (PAT).
1. Log in to your [Azure DevOps portal](https://dev.azure.com).
2. In the top-right corner, click on your profile and select **Security**.
3. In the **Personal Access Tokens** section, click on **New Token**.
4. Set the scopes for the token. You’ll need at least the **"Packaging (read)"** scope to access Azure Artifacts.
5. Save your PAT securely, as you will not be able to view it again.
### Step 3: Configure .npmrc file
```bash theme={null}
echo "//pkgs.dev.azure.com/your-organization-name/_packaging/your-feed-name/npm/registry/:username=AzureDevOps" >> ~/.npmrc
echo "//pkgs.dev.azure.com/your-organization-name/_packaging/your-feed-name/npm/registry/:_password=$(echo -n your-PAT | base64)" >> ~/.npmrc
```
If you're working with NuGet, you will need the following:
```bash theme={null}
mkdir -p ~/.nuget
cat < ~/.nuget/nuget.config
EOL
```
If you need Docker artifacts from Azure:
```bash theme={null}
echo your-PAT | docker login https://your-organization-name.azurecr.io --username your-username --password-stdin
```
To get started with Devin Enterprise, contact our [enterprise sales team](mailto:enterprise@cognition.ai).
## Jfrog Artifactory
### Step 1: Downloading CLI
```bash theme={null}
curl -fL https://getcli.jfrog.io | sh
sudo mv jfrog /usr/local/bin/
jfrog config add
jfrog rt config
```
### Step 2: Download Artifact
```bash theme={null}
#!/bin/bash
# Set variables for your Artifactory instance and artifact details
ARTIFACTORY_URL="https://your-artifactory-instance.jfrog.io/artifactory" # Change this to your Artifactory URL
REPO="my-repository" # Replace with your repository name
ARTIFACT_PATH="my-artifact/my-package/1.0.0/my-package-1.0.0.jar" # Path to your artifact in Artifactory
OUTPUT_DIR="./downloads" # Directory to save downloaded artifact
## Step 1: Download the artifact
echo "Downloading artifact $ARTIFACT_PATH from $ARTIFACTORY_URL"
jfrog rt dl "$REPO/$ARTIFACT_PATH" "$OUTPUT_DIR/"
## Step 2: Check if download was successful
if [ $? -eq 0 ]; then
echo "Artifact downloaded successfully to $OUTPUT_DIR/"
else
echo "Failed to download the artifact."
exit 1
fi
```
## AWS Code Artifact
### Step 1: Downloading CLI
```bash theme={null}
#!/bin/bash
# Variables
ROLE_NAME="robot-artifact-iam-role"
POLICY_ARN="arn:aws:iam::aws:policy/AWSArtifactReadOnlyAccess"
KEY_PAIR_NAME="robot-artifact-key-pair"
# Step 1: Create IAM Role for AWS Artifact
echo "Creating IAM Role: $ROLE_NAME"
aws iam create-role \
--role-name "$ROLE_NAME" \
--assume-role-policy-document '{
"Version": "2012-10-17",
"Statement": [
{
"Effect": "Allow",
"Action": "sts:AssumeRole",
"Principal": {
"Service": "artifact.amazonaws.com"
}
}
]
}' > create_role_output.json
# Check if IAM Role was created successfully
if [ $? -eq 0 ]; then
echo "IAM Role $ROLE_NAME created successfully."
else
echo "Failed to create IAM Role $ROLE_NAME."
exit 1
fi
# Step 2: Attach Policy to Role for Artifact Access
echo "Attaching AWSArtifactReadOnlyAccess policy to IAM Role $ROLE_NAME"
aws iam attach-role-policy \
--role-name "$ROLE_NAME" \
--policy-arn "$POLICY_ARN"
if [ $? -eq 0 ]; then
echo "Policy attached successfully."
else
echo "Failed to attach policy."
exit 1
fi
# Step 3: Create IAM Access Keys (for programmatic access)
echo "Creating Access Keys for IAM Role: $ROLE_NAME"
aws iam create-access-key \
--user-name "$ROLE_NAME" \
> access_keys_output.json
# Check if keys were created
if [ $? -eq 0 ]; then
echo "Access keys created successfully."
ACCESS_KEY_ID=$(jq -r '.AccessKey.AccessKeyId' access_keys_output.json)
SECRET_ACCESS_KEY=$(jq -r '.AccessKey.SecretAccessKey' access_keys_output.json)
echo "Access Key ID: $ACCESS_KEY_ID"
echo "Secret Access Key: $SECRET_ACCESS_KEY"
else
echo "Failed to create access keys."
exit 1
fi
# Step 4: Display the IAM Role and Access Key Information
echo "IAM Role $ROLE_NAME has been created with the policy: $POLICY_ARN"
echo "Access Key ID: $ACCESS_KEY_ID"
echo "Secret Access Key: $SECRET_ACCESS_KEY"
```
### Step 2: Downloading Artifact
```bash theme={null}
#!/bin/bash
# Variables
ARTIFACT_ID="example-artifact-id" # Replace with the actual Artifact ID
# Step 1: Get Artifact URL for downloading the report
echo "Fetching artifact download URL for Artifact ID: $ARTIFACT_ID"
DOWNLOAD_URL=$(aws artifact describe-artifact \
--artifact-id "$ARTIFACT_ID" \
--query "artifactDetails[0].downloadUrl" \
--output text)
```
## Azure Artifacts
### Step 1: Downloading CLI
```bash theme={null}
# Install Microsoft package repository
wget https://packages.microsoft.com/config/ubuntu/$(lsb_release -rs)/packages-microsoft-prod.deb -O packages-microsoft-prod.deb
sudo dpkg -i packages-microsoft-prod.deb
rm packages-microsoft-prod.deb
# Update package lists and install .NET SDK
sudo apt update
sudo apt install -y dotnet-sdk-8.0
dotnet tool install -g AzureArtifactsCredentialProvider
```
### Step 2: Generating a PAT
Next, you’ll need to generate a personal access token (PAT).
1. Log in to your [Azure DevOps portal](https://dev.azure.com).
2. In the top-right corner, click on your profile and select **Security**.
3. In the **Personal Access Tokens** section, click on **New Token**.
4. Set the scopes for the token. You’ll need at least the **"Packaging (read)"** scope to access Azure Artifacts.
5. Save your PAT securely, as you will not be able to view it again.
### Step 3: Configure .npmrc file
```bash theme={null}
echo "//pkgs.dev.azure.com/your-organization-name/_packaging/your-feed-name/npm/registry/:username=AzureDevOps" >> ~/.npmrc
echo "//pkgs.dev.azure.com/your-organization-name/_packaging/your-feed-name/npm/registry/:_password=$(echo -n your-PAT | base64)" >> ~/.npmrc
```
If you're working with NuGet, you will need the following:
```bash theme={null}
mkdir -p ~/.nuget
cat < ~/.nuget/nuget.config
EOL
```
If you need Docker artifacts from Azure:
```bash theme={null}
echo your-PAT | docker login https://your-organization-name.azurecr.io --username your-username --password-stdin
```
To get started with Devin Enterprise, contact our [enterprise sales team](mailto:enterprise@cognition.ai).